Windows Update should work without additional assistance, but sometimes it struggles. Occasionally, you may stumble across the cryptic error code 0x8007054F, which doesn't tell you much about how to fix it.
Fortunately, it's very easy to troubleshoot Windows Update's 0x8007054F error. So, let's dive into some fixes.
What Causes Windows Update's Error Code 0x8007054F?
Windows Update's error code 0x8007054F mainly occurs due to corrupt system files. It is usually displayed alongside a message that reads: "Something went wrong. You can contact Microsoft support for help with this error. Here is the error code: 0x8007054F."
Below is a non-exhaustive list of the potential culprits.
- One of the prime reasons behind error 0x8007054F is corrupt or missing system files.
- Startup applications and services can sometimes interfere with the update process and cause problems.
- The issue can also appear if the system doesn't have the required storage space to download and install an update.
Now we know the basics, let's get stuck into the fixes.
1. Restart Your System
Let's begin with the most basic yet effective solution for any Windows error—restarting the system. If you haven't rebooted in a while, a quick restart can sometimes fix Windows Update's 0x8007054F error.
As such, give your PC a quick restart and see if that fixes the issue.
2. Create More Disk Space for the Update
Windows will fail to download any update if the system doesn't have enough space to download it. Although Windows always keeps a certain amount of space reserved for updates, it can run out of space if your drive is full to the brim.
To fix this, try clearing the junk files on your PC to free up room. You can also open the File Explorer and either delete large files or move them to an external storage device for the time being.
Finally, it might be time to give your PC a deep clean of old and unused software. Our guide on how to uninstall Windows programs the fast way contains some handy tips that can help you get rid of software you no longer want.
3. Run the Windows Update Troubleshooter
One potential way to fix any Windows Update error is to run the Windows Update Troubleshooter. This is a built-in utility that helps resolve any errors with the updating process.
You can run the Windows Update troubleshooter by performing the following:
- Open the Settings menu using Win + I.
- Choose System from the left pane.
- Click on the Troubleshoot option.
- Choose Other troubleshooters.
- Click on Run next to Windows Update.
The troubleshooter will look for and fix any available issues.
4. Disable Any Active VPN Connections and Antivirus Apps
A virtual private network (VPN) helps to hide your identity online and gives you access to geo-blocked websites. On the negative side, VPNs can also interfere with the Windows update process. If you have a VPN enabled on your computer, try disabling it before checking for updates again.
If turning off the VPN wasn't helpful, try disabling the antivirus program temporarily. You can usually right-click on the application icon in this system tray and choose to disable it from the context menu.
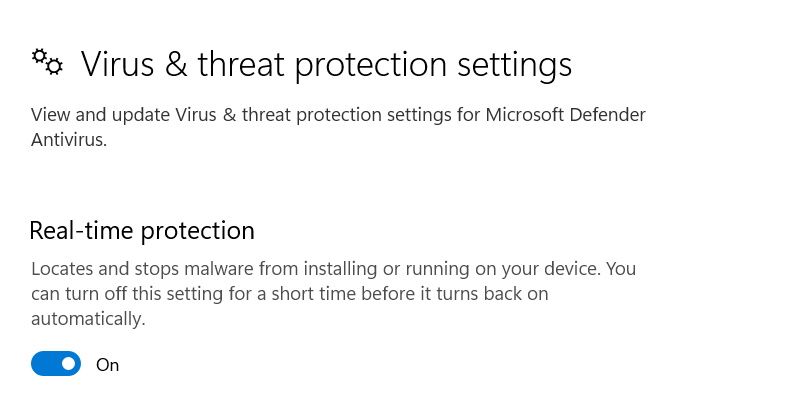
If you are using Microsoft Defender as your security program, here's how to disable it temporarily:
- Open the Start Menu using the Win key.
- Type Windows Security and press Enter.
- Choose Virus & threat protection from the left pane.
- Click on Manage settings.
-
Disable the toggle under Real-time protection.

Try to download the Windows update again and check if the problem is fixed. Regardless of the outcome, be sure to re-enable the protection again before continuing.
5. Restart the Windows Update Services
There are several services on your PC that are required for Windows Update's smooth operation. If any of those services encounters a problem, it can trigger the 0x8007054F error message.
As such, you should try restarting these services to see if this fixes this issue. Here's how to do it:
- Open the Run dialog box, type services.msc and press Enter.
- Locate and right-click on Windows Update.
- Change the Startup type to Automatic.
-
Click Start under Service status > OK.
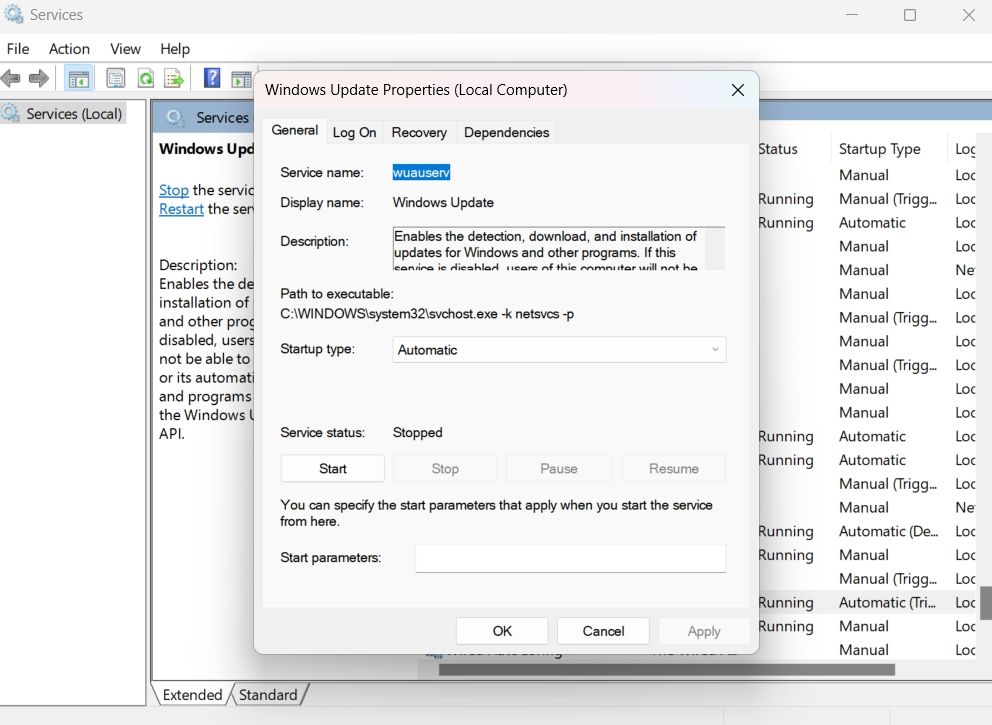

Next, repeat the above steps with Application Identify, Background Intelligent Transfer Service, and Cryptographic Services. Once done, give your PC a restart and try to download your updates again.
6. Reset Windows Update's Essential Components
The SoftwareDistribution and catroot2 folders contain all the necessary files related to the Windows update process. But by any chance, if either of these folders gets corrupted, you will face difficulties updating Windows.
As a solution, you will have to reset the Windows Update components. Here are the steps to do it.
- Open the Start Menu, type cmd and choose Run as administrator.
-
Type the following command and press Enter.
        net stop bits
net stop wuauserv
net stop appidsvc
net stop cryptsvc -
Type the following command to rename the SoftwareDistribution folder and press Enter.
Ren %systemroot%\SoftwareDistribution SoftwareDistribution.old -
To rename the catroot2 folder, type the following command and press Enter.
Ren %systemroot%\System32\catroot2 catroot2.old -
Now, restart the above services by executing the above commands.
        net start bits
net start wuauserv
net start appidsvc
net start cryptsvc
Once the process is complete, Windows will create a new SoftwareDistribution and catroot2 folder containing new Windows Update files. Now try redownloading the update that's giving you trouble.
7. Troubleshoot the Problem Using Clean Boot
Windows update error code 0x8007054F can result from the conflict between the startup applications and the update process. You can consider starting the system in a clean boot state in this situation.
Performing a clean boot ensures that the system starts with a minimal set of drivers and startup applications. Below are the steps to perform a clean boot.
- In the Run dialogue box, type msconfig, and press Enter.
-
Switch to General tab, and select Selective startup.
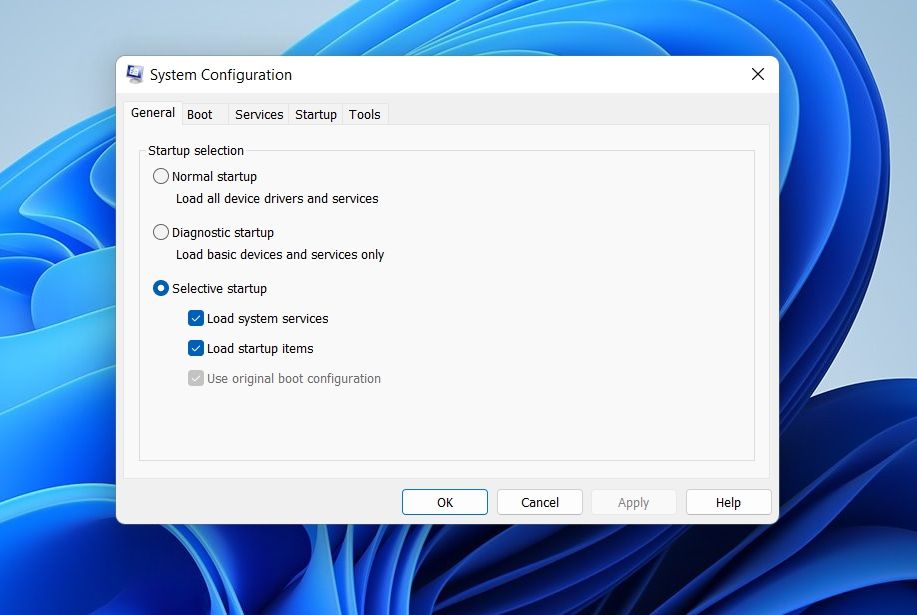
- Click on the Services tab.
-
Checkmark Hide all Microsoft services and click on Disable all.
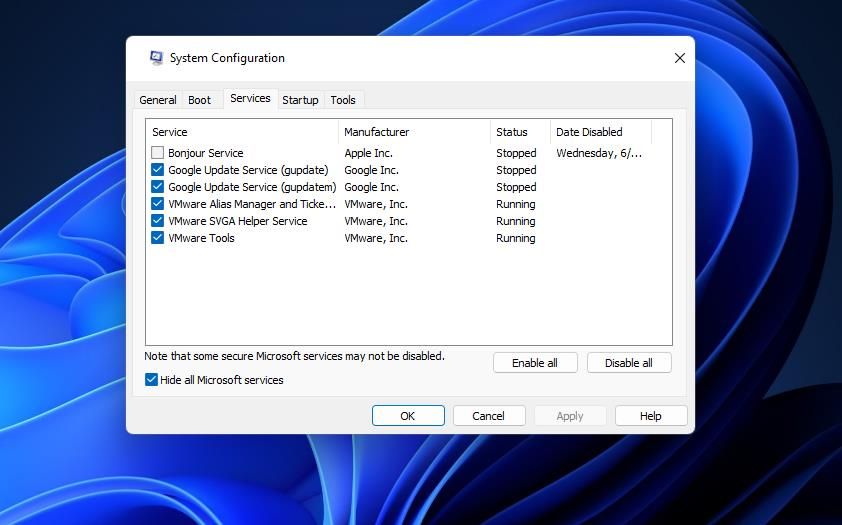
- Click OK.


On the next boot, the system will start in the clean boot state.
Now that you're in the clean boot state, try running Windows Update again. If it succeeds, it means one of the services you disabled was the culprit.
If you want to narrow it down, repeat the above process while slowly re-enabling each service until the problem arises again. Once you nail which service is causing you grief, try downloading drivers for the service if you can, or run an SFC scan if it's a Windows-based service.
8. Run an SFC Scan

Running an SFC scan is another effective way to eliminate the Windows update problem. The SFC scan tool automatically locates and replaces corrupt system files.
You can run an SFC scan like this:
- Open Command Prompt as an administrator.
-
Type the following window and press Enter.
sfc /scannow
Once the scan finishes, try updating Windows again.
Fixing Up Error 0x8007054F in Windows 11
Now you know all the effective solutions to eliminate Windows update error code 0x8007054F. As the problem is related to Windows updates, the culprit is likely your network connection or corrupt Windows components. With any luck, you can quickly troubleshoot the problem and keep the system updated.