
Windows comes with several built-in troubleshooting utilities that scan your system for potential issues, identify inconsistencies, and attempt to fix system-related problems without needing your input. And while most of these tools typically do their job well, there are times that they can act up.
When a specific system tool can't do its job right, you'll encounter an error that reads "Windows Resource Protection found corrupt files but was unable to fix some of them." So, let's dive into what tool is encountering a problem, and how to fix it.
Why Does the "Windows Resource Protection Found Corrupt Files" Error Occur?
The "Windows Resource Protection found corrupt files" error message happens because of a failure from the System File Checker (SFC) tool, which is responsible for scanning the protected system files and resolving the issues related to them.
If the SFC tool identifies a problem but fails to fix it, it will show you an error that reads, in full, "Windows Resource Protection found corrupt files but was unable to fix some of them."
There are a few reasons why the System File Checker was unable to resolve problems within the operating system:
- The tool does not have enough resources to fix the issue.
- You are running an outdated operating system.
- A background process is interfering with the process of the System File Checker, preventing the tool from completing its job.
Now that we know about the potential causes, let's have a look at the troubleshooting methods that can help you fix the problem.
1. Make Sure Your Windows Is Up-to-Date
Problems like the one at hand commonly arise when you are running an outdated version of your operating system.
Installing the latest system updates is important for a number of reasons. If you do not update your system regularly, you make it incompatible with numerous Windows services, and vulnerable to attacks. The easiest way to fix this problem is by installing the pending updates regularly on your Windows operating system.
If you haven't done so in a while, we recommend that you take your time to install them and check if that fixes the problem. Our guide on how to manage Windows Updates contains all the information you need to get your PC up to speed.
2. Run an SFC Scan in Safe Mode
The System File Checker tool might be throwing an error because a background process interferes with it mid-scan. This process could either be a legitimate app that you installed or some malware.
To check if this is the case, we recommend that you boot Windows into Safe Mode and try running the scan there. Safe Mode launches Windows only with the basic drivers and software programs, which clears the slate for the SFC tool to work without interruption. Best of all, If the scan successfully runs in the Safe Mode, you can use the process of elimination to figure out which program is the culprit.
Here is all that you need to do:
- Press Win + R to open Run.
- Type msconfig in the text field of Run and click Enter.
- In the following window, head over to the Boot tab and checkmark the box associated with Safe Boot.
-
Then, choose Minimal under the Safe Boot option.
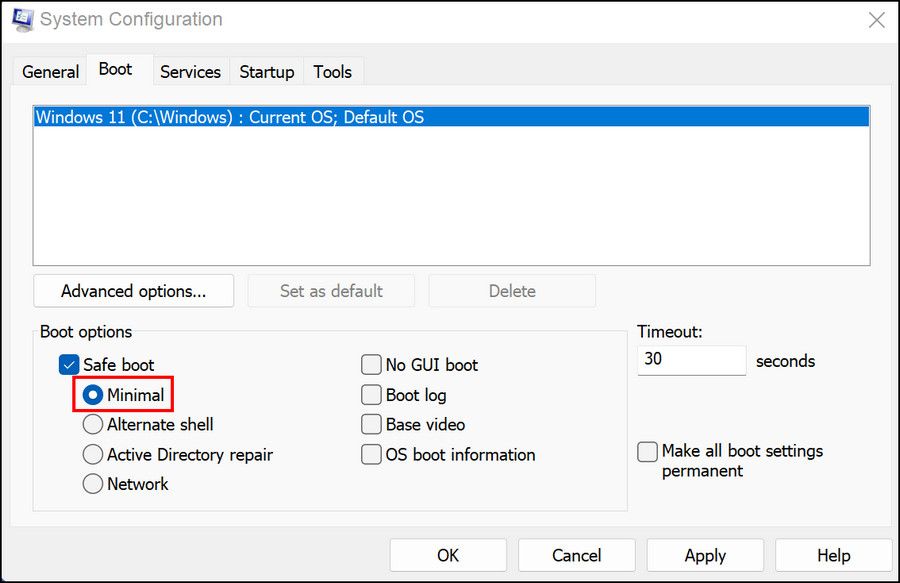
- Click Apply > OK and then restart your computer.

Upon reboot, Windows will automatically launch in the Safe mode. Try running the scan like you previously were in this mode, and see if it completes successfully now. If it does, then you can try uninstalling the programs you recently installed as they might be causing the issue.
3. Run DISM and CHKDSK Scans
SFC is a powerful tool, but there are other troubleshooting utilities you can turn to if the System File Checker itself encounters a problem.
As a first option, you can use the DISM tool, which is one of the most powerful utilities included with Windows. This tool targets the Windows component store of the system image, fixing any issues that might be present there.
Here is how you can run the DISM tool:
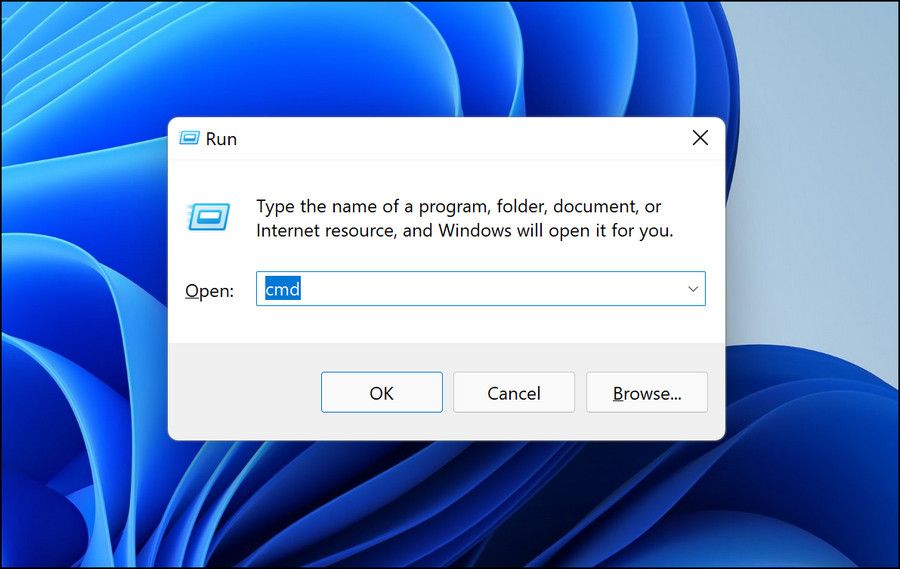
- Press Win + R to open Run.
-
Type cmd in the text field of Run and press the Ctrl + Shift + Enter keys together. This will launch the Command Prompt with administrative privileges.
- Alternatively, you can also launch Command Prompt by using Windows search. Simply type cmd in the search bar and choose Run as administrator.
-
Once you are inside the Command Prompt window, type the command mentioned below and hit Enter to execute it.
DISM /Online /Cleanup-Image /RestoreHealth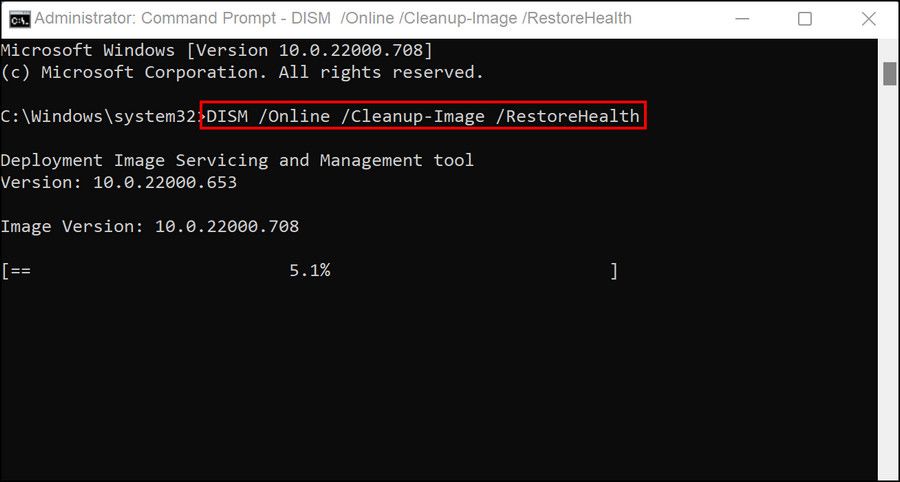


The scan might take a while to complete, so do not be impatient. Once it is done, we recommend that you run a CHKDSK scan, which scans your hard drive for inconsistencies and any bad sectors. If the culprit lies within the hard drive, this scan will fix the problem.
To run the CHKDSK scan, type chkdsk /f c: in elevated Command Prompt. Once that command is executed, execute chkdsk /r c: to check for bad sectors as well.

4. Revert Your System to an Older Point in Time
You can also get rid of the issue by using the System Restore utility.
This utility creates restore points on your system periodically, allowing you to revert to an older point in time if something goes wrong in the future. If this service is enabled on your computer, then you can try going back to a system state where the issue was not present.
5. Perform an In-Place Upgrade
Finally, if none of the methods above have done the trick for you, then there is a chance that the underlying issue is a serious one, and cannot resolve using the conventional troubleshooting methods.
If this case applies to you, then we suggest you go ahead with an in-place upgrade to fix the problem. This step might take a while to complete, so we recommend only going forward with it when you have some free time on your hands.
If you'd like to learn more, check out our guide on how to repair a corrupted Windows 10 installation for instructions on how to perform an in-place upgrade.
Fix Your Issues With the Resource Protection Tool
Many of us use the built-in tools of Windows to solve issues that arise from time to time. However, when these tools become unresponsive or do not perform properly, users can be left wondering what to do. We hope that the troubleshooting methods listed above will assist you in finding and fixing the problem. In the event nothing works, you can try switching to a similar third-party utility and see if that helps.