You want to print out an important document, but right when you send the request off, you suddenly encounter an error message that reaads “PDF Printer Error: invalid font when printing."
The error sounds very cryptic, and it can be caused by various other things besides an “invalid font.” For example, it could be caused by the fact that your PDF viewer is outdated. In other instances, it might be caused by some bugs on your device.
As such, there are a lot of potential fixes you can try. So, let’s explore how you can tackle this printing error on your Windows device.
1. Restart Your PDF Reader
This issue might often be caused by a temporary glitch in your PDF reader. So, the first thing you should try is to restart the PDF reader by closing and re-opening it.
Alternatively, if you’re using Adobe Acrobat Reader, click File in the top-right corner and then select Exit Application. From there, re-open the app by typing Adobe Reader in the Start Menu search bar and selecting the Best match.
If this doesn’t help, try restarting your PC and see if this helps.
2. Configure the Preferences Settings on Adobe Reader

There's a possibility that this error is caused by the way you’ve configured your PDF reader settings. As such, let's tweak some settings on Adobe Acrobat Reader to resolve the issue:
- Type Adobe Acrobat Reader in the Start Menu search bar and select the Best match.
- Click Edit in the top-left corner and then select Preferences.
- Next, select the Page Display category on the left-hand side pane.
- Tick the Use local fonts box. From there, click the Smooth Text drop-down menu and select For Laptop/LCD screens.
- Finally, press the OK button to save these changes.

3. Change the File Format Before Printing
In some instances, the “invalid font” issue might be caused by an incompatible file format.
If you’re using Adobe Acrobat Reader, you can change the file format before printing. For example, you can try printing your document as an image through these steps:
- Click the Start Menu search bar and type the name of the document you want to print out. Right-click on the option and select Open file location.
- Next, right-click on the document and select Open with > Adobe Acrobat DC.
- Click File in the top-right corner and then select Print. Alternatively, press Ctrl + P.
- Press the Advanced button towards the top-right corner.
-
Next, check the Print As Image option and then press OK.
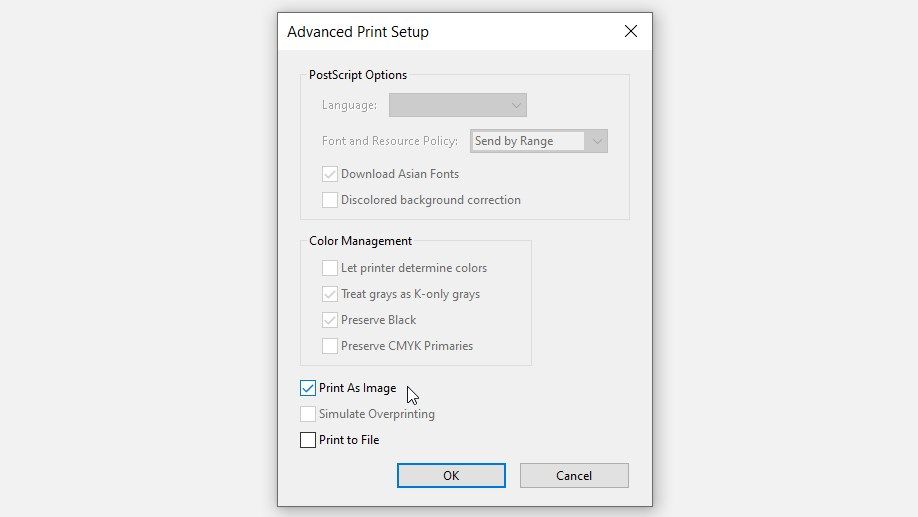
- Finally, close the Advanced Print Setup screen and try printing your document again.

4. Update Your PDF Reader or Use the “Repair Installation” Option
Just like any other app, your PDF reader needs to be regularly updated. Doing this helps get rid of bugs and issues such as the “invalid font” error.
Here are the steps for updating Adobe Acrobat Reader:
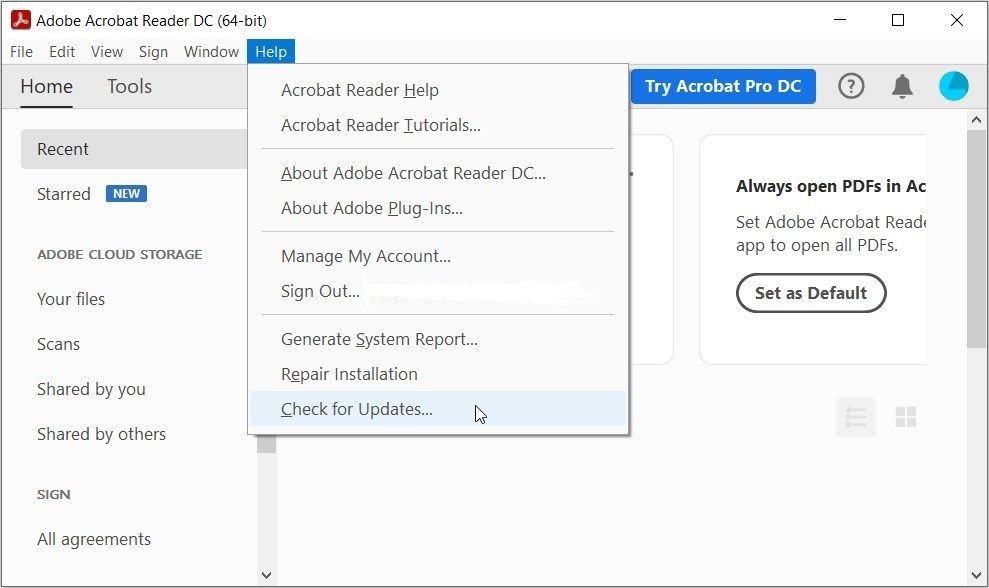
- Type Adobe Acrobat Reader in the Start Menu search bar and select the Best match.
- Click the Help tab in the top-left corner of the screen.
-
Select Check for Updates and follow the on-screen instructions to finalize the process.

Alternatively, try using the “Repair Installation” option. This can also help get rid of the glitches or bugs that are affecting Adobe Acrobat Reader’s functionality.
Here are the steps for using the “Repair Installation” option:
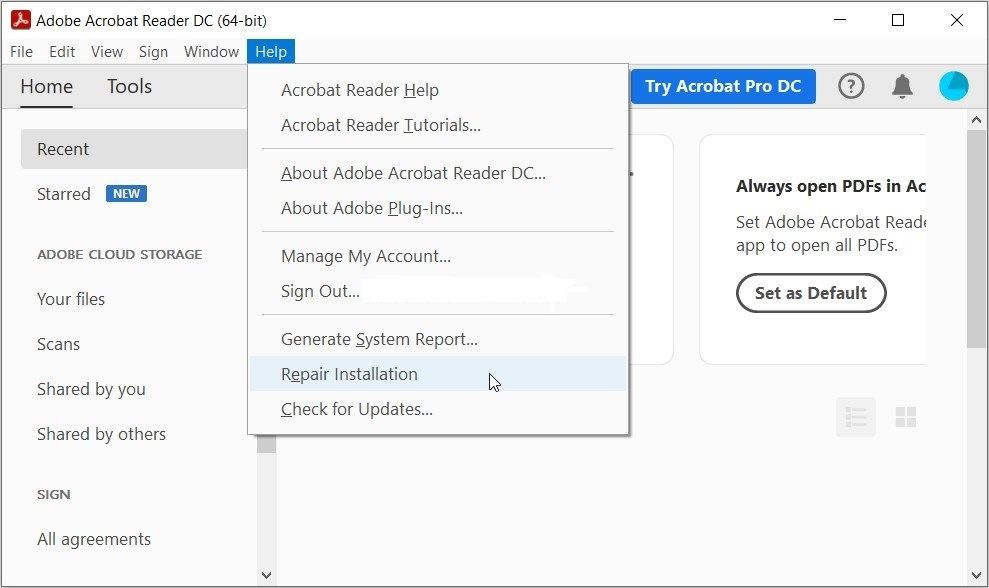
- Open Adobe Acrobat Reader as per the previous steps.
- Click the Help tab in the top-left corner of the window.
-
Select Repair Installation from the options and then follow the on-screen steps.

5. Re-Install or Repair Your PDF Reader in the System Settings
If you’re using alternative PDF readers to Adobe Reader, then you might not see the “Repair Installation” or “Update” options. In this case, you can re-install the app or repair it using the system settings.
Here’s how you can repair your PDF reader on Windows:
- Type Settings in the Start Menu search bar and select the Best match.
- Select Apps from the menu items.
- Click Apps & features on the left-hand side pane.
- Locate and click on your PDF reader on the right-hand side pane.
- To repair the tool, press the Modify button and follow the on-screen instructions.

To reinstall the app, press the Uninstall button and then follow the on-screen steps. From there, open the Apps & features screen, click on the PDF reader, and then press the Install button.
If the PDF reader doesn't appear on the Apps & features screen anymore, try downloading it from the Microsoft Store or any other safe website.
6. Reset Adobe Reader’s Settings
In some instances, you might have configured some Adobe Acrobat Reader settings unknowingly. So, this might be the reason you’re seeing the “invalid font” error.
Now, the best solution here would be to reset Adobe PDF Reader’s settings through these steps:
- Press Win + R to open the Run Command dialog box.
- Type AppData and press Enter.
- Navigate to Roaming > Adobe > Acrobat > DC.
- Rename the JSCache and Security subfolders. Alternatively, move these subfolders to a different folder on your PC.

After renaming or moving the folders, close and restart Adobe Acrobat Reader. This should reset the app’s settings and resolve the issue at hand.
7. Use the System Maintenance Troubleshooter
If you still can’t resolve the problem, then you’re likely dealing with a system-specific issue. In this case, you can resolve the issue by using Windows' troubleshooting tools.
Because this is likely a system maintenance issue, the System Maintenance troubleshooter could help. So, here are the steps for running this tool:
- Type Perform recommended maintenance tasks in the Start Menu search bar and select the Best match.
- Next, click the Advanced option and check the Apply repairs automatically box.
- Click the Next button and then follow the on-screen steps to complete the process.

8. Scan and Fix Your Hard Drive
If you're still running into issues, then there might be some corruption on your hard drive. In this case, the best solution would be to scan and repair your hard drive.
Now, let’s check out how you can run a Check Disk (CHKDSK) scan to get rid of the issue at hand:
- Type Command prompt in the Start Menu search bar. Next, right-click on the Best match result and select Run as administrator.
- Type the following command and press Enter to run a Check Disk scan:
chkdsk C: /f
Finally, restart your device when the process is complete.
Running into issues while running the command? Simply replace the C: command with the letter of the relevant drive where your Windows OS is installed.
Invalid Font While Printing? Not Anymore
Printing errors are common on most Windows devices. The good news is that it’s often quite easy to get rid of these problems.
If you encounter the “invalid font while printing” error, any of the methods we’ve covered should help you out. From there, you can explore cool tricks such as creating desktop shortcuts for your printers!