.jpg?q=50&fit=contain&w=1140&h=&dpr=1.5)
There are three types of network profiles available on the Windows operating system, and these determine how certain features, such as file sharing and network security, will be handled.
In Windows, you can view the network profile type in the Settings app. However, users have complained that the network profile type is missing. This guide will explain why this happens and suggest troubleshooting methods you can try to get the missing network profile option back on Windows 10 or 11.
Why Is Your Network Profile Missing in Windows 10 or 11?
If you cannot view your network profile in Windows 10 or 11, here are a few reasons why this might be happening:
- Your system is dealing with a temporary glitch, which is causing certain features to disappear or act up.
- The relevant drivers are either outdated or corrupt. Since drivers connect the hardware components with the system, you are likely to experience issues like the one at hand when they fail to work.
- The system itself is outdated, which is causing services like the network service to experience issues.
- You are using a third-party security solution that is interrupting the process of network services.
- The network adapter, which is responsible for allowing your system to establish stable connections, is experiencing a problem.
Fortunately, the issue of network profile disappearing in Windows 10 and 11 is solvable, so whatever the cause of the issue in your case might be, the troubleshooting steps in this guide will help you fix it quickly.
Before you get started with the troubleshooting methods, we suggest you restart your computer. In case the issue is caused by a temporary glitch, performing a simple reboot should fix the problem. If that does not help, proceed with the steps below.
1. Run the Network Adapter Troubleshooter
Since the error at hand, in most cases, was caused by issues within the Network adapter, we suggest that you begin troubleshooting by running the Network adapter troubleshooter.
This utility comes built into Windows and is designed by Microsoft to scan the system for potential issues that may be leading to a network-related issue. In the event that a problem is identified during the scan, the troubleshooter will apply a fix automatically.
Here is how you can run the troubleshooter:
- Press the Win + I keys to open the Windows Settings app.
- Choose System from the left pane.
- Now, click on Troubleshooter and then select Other troubleshooters.
-
In the following window, locate the Network adapter troubleshooter and click on the Run button for it. Wait for the scan to complete.

- If the troubleshooter finds any issues, it will notify you. In that case, click on Apply this fix.
- In case the troubleshooter fails to identify the problem, click on Close the troubleshooter. You can move towards the next troubleshooting method in that case.

2. Update the System
The next thing that we recommend you do is install the pending system updates available in the Settings app. If you hold installing the updates for too long, the system can become prone to corruption errors and viruses, which can then lead to issues like the one at hand.
In case you are encountering a problem due to an outdated system, installing the pending updates should do the trick.
3. Disable Your Security Program
Another reason why you might be encountering the problem is because of your security program, which might be interfering with the process of the network services.
This is typically common for users who are using a third-party antivirus program instead of Windows Defender. If you are one of them, then try disabling the program temporarily. You can do this by simply right-clicking on the program icon in the taskbar and choosing Disable > Disable until the next restart.
If this fixes the problem, then we suggest you switch to a better antivirus solution or use Windows Defender.
4. Change the Network Type
You can also try changing the network type from public to private to view the network profile and check if that makes a difference.
Here is how you can do it:
- Type Powershell in Windows search and click on Run as administrator.
- Click Yes in the User Account Confirmation prompt.
-
Once you are in the Powershell window, type the command mentioned below and hit Enter to execute it. Note down the index number displayed after this command is executed.
Get-NetConnectionProfile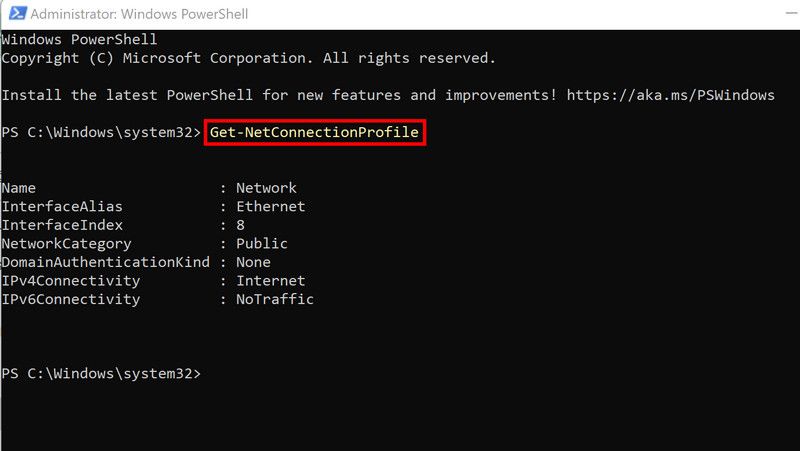
-
Next, execute the following command. Replace the <index number> with the number you noted earlier.
Set-NetConnectionProfile -InterfaceIndex <22> -NetworkCategory Private

However, in case this does not change the network profile type successfully, you can try making these changes via the Registry Editor. Before you proceed, we recommend creating a Registry backup. This will help you revert to the current Registry state if anything goes wrong during the process.
Follow the steps below to proceed, but make sure you create a Registry backup before continuing.
- Press Win + R to open Run.
- Type regedit in the text field of Run and click Enter.
- Click Yes in the User Account Confirmation prompt.
-
In the following window, navigate to the location below:
HKEY_LOCAL_MACHINE –> SOFTWARE –> Microsoft –> Windows NT –> CurrentVersion –> NetworkList –> Profiles - You should have one or more folders under the Profile key. Expand each to look for the ProfileName key corresponding to the network.
-
Once you have found the key with the ProfileName value, double-click on the Category value.
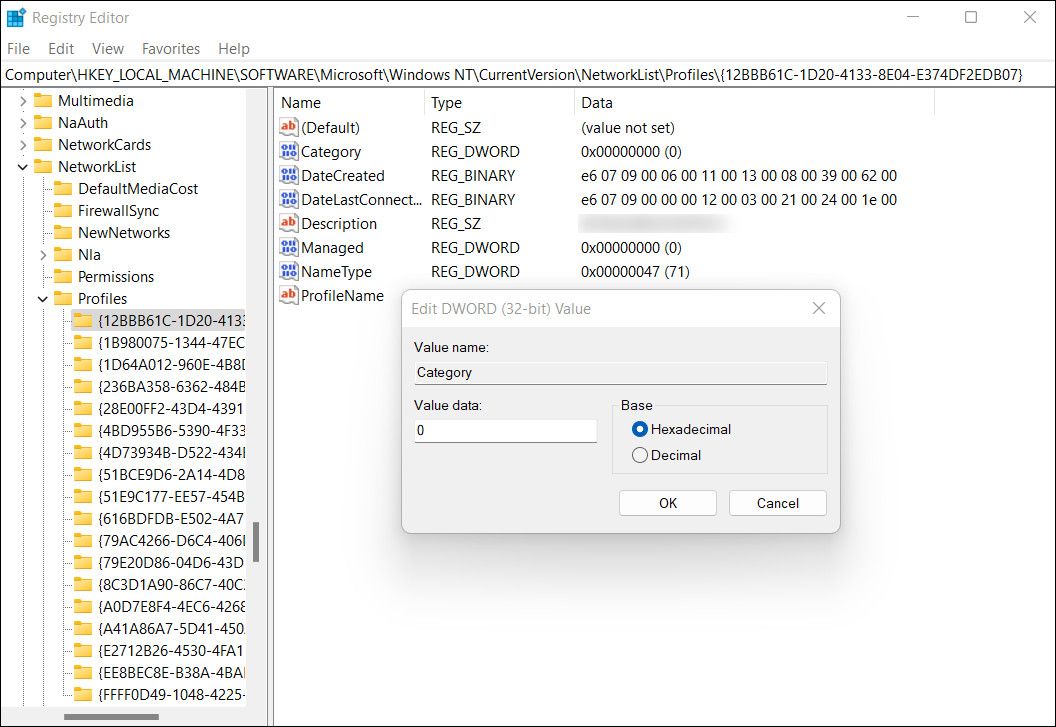
- Type 1 under Value data and click Enter.
- Finally, restart your computer to save the changes.

This will successfully change the network type, resolving the error in the process.
The Missing Network Profile Type Issue, Resolved
By now, you should be able to fix the missing network profile type issue in Windows. If the issue occurs again, you can try contacting the official Microsoft team and report the problem. The experts will help you better understand the cause of the problem and suggest a relevant fix.