
CPU utilization refers to the current percentage of CPU resources consumed by all programs. Some programs are judicial with their resource usage while some crave as much as they can get. CPU-hungry programs create a problem for the user because they cause the CPU utilization to shoot up.
If you notice that some programs are devouring your CPU cores, you can try setting a limit on their CPU usage. This guide will discuss all the ways you can limit the CPU usage of a program in Windows OS, so, you can give your CPU a break.
Should Your CPU Be Running at 100 Percent All the Time?
CPU is an important component of any system. It works in tandem with other components like the RAM to execute instructions. If your CPU usage is 100 percent at all times, you'll start setting issues with your system performance.
Unless you are running heavy programs on a fairly older processor, your CPU usage should remain under 80 percent. Even if it shoots up to 100 percent, it should be only for a short amount of time for a single application. Otherwise, it will slow down your system, and you'll notice that all of your apps will feel slower than usual.
How to Limit the CPU Usage of a Program in Windows OS
If a program is taking up a little too much of your CPU, here are a few methods using which you can limit the CPU usage of a program on a Windows PC.
1. Change the Process Priority
Windows has a process priority system to allocate resources to each process based on its requirements. It is pre-determined by the OS and you don't have much say in the matter. Process priority helps Windows allocate and de-allocate resources required by all the active processes.
But you can alter the process priority of any process/sub-process in the task manager. This is a tricky endeavor that should be only done for non-system processes. You should leave the process priority settings of the core system processes unaltered.
To change the process priority, do as follows:
- Press Ctrl + Shift + Esc key to launch the task manager. Now identify the process whose priority you want to alter.
- You can also click on the CPU column to arrange the processes in descending order of their consumption.
- Now, right-click on the process and select the Go to details option from the context menu.
-
Under the details section, right-click on the process again and select the Set priority from the context menu.
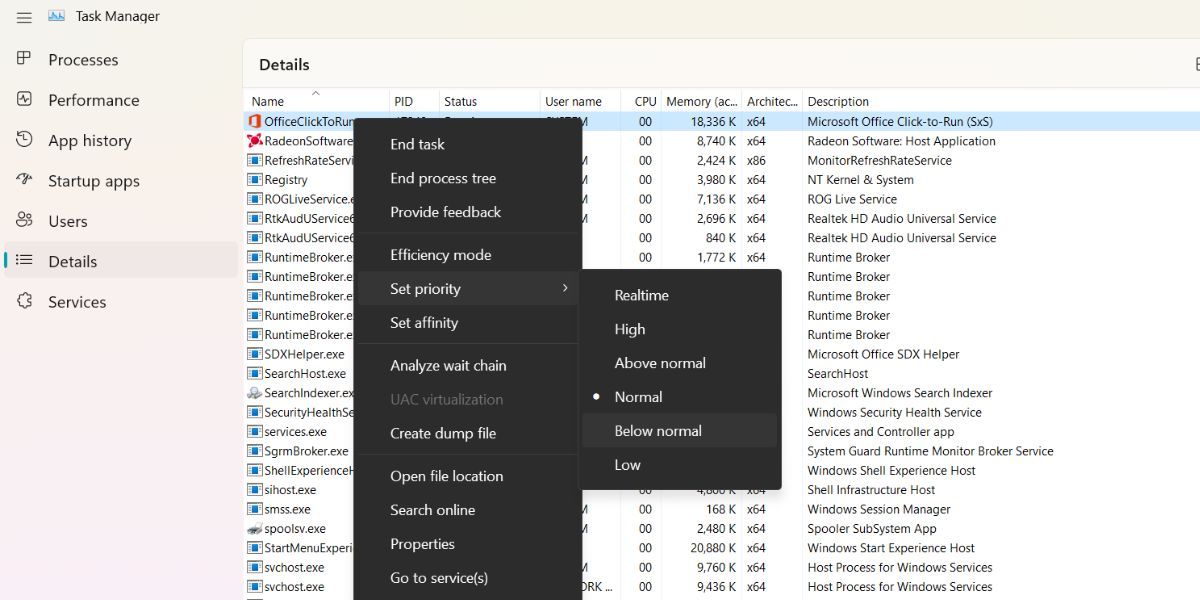
- Then, select Below Normal or Low. Below Normal option will allocate slightly fewer resources when they are available. The Low option will allocate the least amount of system resources when they become available.
- A warning window will pop up informing you about the effects of changing the process priority.
- Click on the Change Priority button to apply changes. Now, the process will not consume high system resources including the CPU time.

2. Change the CPU Affinity
Another method to curb the CPU usage of a program is by adjusting the CPU Affinity. It is simply restricting the processes to use fewer CPU cores of your system. By changing CPU affinity, you can free up CPU cores which will become available to other processes.
To change the CPU affinity of a program, repeat the following steps:
- Press Ctrl + Shift + Esc key to launch the task manager. Now identify the process whose priority you want to alter.
- Now, right-click on the process and select the Go to details option from the context menu.
-
Task Manager will highlight the process. Right-click on it and select the Set affinity option from the context menu.
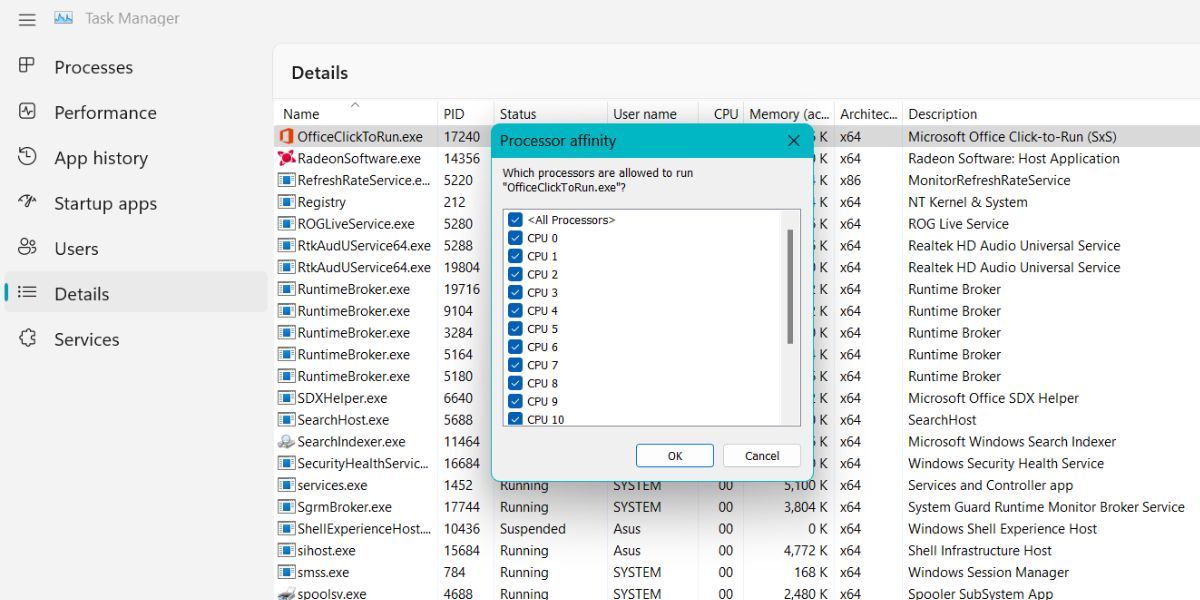
- You will notice that the process is set to use all the system core. Simply uncheck the boxes of CPU cores that you don't want the process to use.
- Click on the OK button. Now, the process will use a limited number of CPU cores. Remember that Windows will reset the configuration after you close the program.

3. Use a Third Party Utility
If you want a more comprehensive solution to manage the resource usage on a program, you can try Process Lasso. While the Task Manager can solve a high CPU usage problem, it resets your preferences after the program restarts. This is where a tool like Process Lasso comes in handy.
You can set attributes like priority and affinity for a specific program permanently. Even if the program restarts, your preferred priority, and affinity settings won't be reset. Moreover, you can create rules to limit the CPU usage percentage of a program.
To limit the CPU usage of a program using Process Lasso, do as follows:
- Open any browser on your system and go to the official Process Lasso download page.
- Download the appropriate version and install it on your system.
- Launch the Process Lasso application with elevated permissions.
-
Right-click on the desired process and change its priority and affinity as per your preference.
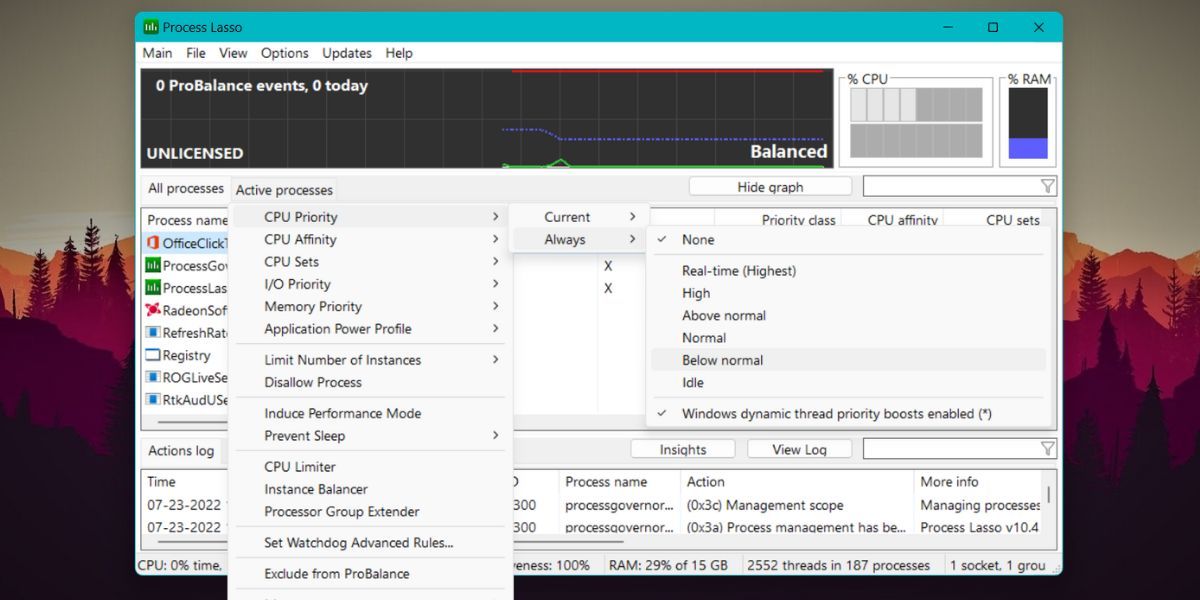
- Make changes by selecting the Always option from the context menu. If you choose the Current option, it will only be applicable until the program restarts.

There is a lot more to tweak including process priority and affinity in Process Lasso. However, we suggest you keep things simple and make a restore point before trying any big tweaks.
4. Change the Maximum Processor State
Reducing the maximum power state of your processor can limit the overall usage. This setting allows you to limit the maximum speed your CPU can attain. Tweaking this setting will lower the stress on your processor and prevent overheating.
To reduce the maximum power state of your processor, repeat the following steps:
- Press Win + R to launch the Run command box. Type Control Panel in the text input area and hit the enter key.
- Control Panel will launch. Find and click on the Power Options feature.
- Click on the Change plan settings option located next to the active power plan of your system.
- Then click on the Change advanced power settings. A new Power Options window will launch.
-
Find and expand the Processor Power Management option. Click on the Maximum processor state option and edit the values. It will be 100 percent by default.
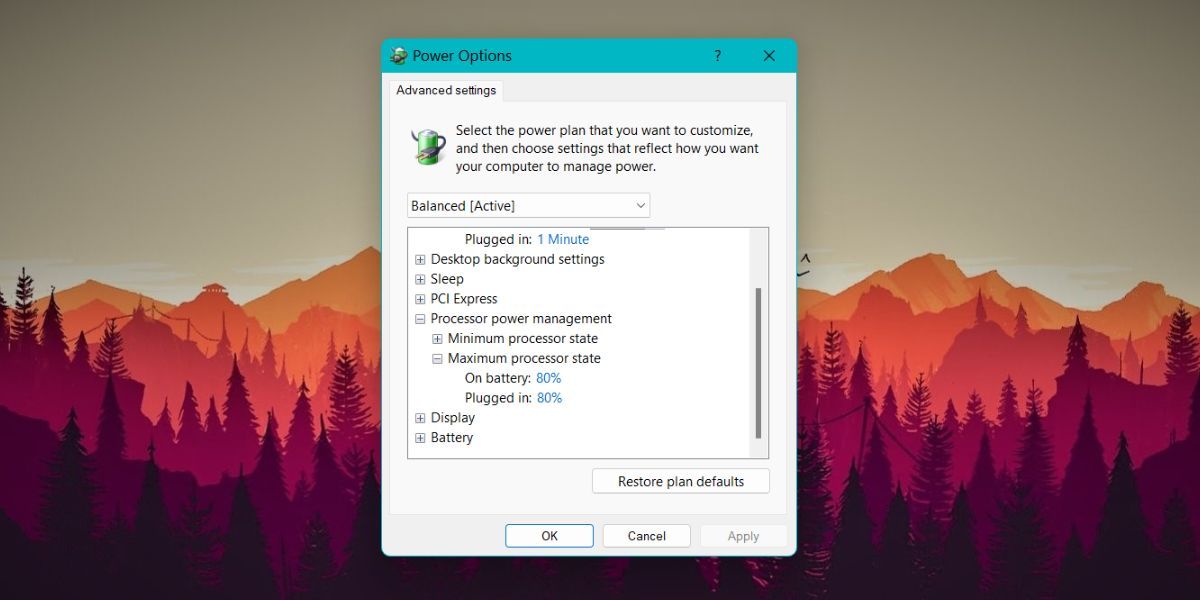
- Change it to 80 percent for both the On Battery and Plugged in options.
- Click on the Apply button. Then click the OK button and exit the window. Now, your CPU will run at 80 percent of its capacity during peak loads.

Stop Programs From Devouring Your CPU
We have covered all the methods to limit the CPU usage of the program in Windows OS. Task Manager does offer options to tweak the program, but it is temporary. Third-party tools like Processor Lasso offer a plethora of tweaks that you can make to a program. In addition, you can even apply those tweaks permanently for a specific program.