
In situations where you do not intend to use the keyboard keys and are afraid of pressing them accidentally, or if there are children around, locking the keyboard is helpful. You can use certain key combinations or third-party tools for this, and then you can unlock the keyboard again when you are ready to use it. But what if it doesn't unlock?
In this guide, we will show the method of unlocking the keyboard, and will also discuss the troubleshooting methods to try if you cannot unlock it successfully.
1. Try the Right Key Combination
Depending on the manufacturer, different keyboards require different keys for unlocking and locking.
You can check if you are using the right combination by heading over to the manufacturer’s official website and looking for the keyboard combinations there. Another fix that worked for users was enabling the on-screen keyboard and then pressing Win + L.
Here is how you can enable the on-screen keyboard on Windows 10:
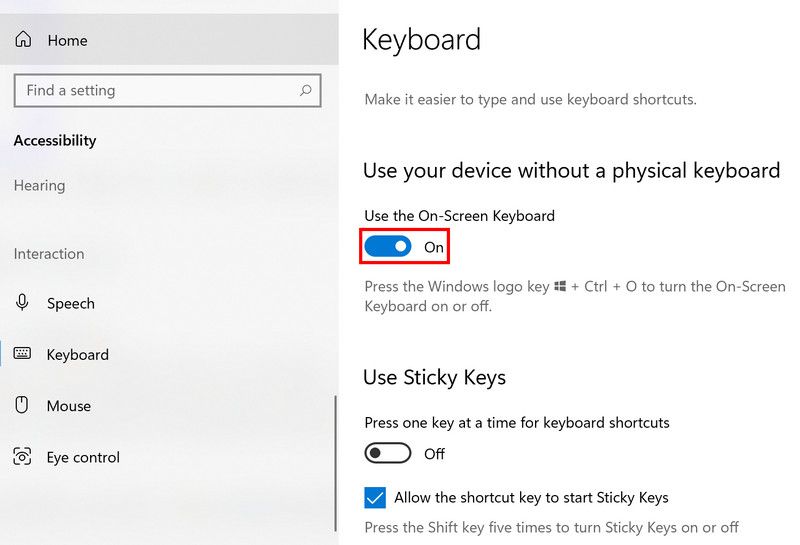
- Launch Settings and head over to the Ease of Access section.
-
Click on Keyboard and then turn the toggle on for Use the On-Screen Keyboard.

If you are a Windows 11 user, follow these steps:
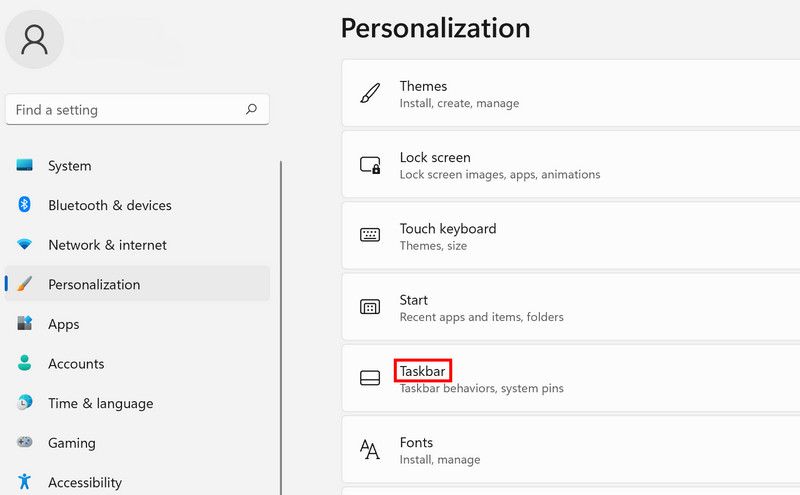
- Launch the Settings app and from the left pane, select Personalization.
-
In the right pane, scroll down to find the Taskbar option and then select it.
-
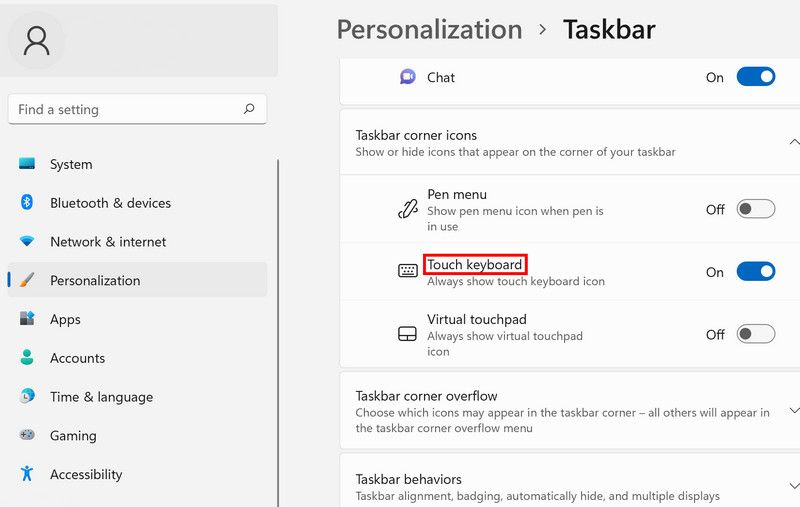
You can now enable the Touch keyboard toggle in the Taskbar corner icons section. Once done, you should see a touch keyboard icon on your taskbar which can be launched by simply clicking it.


Once the on-screen keyboard is launched, press the Win + L keys together and see if that makes a difference.
2. Check if the Issue Is Hardware-Related
If using the right key combination did not work for you, then the issue can be related to both your keyboard and the system.
Before we move on to the system-related troubleshooting methods, we suggest you make sure that the issue is not related to the hardware.
It is common for such issues to arise if the keys you are trying to use are broken, or if there is something physically wrong with the keyboard. In some cases, the issue arose simply because the keyboard was too dirty to work!
The best way to test if this is the issue is by first cleaning the keyboard and then replacing its batteries.
If replacing the batteries does not work either, then try connecting the keyboard to another computer. If it works on another computer, it is a software issue; if it doesn't, it implies that the problem is with the keyboard itself.
An experienced keyboard technician may be able to tell what is causing the problem better and suggest a suitable remedy in this latter scenario.
3. Update the Keyboard Drivers
If the problem is within the system, then the first thing you should do is update the keyboard drivers. You might be facing the problem if the drivers are outdated or corrupt, and updating them can fix the issue once and for all.
You will need to use the on-screen keyboard for this method and the ones discussed later on in this guide. This is why, before proceeding, ensure you enable it by following the steps we discussed above.
Here is what you need to do:
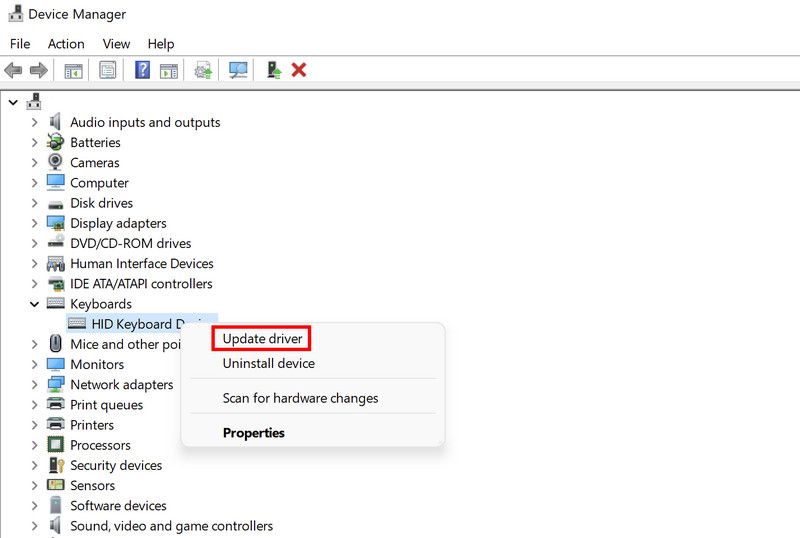
- Open Windows Search, type "Device Manager" and click Open on the search result.
- In the following window, expand the Keyboard section.
-
Right-click on your keyboard driver and choose Update driver.
-
Now, click on Search automatically for drivers and wait for the system to locate the updated version. Once it finds it, the driver will be installed without requiring much input from your side.
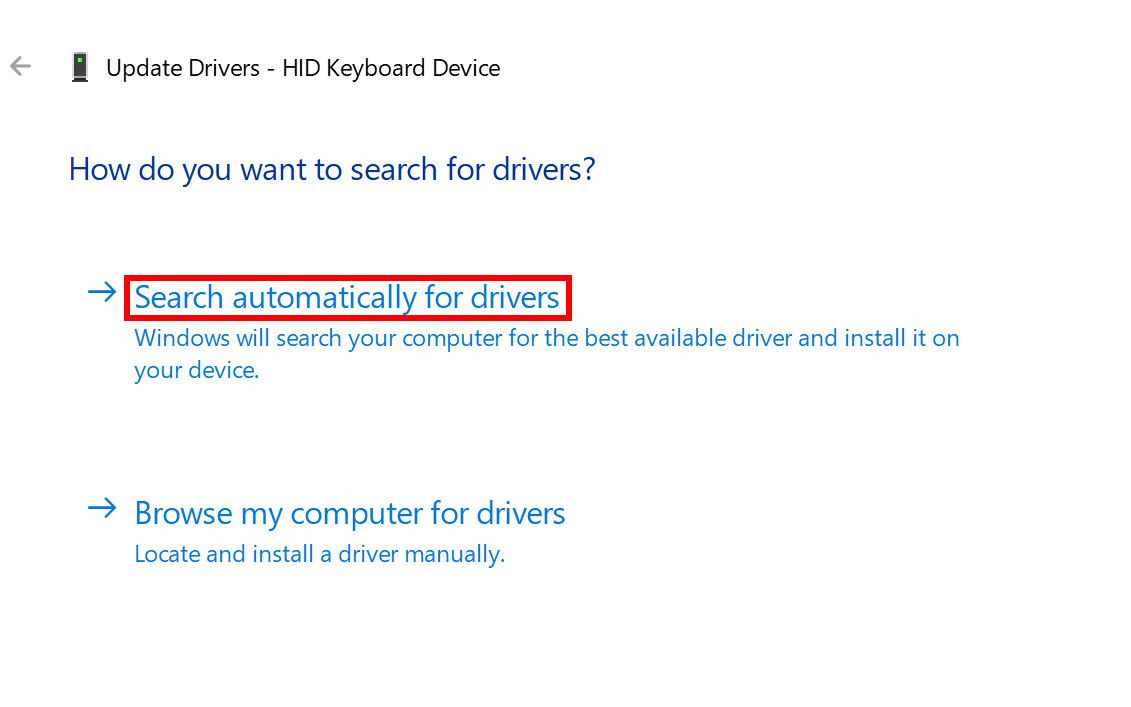


However, if this does not work, then you can uninstall the driver completely and install a new version from the manufacturer’s website. Hopefully, it will help you fix the problem successfully.
4. Disable Sticky and Filter Keys
In some cases, the users were unable to unlock their keyboards because the sticky keys and filter keys were enabled. If you have enabled these features, we suggest you disable them and check if doing so works.
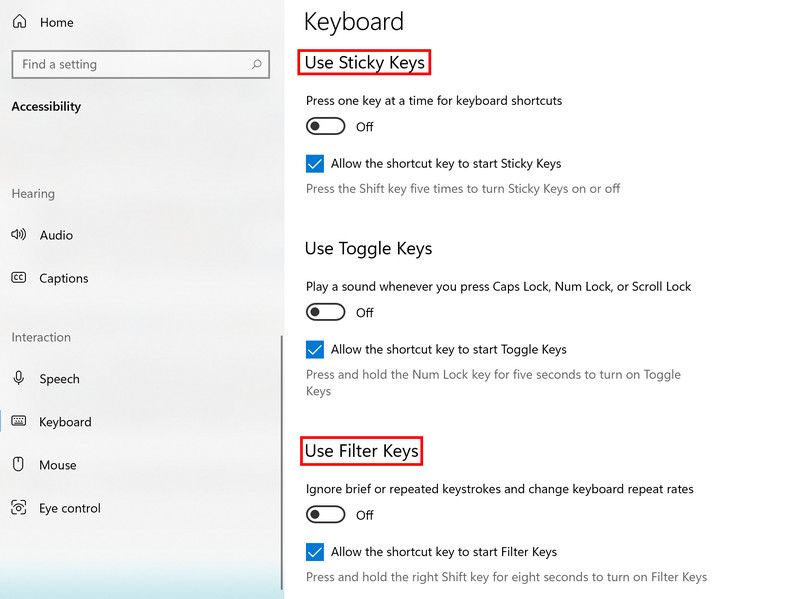
Here is how to do it if you are using Windows 10:
- Head over to the Settings app and launch Ease of Access settings.
- Choose Keyboard from the left pane.
-
Move to the right side of the window and turn the toggle off for Sticky keys and Filter keys.

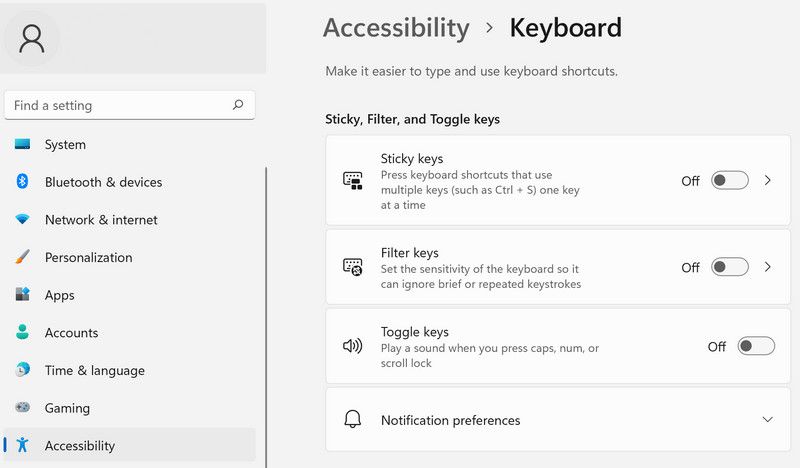
If you are a Windows 11 user, here is how to proceed:
- Launch the Settings app and choose Accessibility from the left pane.
- Scroll down in the following window and click on Keyboard.
-
Now, turn the toggle off for Sticky keys and Filter keys.

Once done, you can close the Settings app and try unlocking the keyboard now.
5. Run the Keyboard Troubleshooter
Keyboard-related issues can also be resolved using the built-in troubleshooting utilities within Windows. The most appropriate one to use in this case would be the keyboard troubleshooter which you can run using the Settings app.
Here is how you can run the keyboard troubleshooter:
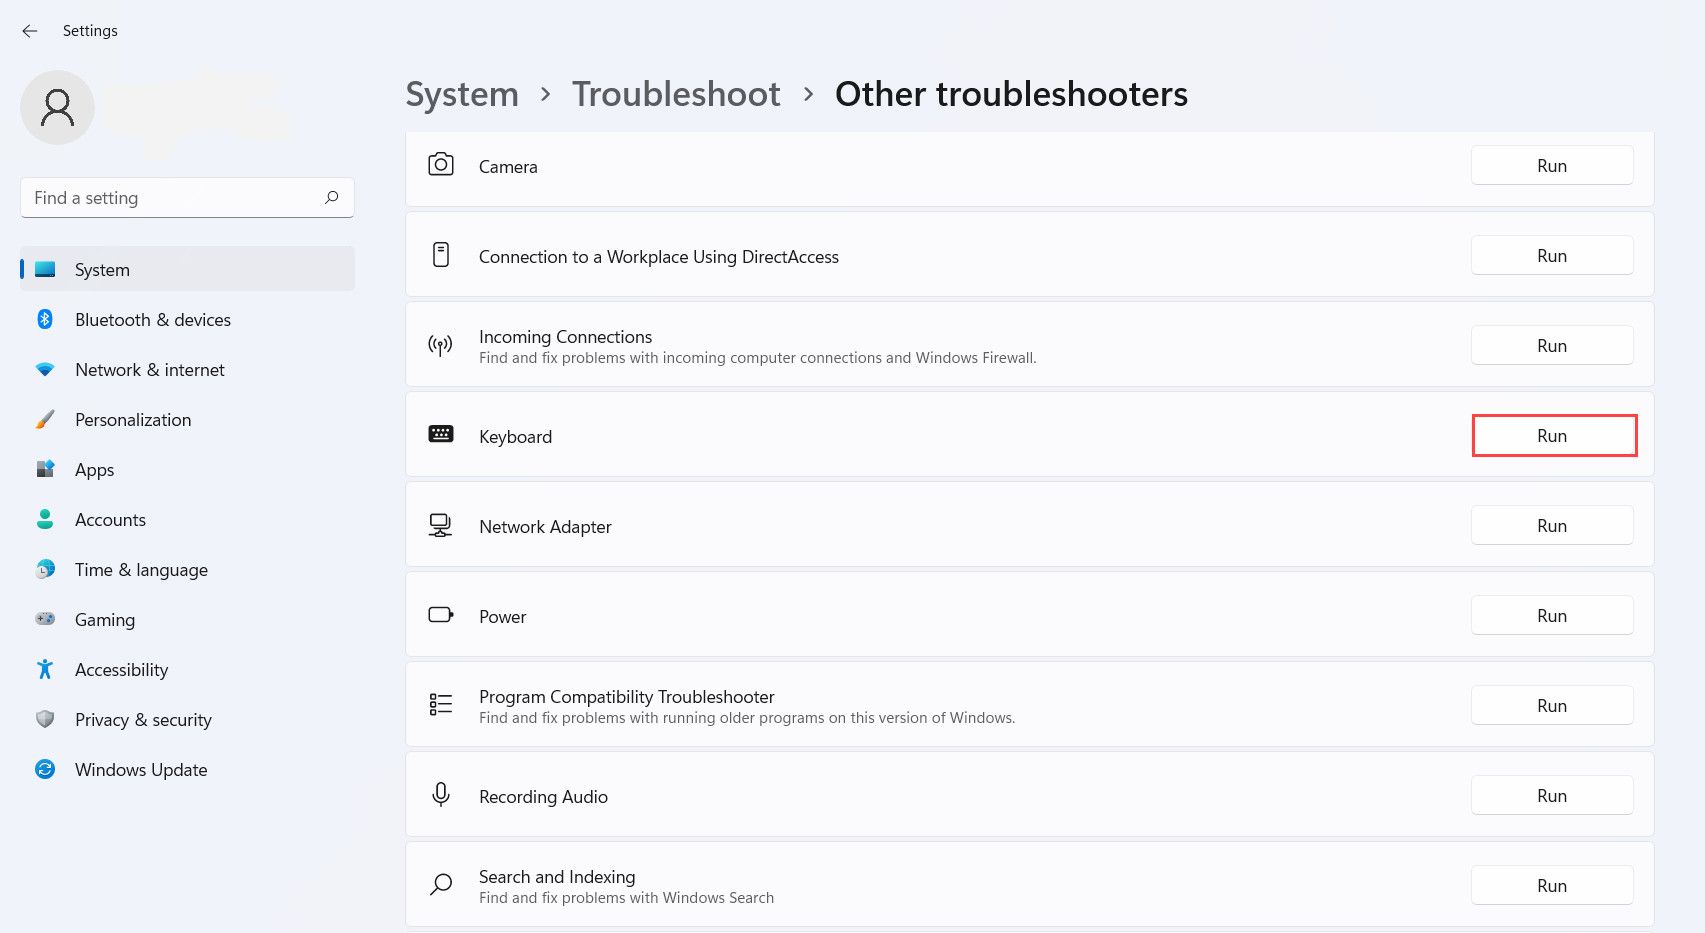
- Launch the Settings app and choose System from the left pane.
- Click on Troubleshoot on the right side of the window and then navigate to Other troubleshooters.
-
In the following screen, locate the Keyboard troubleshooter and click on the Run button for it.

Now, wait for the troubleshooter to complete its process. If it finds any issues, click on Apply this fix to implement the recommended fixes. If not, you can click on the Close the troubleshooter option.
Unlock Your Keyboard With Ease
If you are not actively typing, locking the keyboard is a great trick to prevent any typing mishaps. Should you be having difficulty unlocking the keyboard on the Windows system, hopefully, the methods listed above will help you. If the problem persists, you might be able to solve it permanently by replacing the keyboard.