Just when you’re about to connect your headset to your Windows device, the audio jack suddenly becomes unresponsive. It’s irritating when this happens, especially if you don’t know what's causing the issue.
If this happens to you, worry not. Fixing an unresponsive audio jack isn’t complicated, so let's explore the best solutions to resolve this issue.
1. Quick Fixes for an Unresponsive Audio Jack
An unresponsive audio jack could be caused by minor things that you can resolve in a few quick steps. So, before you continue with the detailed fixes in this article, you might want to explore these few quick fixes:
- Some devices have both a microphone and a speaker jack. As such, you should first ensure that your headsets or speakers are connected to the correct audio jack.
- Check if your headsets or speakers work on a different device. If they do, try cleaning the problematic audio jack and get rid of any dirt.
- Perhaps you’ve hit the wrong button accidentally and muted your audio. In this case, you could try and check if your audio isn’t on mute.
2. Enable Your External Audio Device
Your audio jack could sometimes be unresponsive because of how you’ve configured your sound settings. For example, you might have disabled your headsets in the Device properties settings or the Control Panel. In this case, here’s how you can enable your external audio device:
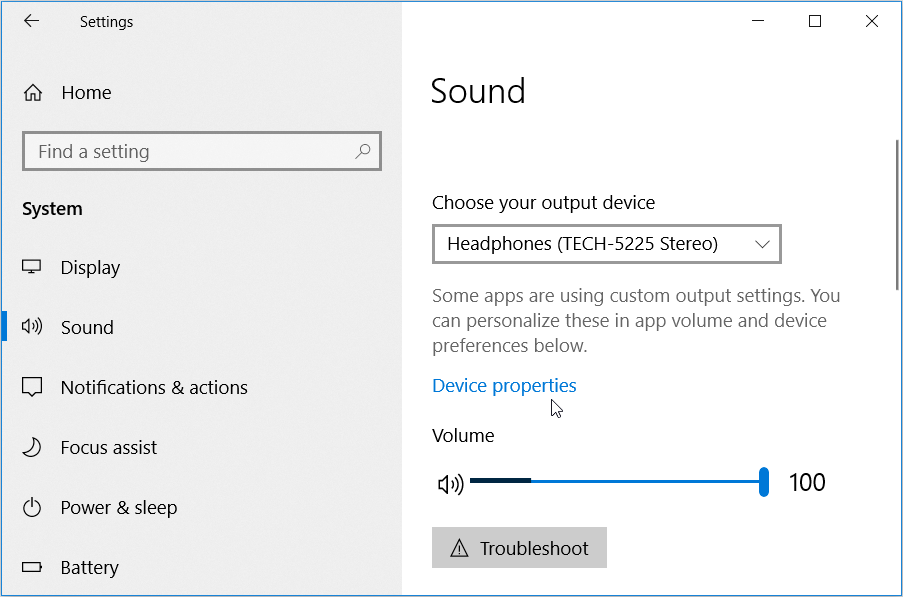
- Navigate to the Windows Start Menu > PC settings > System > Sound.
- On the right-hand side pane, click Device properties under the Choose your output device option.
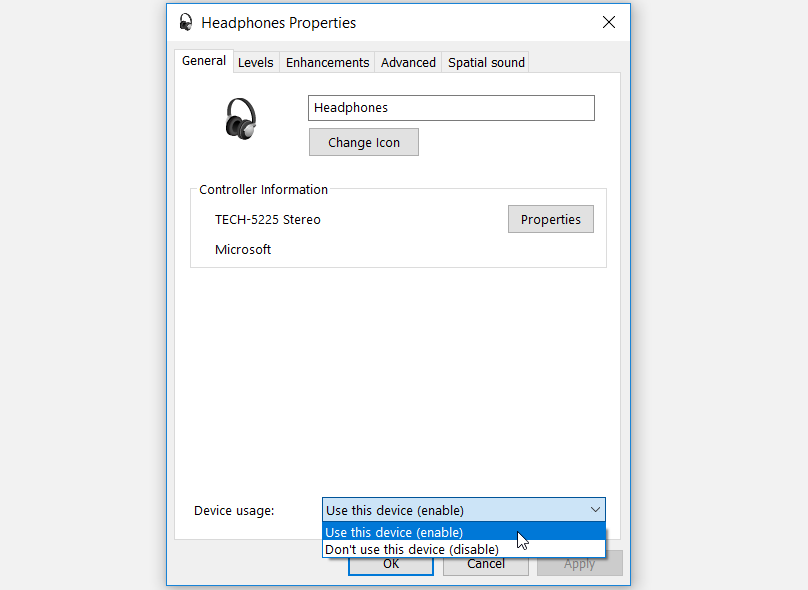
In the General tab of the Speakers Properties window, click the drop-down menu next to Device usage. Next, choose the Use this device (enable) option, click Apply, and click OK to apply these changes.
Alternatively, try enabling your output device in the Control Panel by following these steps:
- Type Control Panel in the Windows search bar and select the Best match.
- In the Control Panel Window, select Large icons under the View by drop-down menu. From there, select Sound from the Control Panel menu items.
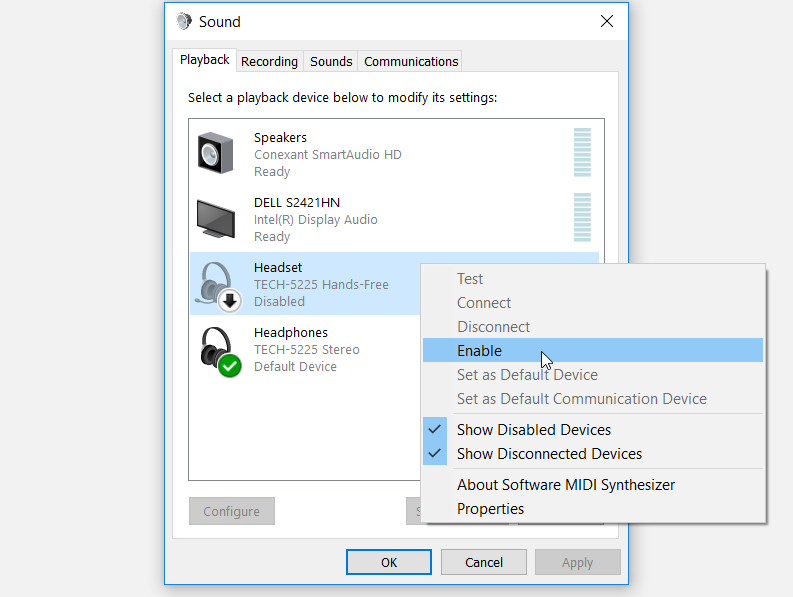
- In the pop-up window, navigate to the Playback tab.
- Finally, right-click on your connected device and select Enable. Next, click Apply and then click OK to apply these changes.
3. Set Your Headphones as the Default Audio Device
There are cases when your external audio device is enabled in the settings, but the audio jack will still not respond. In this case, you could try setting your headphones or speakers as the default audio device. Here’s how:
- Right-click the volume icon in the taskbar and select Sounds.
- In the next window, navigate to the Playback tab.
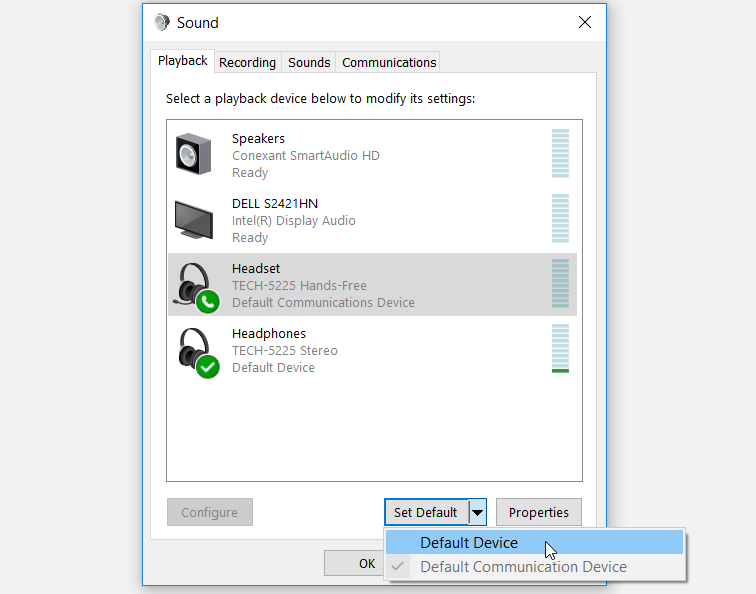
- Next, click your external audio device and then click the Set Default drop-down menu.
- Choose Default Device from the menu options. When you finish, click Apply and then click OK to save these changes.
4. Test Different Audio Formats
You could also test different audio formats to see if this resolves the issue with your audio jack. Here’s how you can do this:
- Right-click the volume icon in the taskbar and select Sounds.
- In the next window, navigate to the Playback tab.
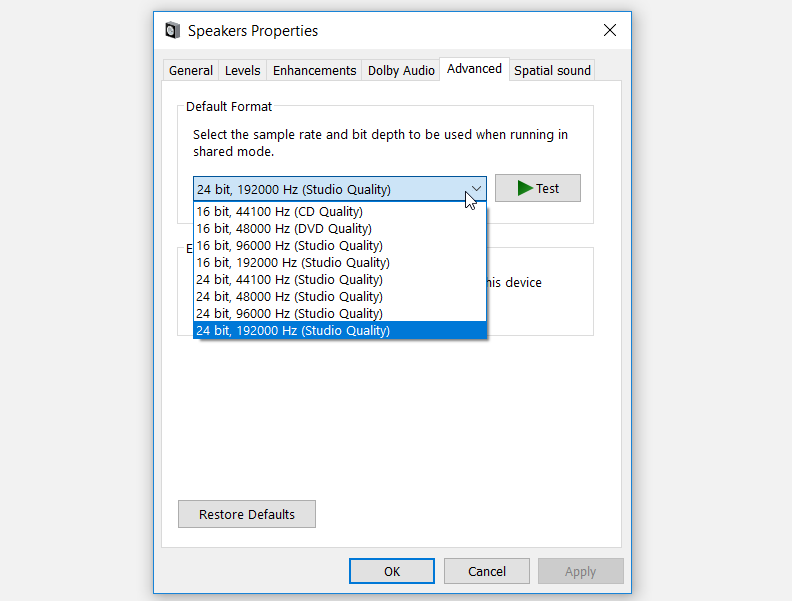
- Right-click your external audio device and select Properties.
- Navigate to the Advanced tab in the next window and then test various audio formats in the Default Format drop-down menu.
5. Disable Audio Enhancements
The Windows Audio Enhancements feature is designed to help your PC produce high-quality audio. However, this feature might sometimes not work as intended. So, disabling your audio enhancements might be the solution to your audio jack problems.
To get started with disabling audio enhancements, here’s what you can do:
- Right-click the volume icon in the taskbar and select Sounds.
- In the next window, navigate to the Playback tab.
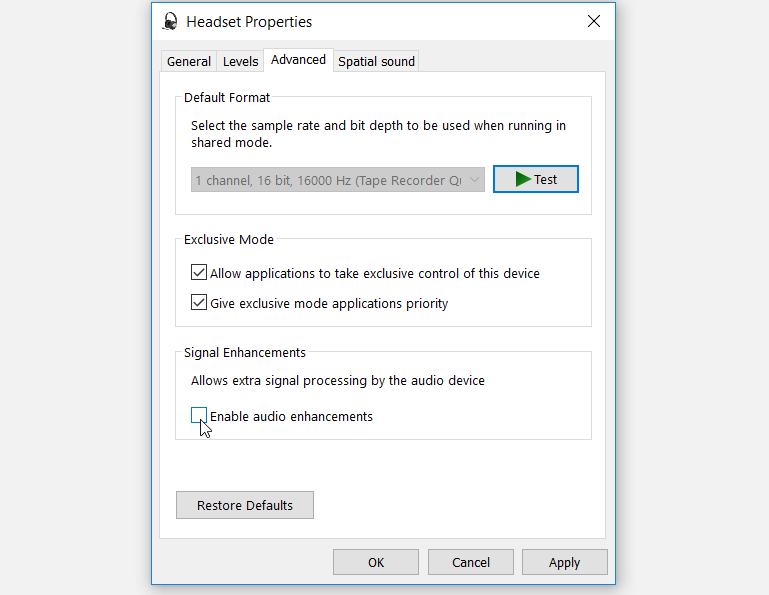
- Next, right-click your external audio device and then select Properties.
- Navigate to the Advanced tab in the next window and then uncheck the Enable audio enhancements box.
Click Apply and then click OK to save these changes.
6. Restart the Windows Audio Services
If the Windows audio services are disabled, your audio jack could be unresponsive, and you could experience other sound issues.
To resolve your system sound problems, here’s how you can restart the audio services:
- Type Services in the Windows search bar and select the Best match.
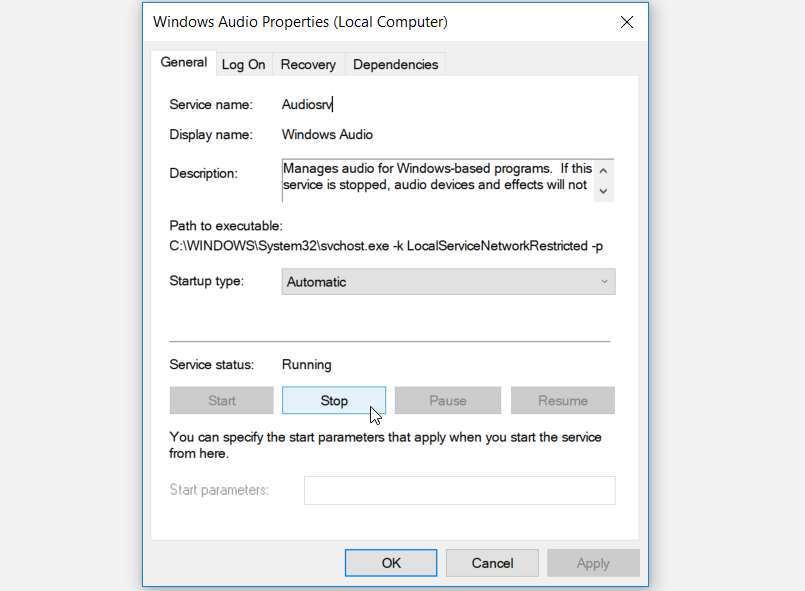
- Next, locate the Windows Audio option and double-click on it.
- In the next window, locate the Startup type drop-down menu and select Automatic from its options.
- Finally, press the Start button, press Apply, and then press OK.
7. Use Windows' Troubleshooting Tools
In other instances, this problem can be caused by system-specific issues. This is where a few Windows troubleshooters can come in handy. As such, we’ll take a look at how you can resolve this issue using the Audio troubleshooter and the Hardware and Devices troubleshooter.
To get started with using the audio troubleshooter, here are the steps you could follow:
- Type Troubleshoot in the Start menu search bar and select the Best match.
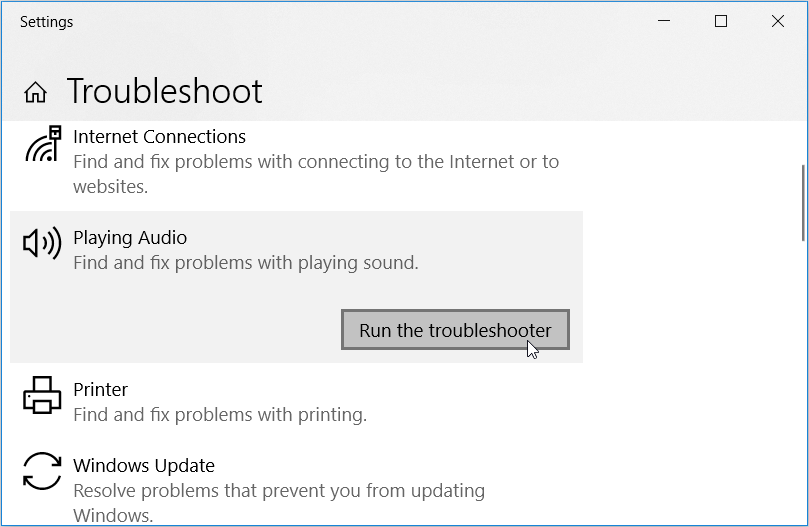
- Scroll down on the right-hand side pane, click the Playing Audio option, and then press Run the troubleshooter.
Restart your PC when the process is complete.
In case this still doesn’t resolve the issue, try running the Hardware and devices troubleshooter by following these steps:
- Open the Troubleshoot Settings window as per the previous steps.
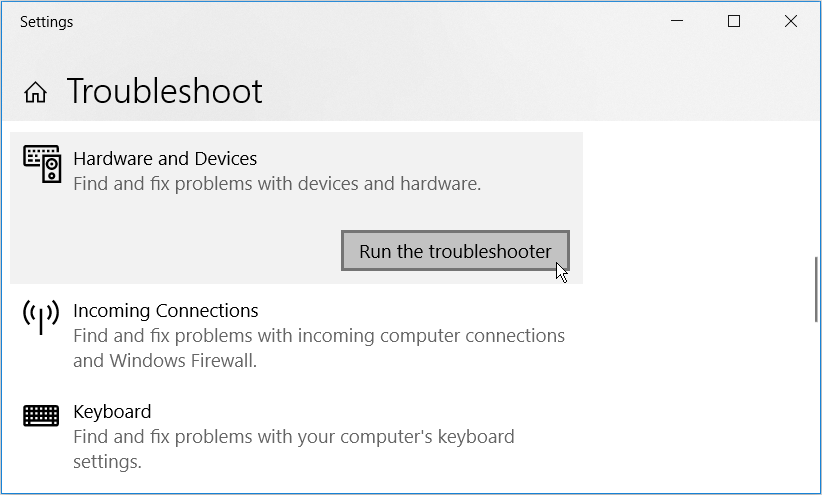
- Scroll down, click the Hardware and Devices option, and then press Run the troubleshooter.
When you finish, close the troubleshooter and restart your PC to apply these changes.
8. Restart or Reinstall Sound Drivers
You could be facing this issue due to corrupted sound drivers. In this case, you can fix your audio jack issues by either restarting or reinstalling your sound drivers.
Let’s first take a look at how you can restart your sound drivers:
- Press the Win + X and select Device Manager from the options.
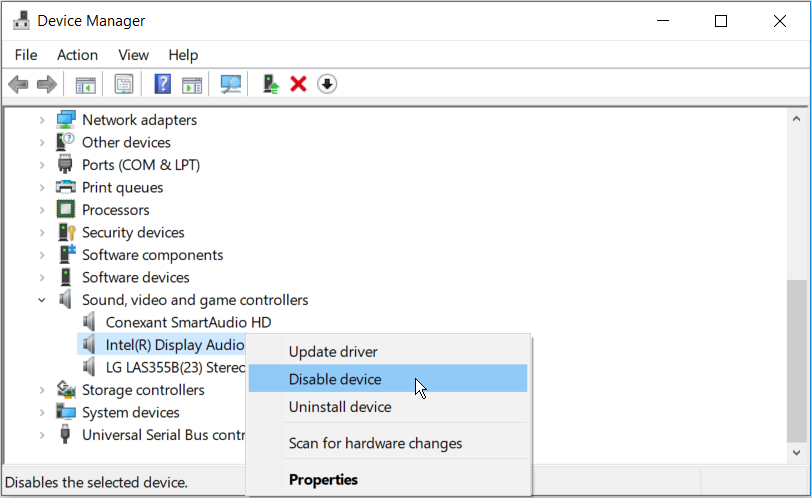
- Expand the Sound, video, and game controllers option by double-clicking on it.
- Right-click the Sound driver and select Disable device.
Finally, right-click the Sound driver and click Enable device. Restart your PC when you finish.
In case the issue persists, try reinstalling the sound drivers by following these steps:
- Open the Device Manager and the Sound drivers as per the previous steps.
- Right-click the Sound driver and select Uninstall device.
- Navigate to the Action tab and then select the Scan for hardware changes option.
Restart your PC again to apply these changes.
9. Use the DISM and SFC Tools
If corrupted system files cause the audio jack issue, you can fix the issue using both the built-in DISM and SFC tools.
To get started, run the DISM tool by following these steps:
- First, press Win + R to open the Run command dialog box.
- Type CMD and press Ctrl + Shift + Enter to open an elevated Command Prompt.
- Type the following command and press Enter:
DISM /Online /Cleanup-Image /ScanHealth
When this scan is complete, type the following command and then press Enter:
DISM /Online /Cleanup-Image /RestoreHealth
Restart your PC to apply these changes.
Next, open the Command Prompt as per the previous steps. From there, type the following command and press Enter to run an SFC scan:
sfc /scannow
Finally, close the Command Prompt and restart your PC when the scan is complete.
Your Audio Jack Is Now Up and Running
Fixing a problematic audio jack on a Windows device isn’t a complicated process. By simply following the tips in this article, you should be good to go. However, if all else fails, perhaps your PC’s audio board is critically damaged and needs replacement.

