When your PC is having issues, sometimes you want to send it back in time to a point where everything worked fine. Fortunately, with Windows machines, you can do just that with its handy system restore feature.
However, just when your troubles are over, you run into the dreaded “System Restore is disabled by your system administrator” error. You may feel frustrated and clueless about what to do, but don't worry; there is a way to fix this. In this article, we’ll show you how you can tackle this issue and get your PC up and running again.
What Is the Windows System Restore Feature?
The Windows System Restore is a tool designed to protect and repair your PC whenever you run into issues. This feature takes a snapshot of your system files and registry entries and then saves them as restore points.
When something suddenly goes wrong with your PC, a system restore point takes your PC back to its previous state without you having to reinstall the operating system. You can create restore points manually or configure your system to create daily system restore points automatically.
So if restore points are a useful and time-saving tool, what is it that causes the “System Restore is disabled by your system administrator” error? Let’s find out.
What Causes the "System Restore Is Disabled by Your System Administrator" Error?
When System Restore fails, you'll usually notice via one of two ways. You’ll either see an error message or your restore points will be grayed out. This issue can be caused by dodgy third-party software or the way you’ve configured your system settings.
If you're using someone else's PC, it’s also possible that the administrator has disabled System Restore. In this case, you could request administrator privileges or ask the administrator to enable the System Restore feature.
Otherwise, here’s how you can get rid of the “System Restore is disabled by your system administrator” error on your PC.
1. Configure the System Restore Settings
An easy way to resolve this issue is by configuring your restore point settings. Here’s how you can do this:
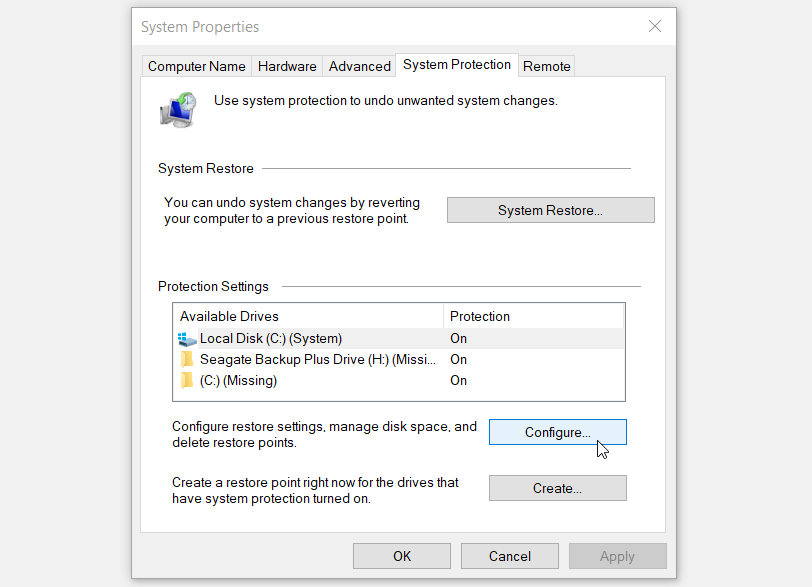
- Type create a restore point in the Windows search bar and select the Best match.
- Navigate to the System Protection tab.
- Click the Configure button under Protection settings.
In the next window, select Turn on system protection, click Apply, and then click OK. Restart your PC to save these changes.
2. Ensure Your System Restore Services are Running
If your computer's system restore point services aren’t running, there's a good chance they're causing the error message. These services include the Microsoft Software Shadow Copy Provider Service and the Volume Shadow Copy.
To resolve this issue, here’s what you can do:
- Press Win + R, type services.msc, and press Enter.
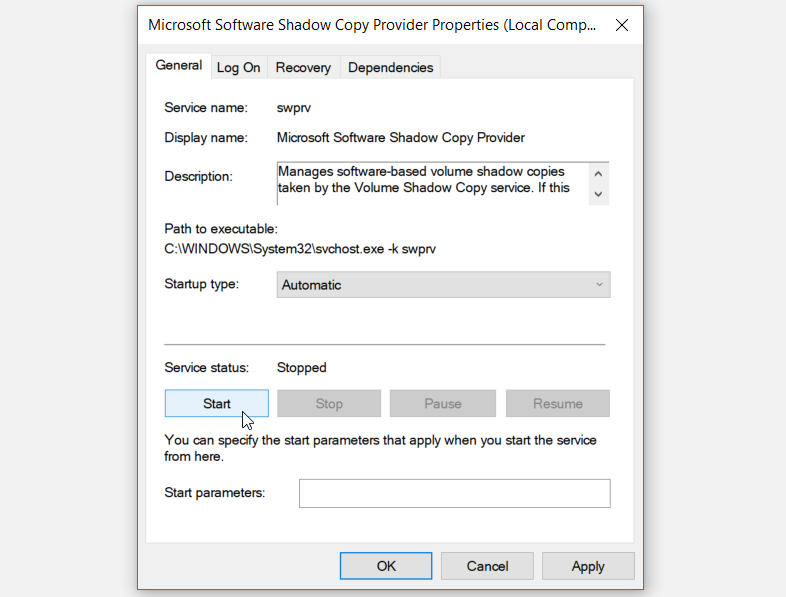
- Locate Microsoft Software Shadow Copy Provider Service and double-click on it.
- In the next window, select Automatic from the Startup type drop-down menu.
- From here, click Start under the Service status options. Press Apply and then press OK to save these changes.
When you finish, locate the Volume Shadow Copy and configure it the same way you did for the previous steps. Then, restart your PC to save the changes.
3. Use the Registry Editor
One of the best ways to get your System Restore up and running again is by using the Registry Editor. This is a Windows built-in tool that helps modify registry keys that control how your PC works.
However, because the registry handles information that is crucial for your PC's performance, it's a good idea to take precautions so you don't end up doing damage to your computer. Before you continue with these steps, you might want to back up the Registry Editor just in case something goes wrong.
Here’s how you can fix System Restore using the Registry Editor:
- Press Win + R to open the Run command dialog box.
- Type regedit and press Enter.
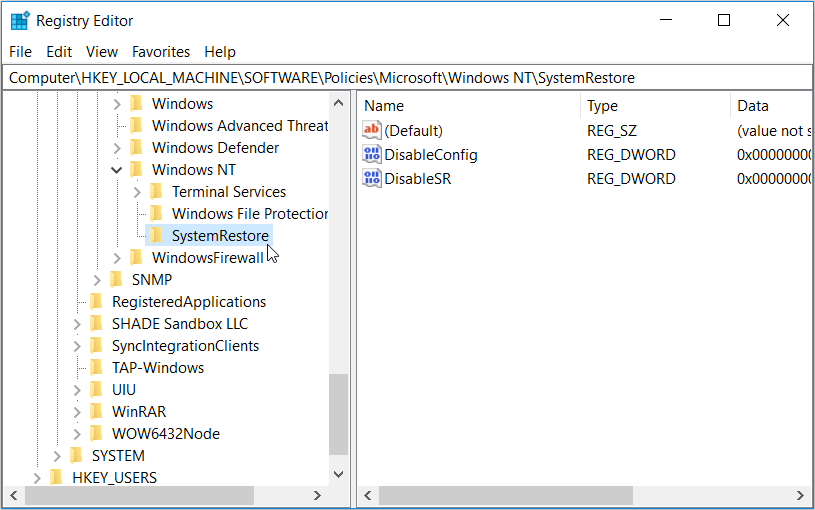
- In the left pane of the Registry Editor window, navigate to HKEY_LOCAL_MACHINE > SOFTWARE > Policies > Microsoft > Windows NT > SystemRestore.
If the SystemRestore key is present, you can skip to the next step. However, if the key is missing, here's how to make your own:
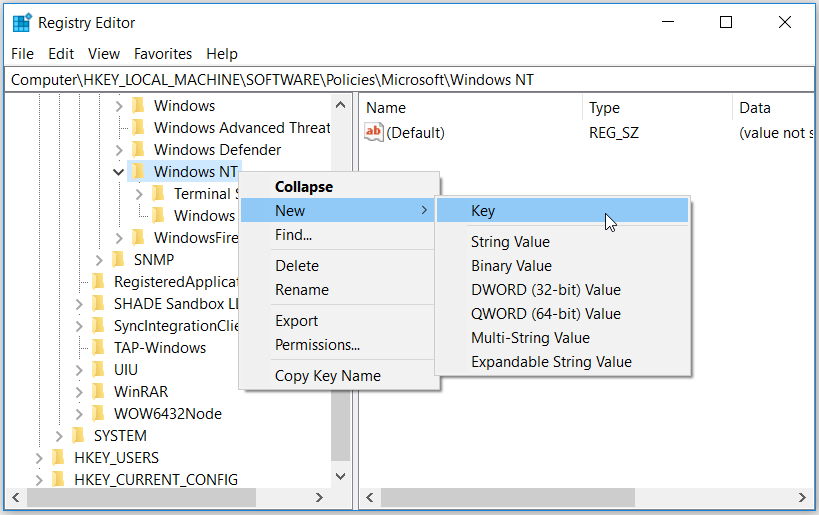
- Right-click on the Windows NT key, click New, and then click Key.
- Rename the new key as SystemRestore.
Next, click the SystemRestore key—you should see the DisableConfig and DisableSR values on the right-hand pane. If these values are present, skip to the next step.
If these values are missing, here's how to create them:
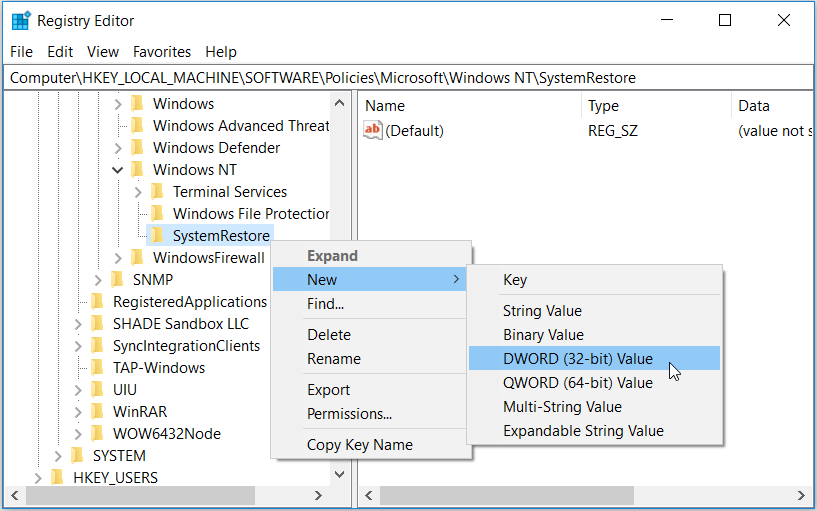
- Right-click the SystemRestore key, click New, and then select DWORD (32-bit) Value.
- Name this value as DisableConfig and click Enter.
- When you finish, create the DisableSR value as per the previous steps.
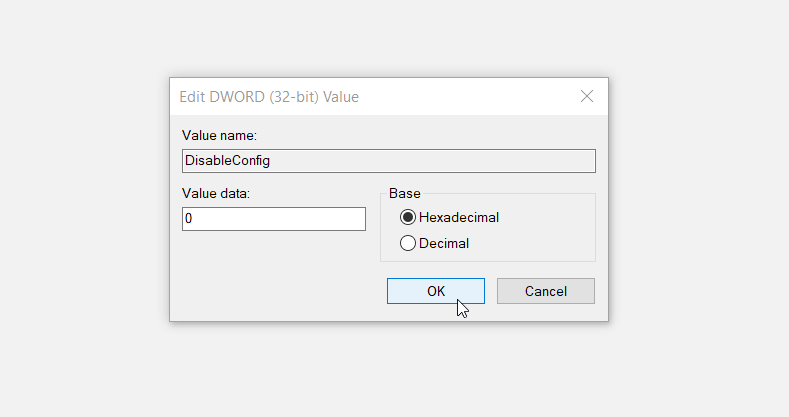
Double-click the DisableConfig value. In the next window, set the Value data to "0" (zero), and click OK to finish. Finally, double-click the DisableSR value, set its Value data to "0", and click OK.
When you finish, close the Registry Editor and restart your PC to save these changes.
4. Use the Local Group Policy Editor
You can also tackle this error by configuring some settings in the Local Group Policy Editor. However, this feature is only available in the Windows 10 Pro, Education, and Enterprise editions. Despite that, there are some steps you could follow to access the Local Group Policy Editor on Windows 10 Home.
Here's how you can fix the System Restore issue using the Local Group Policy Editor:
- Press Win + R to open the Run command dialog box.
- Type gpedit.msc and press Enter.
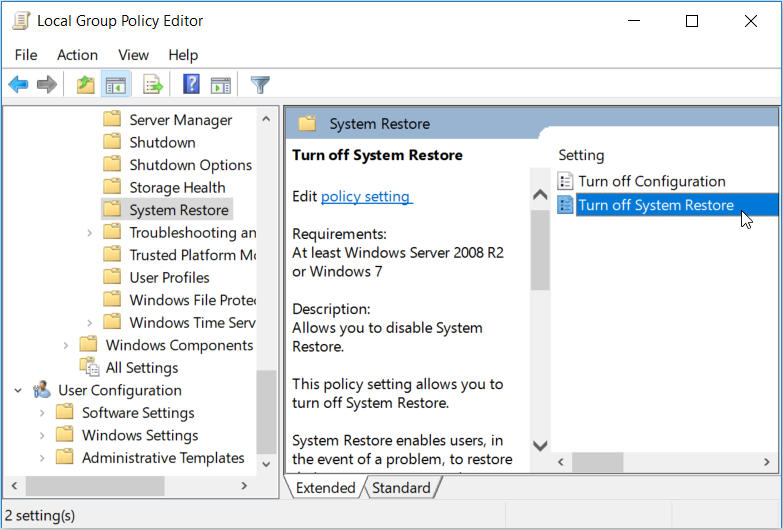
- Navigate to Computer Configuration > Administrative Templates > System > System Restore.
- Double-click the Turn off System Restore setting on the right-hand side pane.
In the next window, select Not configured or Disabled. From there, press Apply, press OK, and then restart your PC.
5. Use the DISM and SFC Tools
There's a chance that this error could be caused by corrupt system files. If this is the case, you can fix the problem with Windows' DISM and SFC tools. These tools automatically scans and fixes corrupt or missing system files, so it's worth giving both of them a shot to see if they fix your problem.
However, if you want to use these tools, it's best to start by running the DISM tool first. And while DISM has various functions, using it here then ensures that SFC will work properly.
To run DISM, follow these steps:
- Press Win + R and type CMD.
- Press Ctrl + Shift + Enter to open an elevated Command Prompt.
- Type the following command and press Enter:
DISM /Online /Cleanup-Image /ScanHealth
When the scan is complete, type the following command and press Enter:
DISM /Online /Cleanup-Image /RestoreHealth
Wait for the scan to complete and then restart your PC.
From there, you can run the SFC tool. To do this, open the Command Prompt as per the previous steps. Next, type the following command and press Enter:
sfc /scannow
When the scan is complete, close the Command Prompt and restart your PC.
Fix the Windows System Restore Tool Without a Hassle
The Windows System Restore tool is a handy feature when a new and mysterious error creeps into your system. However, it really gets frustrating when you bump into several error messages that prevent you from accessing this tool. Fortunately, if you bump into the “System Restore is disabled by your system administrator” error, you can easily resolve it using the tips in this article.
Unfortunately, this isn't the only problem you can encounter with System Restore. There are plenty of ways it can break down, and an equal number of ways to get it working again.


