
Storage Sense is a handy feature on Windows that can help you manage your disk space more effectively. When enabled, it can automatically monitor and delete unnecessary files from your computer.
Although Storage Sense prevents your PC from running out of storage space, you may want to disable it for various reasons. There are a few different ways you can go about it. This post will walk you through all the methods for disabling Storage Sense.
1. How to Disable Storage Sense Using the Settings App
Windows Settings app has a dedicated Storage section from where you can configure Storage Sense settings. It also gives you the option to disable the feature on your computer.
To disable Storage Sense via the Settings app:
- Open the Start menu and click the gear icon to launch the Settings app.
- Navigate to System > Storage.
-
Under the Storage management section, disable the toggle for Storage Sense.


Once you complete the above steps, Windows will no longer run Storage Sense on your device.
2. How to Disable Storage Sense via the Group Policy Editor
The Group Policy Editor is a useful tool that lets you configure various policies for your computer and its users. It also provides an easy way to disable the Storage Sense feature on Windows.
Group Policy Editor is a feature reserved for the Professional, Enterprise, and Education editions of Windows. So, if you’re using Windows Home, you won't be able to access it. Luckily, it's possible to enable the Group Policy Editor in Windows Home with a few tweaks.
Once you've enabled Group Policy Editor on your computer, use the following steps to disable Storage Sense.
- Press Win + R to open the Run dialog.
- Type gpedit.msc in the box and press Enter.
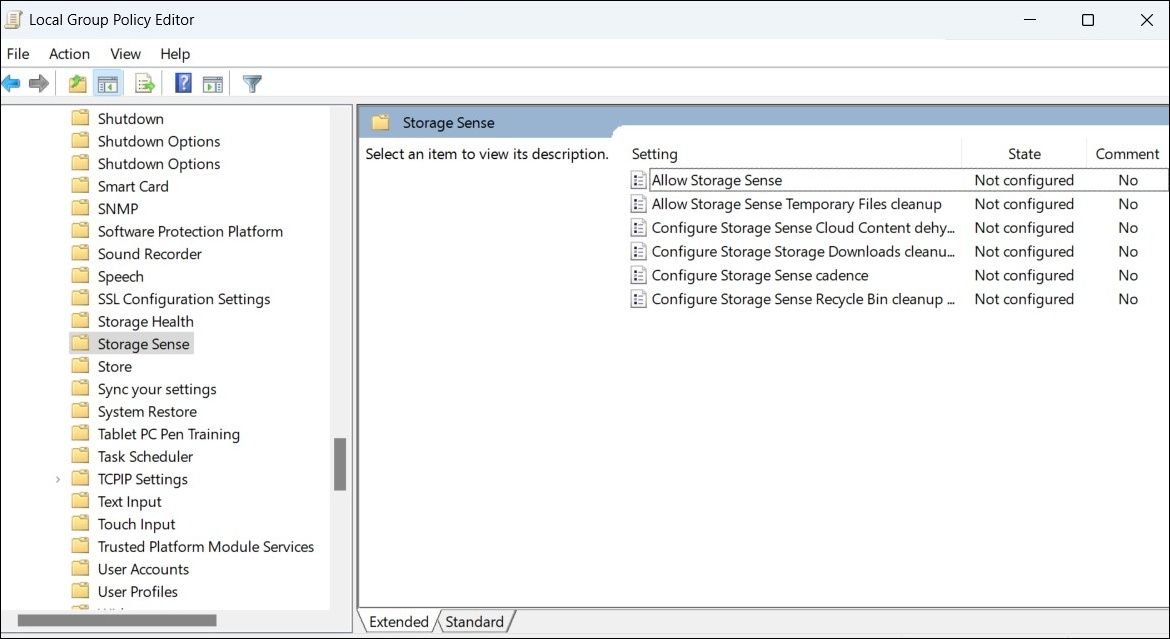
- In the Local Group Policy Editor window, use the left pane to navigate to Computer Configuration > Administrative Templates > Storage Sense.
- Double-click the Allow Storage Sense policy on your right.
- Select the Disabled radio button.
-
Click Apply followed by OK.

If you change your mind later, you can re-enable the Storage Sense feature by setting the Allow Storage Sense policy to Enabled.
3. Disable Storage Sense via Registry Editor
Another way to disable Storage Sense on Windows is to use the Registry Editor. This method, however, may not be suitable for everyone, especially if you are not familiar with editing registry files.
If you decide to use this method, make sure you back up all the registry files or create a restore point before proceeding.
- Press Win + S to open the search menu.
- Type registry editor in the search box and select Run as administrator.
- Select Yes when the User Account Control (UAC) prompt appears.
-
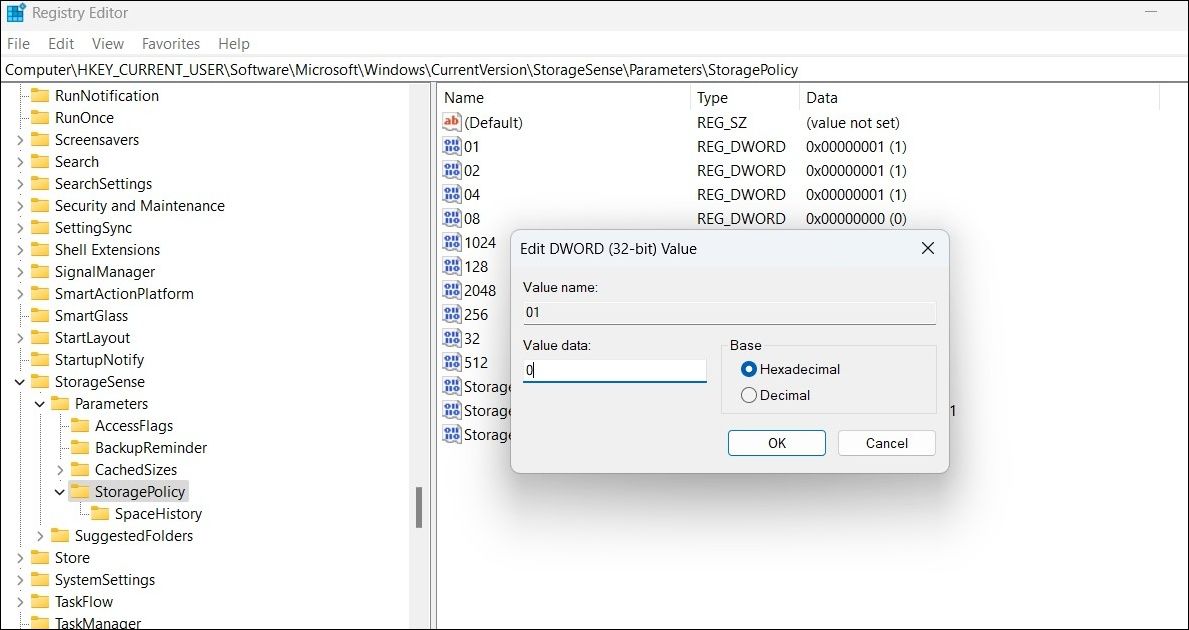
In the Registry Editor window that opens, paste the following path in the address bar at the top and press Enter. This will take you to the StoragePolicy key.
HKEY_CURRENT_USER\Software\Microsoft\Windows\CurrentVersion\StorageSense\Parameters\StoragePolicy - In the right pane, double-click the 01 DWORD.
-
In the Value data field, enter 0 and hit OK.

Exit the Registry Editor window and restart your PC to apply the changes. Following that, Storage Sense will no longer run automatically on your device.
If you want to re-enable Storage Sense in the future, follow the same steps above and change the value data for 01 DWORD to 1.
Disabling Storage Sense on Windows
As we just saw, disabling Storage Sense on Windows is fairly simple, and you can do so using any of the three methods. However, after that, you may need to make storage housekeeping a regular part of your schedule.
Using Storage Sense isn't the only way to keep your Windows computer from running out of storage. You can also free up disk space on Windows by manually removing unnecessary system files and data.