You leave your Windows PC for a few minutes, and then it suddenly goes into sleep mode. Now you have to enter your password to unlock the device, which can be quite frustrating—especially if you often leave your PC unattended.
Would you like to wake your device without entering a password? If so, we’ll explore some easy ways to disable the Windows password option when waking it from sleep.
But First, Is Disabling the Password Option on Wake a Good Idea?
Wondering whether disabling the password option is worth it or not? Well, this depends on whom you share your device with.
If you regularly use your device in public spaces, then disabling the password option might not be ideal. Also, try not to disable the password option on a work or school device that anyone can easily access.
In fact, it’s often best to disable the password option only if you don’t share your device with others. However, you could disable the password option if you share your device with trusted friends and family members. But you might need to set some ground rules to ensure that your data is safe.
Now, let’s check out how to disable the password option when resuming Windows from sleep.
1. Use the System Settings
You can easily troubleshoot most Windows system issues using the system settings. Now, let’s find out how the settings can help you disable the password option:
- Type Settings in the Start menu search bar and select the Best match.
- Select Accounts from the options.
- Next, click Sign-in options in the left-hand side pane.
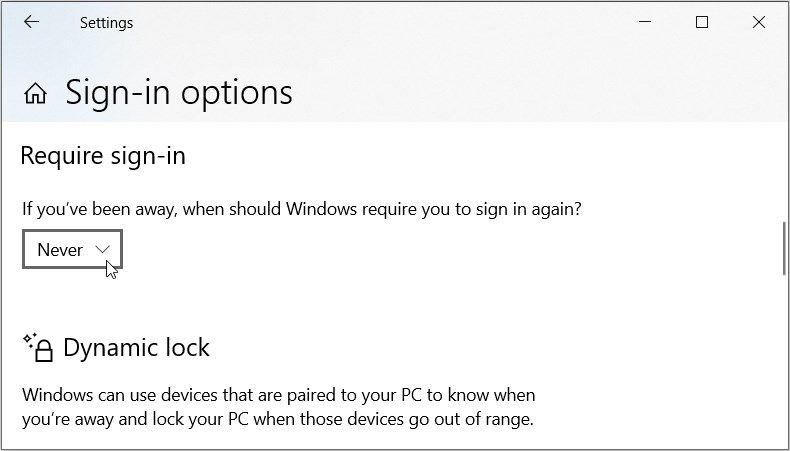
- Click the Require sign-in drop-down menu and select Never. That way, your PC won’t require a password when you resume the device from sleep.
To restore the default settings, navigate to the Sign-in options screen by applying the previous methods. From there, click the Require sign-in drop-down menu and select When PC wakes up from sleep.
2. Use the Control Panel
The Control Panel is another incredible tool that you can use whenever you want to troubleshoot your device. For instance, you cau use the Control Panel to access the Task Manager and other tools.
Now, let’s check out how the Control Panel can help you disable the password option:
- Type Control Panel in the Start menu search bar and select the Best match.
- Click the View by drop-down menu and select Large icons.
- Select Power Options from the list.
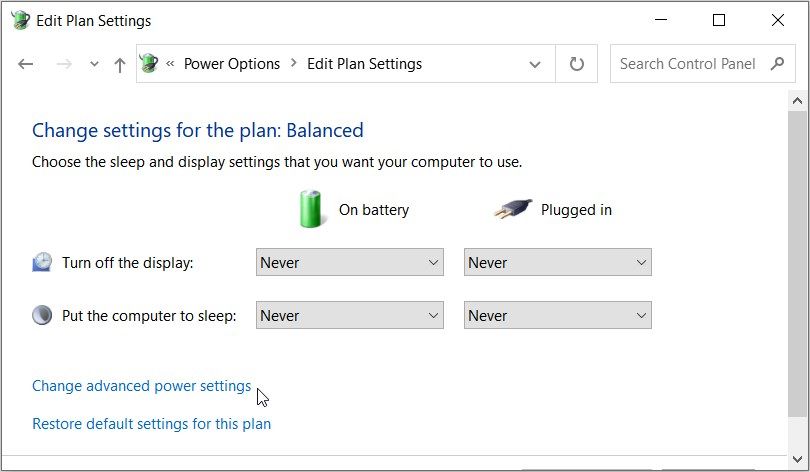
- Click Change plan settings and then click Changed advanced power settings on the next screen.
Next, follow these steps:
- Expand the Balanced menu and then expand the Require a password on wakeup option.
- Select No for both the On battery and Plugged in options.
- Press Apply and then OK to apply these changes.
3. Use the Command Prompt
You can also disable the password option using the Command Prompt. Here are the steps you need to follow:
- Type Command Prompt in the Start menu search bar.
- Right-click on the Best match result and select Run as administrator.
- To disable the password option when your device is using battery power, type the following command and press Enter:
powercfg /SETDCVALUEINDEX SCHEME_CURRENT SUB_NONE CONSOLELOCK 0
To disable the password option when your device is plugged into a power source, type the following command and press Enter:
powercfg /SETACVALUEINDEX SCHEME_CURRENT SUB_NONE CONSOLELOCK 0
Finally, restart your PC to save these changes.
To re-enable the password option when your PC is using battery power, type the following command and press Enter:
powercfg /SETDCVALUEINDEX SCHEME_CURRENT SUB_NONE CONSOLELOCK 1
Finally, to re-enable the password option when your device is plugged in, type the following command and press Enter:
powercfg /SETACVALUEINDEX SCHEME_CURRENT SUB_NONE CONSOLELOCK 1
Wait for the process to complete, and then restart your device.
4. Use the Local Group Policy Editor
The Local Group Policy Editor is another incredible tool that can help. If you’re using the Home edition, you first need to try a few quick methods to access the LGPE on Windows Home. Otherwise, you might want to skip straight to the “Registry Editor” method.
Here’s how to disable the password option using the Local Group Policy Editor:
- Type Edit group policy in the Start menu search bar.
- Right-click on the Best match result and select Run as administrator.
- Navigate to Computer Configuration > Administrative Templates > System > Power Management > Sleep Settings.
- Double-click on the Require a password when a computer wakes (on battery) option on the right-hand side.
To disable the password option, select either Disabled or Not Configured on the next screen. Press Apply and then Press OK to save these changes.
Next, apply the same changes to the Require a password when a computer wakes (plugged in) option.
To re-enable the password option, follow these steps:
- Open the Local Group Policy Editor and navigate to the Sleep Settings option as per the previous steps.
- Double-click on the Require a password when a computer wakes (on battery) option and select Enabled. Finally, press Apply and then press OK.
- Apply the same changes to the Require a password when a computer wakes (plugged in) option.
5. Use the Registry Editor
If you don’t have access to the Local Group Policy Editor, then you can use the Registry Editor. But before you proceed, consider backing up the Registry first before tweaking its keys.
Now, here’s how to disable the password option using the Registry Editor:
- Type Registry Editor in the Start menu search bar.
- Right-click on the Best match result and select Run as administrator.
- Copy-paste the following command into the address bar and press Enter:
Computer\HKEY_LOCAL_MACHINE\SOFTWARE\Policies\Microsoft
From there, follow these steps:
- Right-click on the Microsoft key and select New > Key. Name this key as Power and press Enter.
- Next, right-click on the Power key and select New > Key. From there, name the key as PowerSettings and press Enter.
- Right-click on the PowerSettings key, select New > key, and then name the key as 0e796bdb-100d-47d6-a2d5-f7d2daa51f51.
To disable the password option when your device is using battery power, follow these steps:
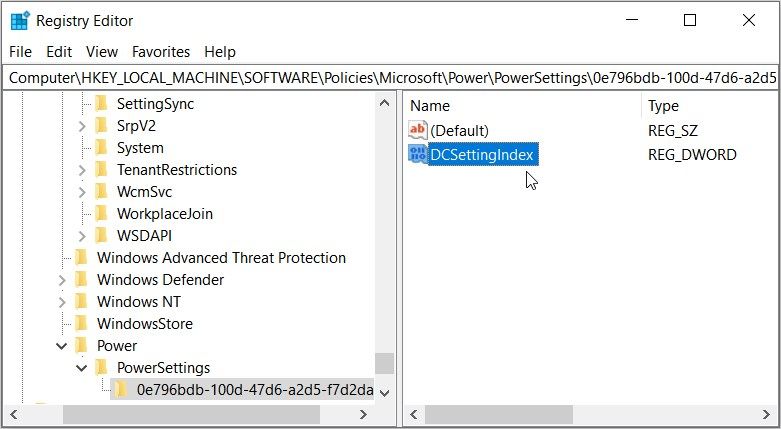
- Click the 0e796bdb-100d-47d6-a2d5-f7d2daa51f51 key, right-click on the right-hand side, and select New > DWORD (32-bit) Value.
- Name the value as DCSettingIndex.
To disable the password option, double-click on the DCSettingIndex value and set the Value data as 0. Alternatively, set the Value data as 1 to enable this option. Finally, close the Registry Editor and restart your device to save these changes.
To disable the password option when the device is plugged into a power source, follow these steps:
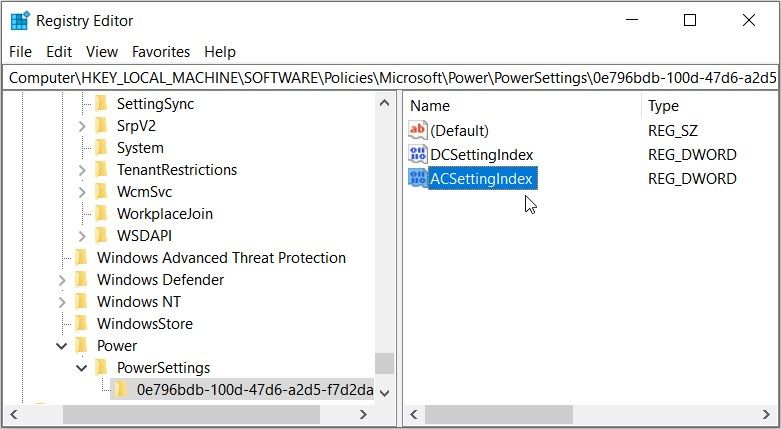
- Click the 0e796bdb-100d-47d6-a2d5-f7d2daa51f51 key, right-click on the right-hand side, and select New > DWORD (32-bit) Value.
- Name the value as ACSettingIndex.
To disable the password option, double-click on the ACSettingIndex value and set the Value data as 0. Alternatively, set the Value data as 1 to enable this option. From there, close the Registry Editor and then restart your device.
Wake Windows From Sleep Without Any Limitations
By default, your Windows device should require a password when you wake the device. But if you want to disable this feature, simply try any of the methods we’ve covered. That way, you’ll be able to wake the device by pressing the power button or any other key.
And if your Windows device won’t wake from sleep, there are solutions for that too.


”-option-in-the-LGPE.jpg)


