One day, you try accessing the Windows desktop and find out that it has turned pink or purple. In most cases, this issue is caused by incorrectly connected cables or outdated display drivers. In some instances, it might be caused by various other things such as malware.
So, let’s dive in and explore all the solutions to a pink or purple desktop on Windows.
1. Quick Fixes for a Windows Desktop That Turns Pink or Purple
Before you try the detailed solutions, you might want to check out a couple of quick fixes first.
For example, are you experiencing this issue on an external display device? If so, then check your cables and ensure that everything is connected properly. Also, ensure that your display cables aren’t damaged.
In some cases, restarting your Windows device could help. Perform any one of the many ways to restart a Windows PC and see if that fixes this.
2. Restart File Explorer
The issue at hand might be caused by a faulty app on your device. Now, a quick solution here would be to close a few active programs and restart the File Explorer.
Let’s take a look at the steps for restarting File Explorer:
- Type Task Manager in the Start menu search bar and select the Best match.
- Navigate to the Processes tab.
- Right-click on Windows Explorer and then select Restart.
3. Disable the Color Filters
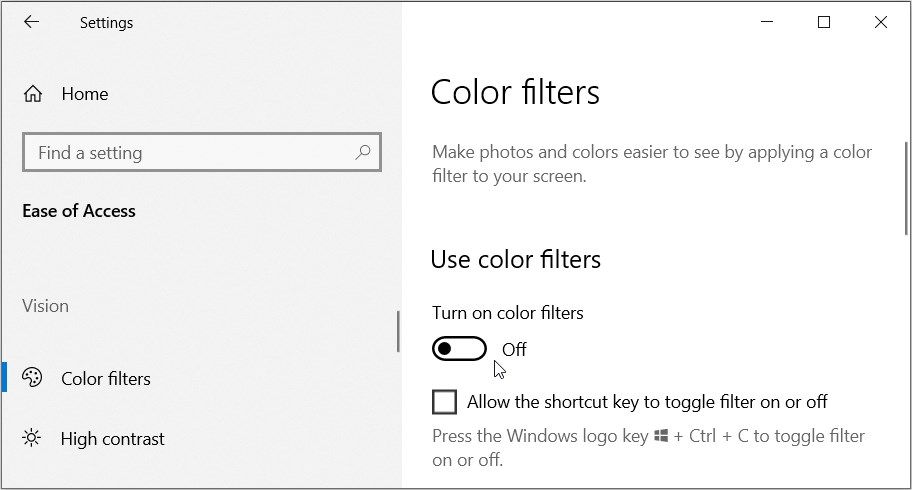
The "desktop color" issue might also be caused by the way you’ve configured the color filters on your device.
In this instance, here’s how you can resolve the problem:
- Press Win + I to open the system settings.
- Click Ease of Access from the menu items.
- Click Color filters on the left-hand side.
- Turn off the Turn on color filters button on the right-hand side. Finally, uncheck the Allow the shortcut key to toggle filter on or off box.
4. Configure the Night Light Settings
In some cases, the issue might be caused by the way you've configured the night light settings.
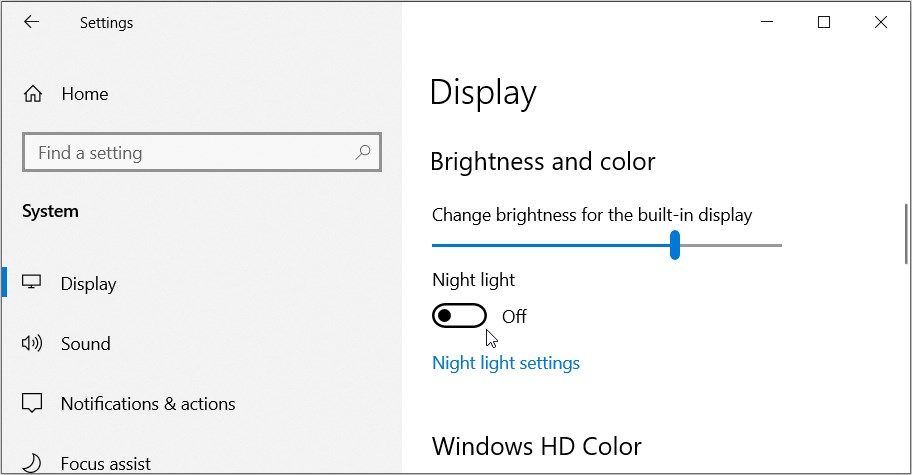
When you turn on the Windows night light settings, your PC displays warmer colors to help you sleep. If you've enabled these settings, it’s highly likely that they're the reason you're experiencing the "desktop color" issue.
To get rid of the problem, follow these steps:
- Press Win + I to open the system settings.
- Select System from the menu items.
- Click Display on the left-hand side pane.
- Turn off the Night light button on the right-hand side.
Next, follow these steps if you want to tweak some additional night light settings:
- Navigate to the Display settings window as per the previous steps.
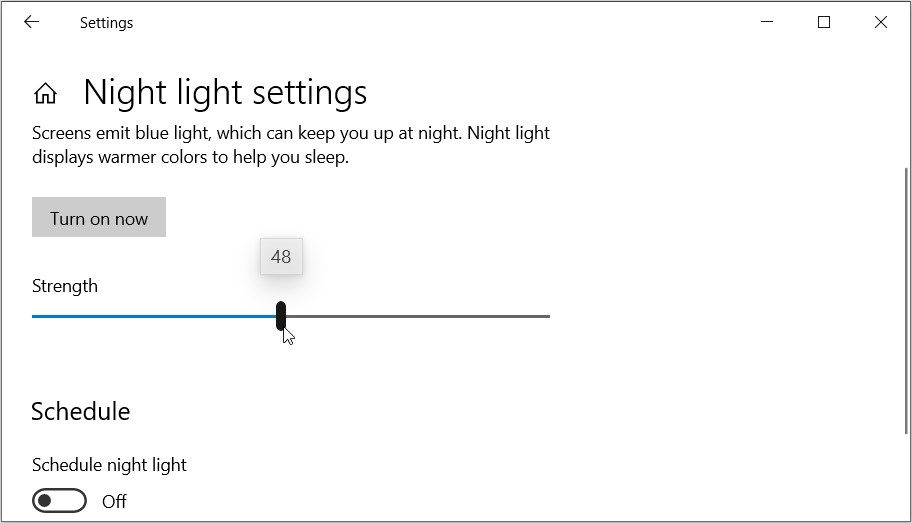
- Click the Night light settings option on the right-hand side.
- Drag the Strength slider button and place it wherever you like. Bear in mind that dragging the button to the left-hand side will reduce the strength of the night light colors.
- If you want to schedule the night light settings, turn on the Schedule night light button and pick the relevant option below it.
5. Update or Reinstall the Windows Display Drivers
In some instances, the “desktop color” issue might be caused by corrupted or incompatible display drivers. Now, an easy way out in this case is to either update or reinstall these drivers.
Let’s first check out how you can update the display drivers:
- Type Device Manager in the Start menu search bar and select the Best match. Alternatively, check out the various ways to access the Device Manager.
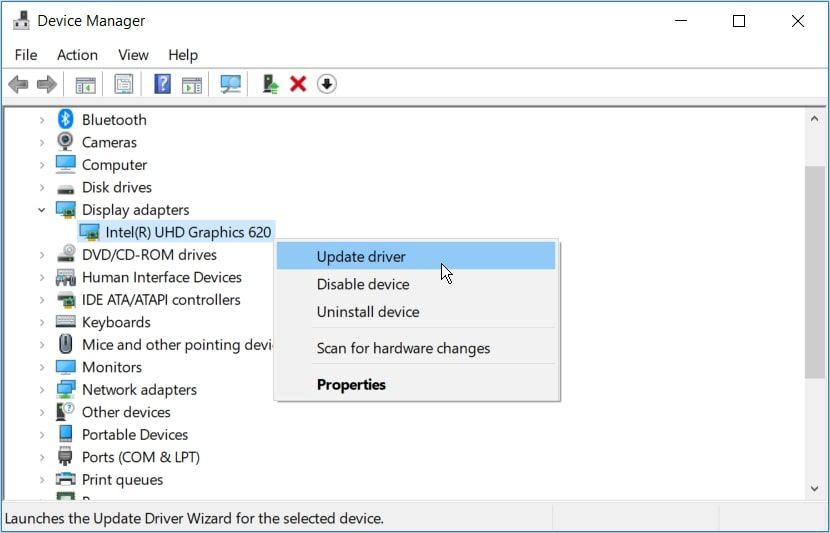
- Double-click the Display adapters option to expand it.
- Right-click your PC’s display adapter and select Update driver.
On the next screen, select Search automatically for updated driver software and then follow the on-screen instructions.
If this doesn’t resolve the issue, try reinstalling the Display adapters through these steps:
- Open the Display adapters option by following the previous steps.
- Right-click your PC’s display adapter and select Uninstall device.
- Navigate to the Action tab and select Scan for hardware changes.
- Close the Device Manager when the process is complete.
- Restart your PC to apply these changes.
6. Use the Built-In Windows Troubleshooters
Still struggling to resolve the "desktop color" issue? The Windows built-in troubleshooters could help! However, you should pick a relevant troubleshooter depending on the nature of the problem.
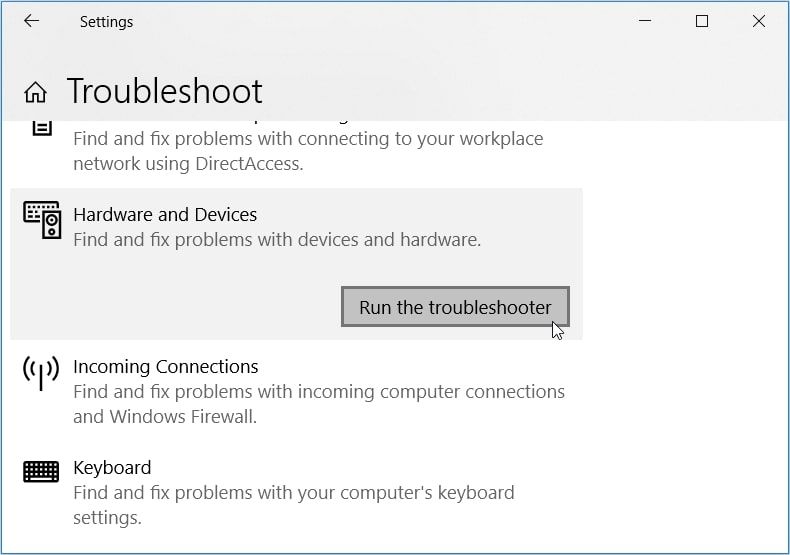
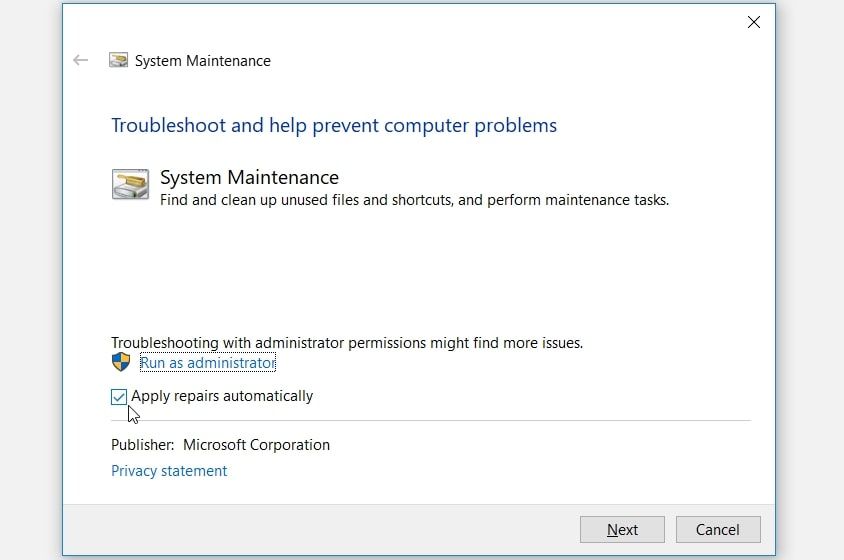
For example, if you’re dealing with a hardware-related issue, then the Hardware and Devices troubleshooter will come in handy. But if the issue is caused by system maintenance issues, then the System Maintenance troubleshooter could help.
Let’s start by checking out how you can run the Hardware and Devices troubleshooter:
- Press Win + I to open the system settings.
- Select Update & Security from the options.
- Select Troubleshoot on the left-hand side.
- Click Additional troubleshooters on the right-hand side.
- Click the Hardware and Devices troubleshooter and then press the Run the troubleshooter button.
- Follow the on-screen instructions and then restart your PC to save these changes.
If the issue persists, run the System Maintenance troubleshooter through these steps:
- Press Win + R to open the Run command dialog box.
- Type msdt.exe -id MaintenanceDiagnostic and press Enter to open the System Maintenance troubleshooter.
- Click the Advanced option in the bottom-left corner. From there, check the Apply repairs automatically box.
- Press the Next button and then follow the on-screen instructions.
7. Scan and Remove Malware From Your PC
In some rare instances, malware might be the reason you’re experiencing the issue at hand. In this case, you can resolve the problem by scanning and removing harmful programs from your PC.
Here are the steps you need to follow:
- Press Win + I to open the system settings.
- Select Update & Security from the options.
- Click Windows Security on the left-hand side.
- Select Virus & threat protection on the right-hand side.
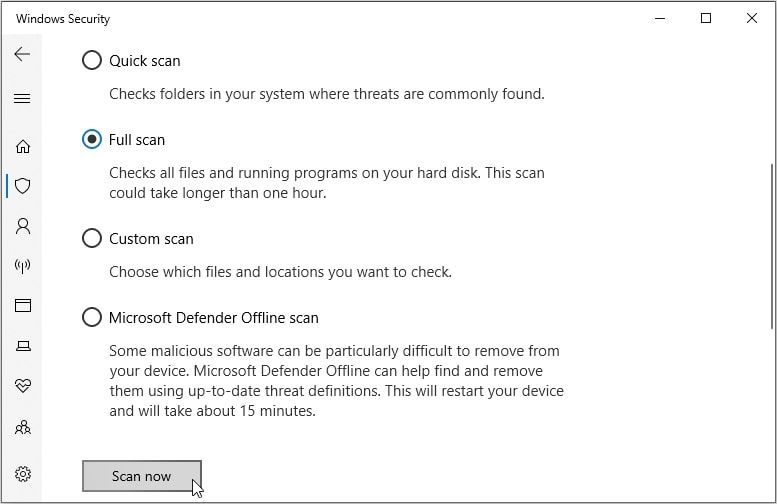
- Select Scan options on the next screen.
- Choose your preferred scan option and then press the Scan now button.
8. Use a System Restore Point
Did you start experiencing the “desktop color” issue recently? If so, then you could tackle the problem by using a system restore point.
When using a restore point, your device will return to its previous state. This means all the recent issues and bugs on your device will be removed.
But before you can use the System Restore tool, you need to create a restore point on your Windows device.
If you have an existing restore point on your PC, here’s how you can use it to tackle the issue at hand:
- Type Create a Restore Point in the Start menu search bar and select the Best match.
- Navigate to the System Protection tab and click System Restore. From there, press Next to continue.
- Select Show more restore points and then pick your preferred restore point.
- Click Next, click Finish, and then wait for the process to complete.
Say Goodbye to Strange Windows Desktop Colors
It’s really irritating when your Windows desktop suddenly turns pink or purple. But lucky for you, we’ve covered all the solutions that can help you tackle this problem.
Want to quickly access the Windows desktop? There are a lot of different methods you can try to quickly bring up all your shortcuts, no matter how many windows you have open.


