UpperFilters and LowerFilters are add-ons added by third-party software during installation. It helps installed programs communicate with your device (system) drivers. Sometimes, these filters can cause device manager errors. You will have to delete the UpperFilters and LowerFilters registry values from your Windows computer to fix the errors.
Here’s a quick step-by-step tutorial on how you can remove "upper filters and lower filters" from the registry on Windows 10.
What Is UpperFilter and LowerFilter in the Registry Editor?
UpperFilter's add-on drivers manage the device-access requests from third-party applications. It then sends the request to the primary device driver, such as the CD drive, etc.
LowerFilters add-ons work similarly by handling device access requests from the main driver. It then sends the request to the kernel driver.
Unfortunately, third-party filters can conflict with the existing device driver and other software installed on your system. In most cases, this conflict results in system issues and a device manager error.
When Should You Delete UpperFilter and LowerFilter in the Registry Editor?
Device Manager errors, such as This Device Cannot Start(Code 10), may require you to remove the UpperFilters and LowerFilters registry values as a potential fix. Filters can also corrupt or remain as leftovers after you uninstall applications and prevent the installation of other apps.
While removing the UpperFilters and LowerFilters is relatively easy, you have to be careful while doing it. Removing incorrect registry values can cause other system issues and sometimes may even require a fresh Windows install.
Before attempting to delete any registry values, make sure to create a Windows registry backup. Also, create a System Restore Point and a recovery drive or system repair disc.
If you accidentally delete the upper and lower filters and brick your PC, these recovery solutions can help you revive your system.
How To Delete the UpperFilters and LowerFilters Registry Values in Windows
Removing UpperFilters and LowerFilters from Windows Registry values is easy. Follow the instructions, and you should be able to remove them in a few minutes.
This tutorial is written for a Windows 10 PC. However, the instructions should roughly translate across other versions of the OS, including Windows 8.1 and 7.
To delete UpperFilters and LowerFilter:
- Press the Windows key + R to open Run.
- Type regedit and click OK to open Registry Editor. Click Yes when the User Account Control prompt appears.
-
In the Registry Editor, navigate to the following location. You can copy and paste the path in the address bar to navigate.
HKEY_LOCAL_MACHINE\SYSTEM\CurrentControlSet\Control\Class -
In the Class key, you will see a list of Class GUID subkeys. Each piece of hardware on your computer comes with a unique Class GUID that looks something like this:
{ca3e7ab9-b4c3-4ae6-8251-579ef933890f} - The above GUID is for a webcam, and it should look identical irrespective of the manufacturer.
- Depending on the Device Manager error you want to troubleshoot, look for the corresponding subkey under the Class subkey.
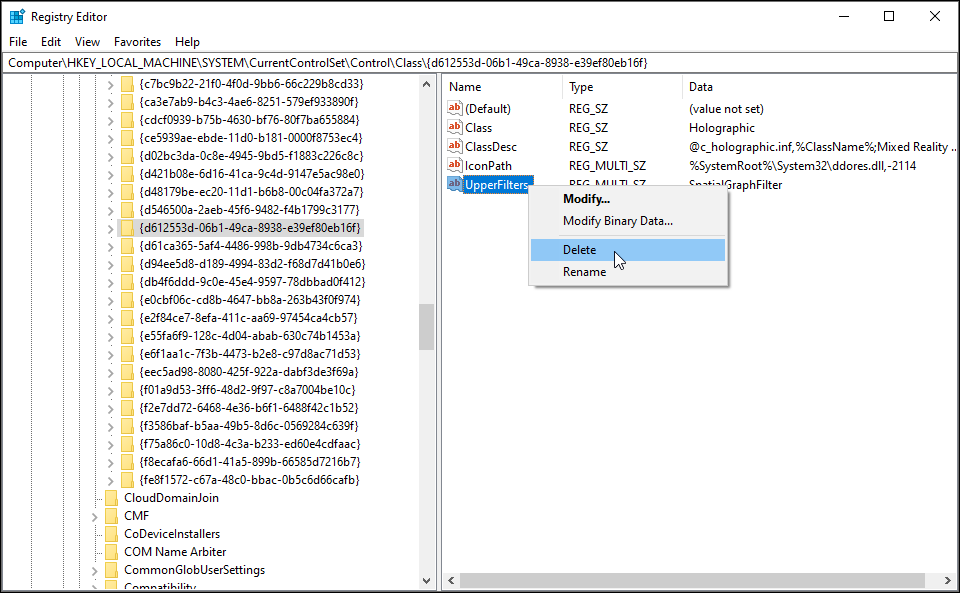
- Select the Registry Subkey and on the right-pane, locate the UpperFilters and LowerFilters values.
- Right-click on the UpperFilters value and choose Delete. Click Yes to confirm the action.
- Next, repeat the process if a LowerFilters value exists for the same GUID class subkey.
- Once done, close the Registry Editor and restart your computer.
After your PC restarts, check if the Device Manager error code appears again. Then, reinstall any software that is designed to utilize the removed filters.
How To Find the Class GUID for a Device Driver
When a Device Manager error occurs, you can quickly use the error code to find the affected device driver's Class GUID.
If not, you can manually find it in the device properties using Device Manager. Here's how to do it:
- Press the Windows key + R to open Run.
- Type devmgmt.msc and click OK to open the Device Manager.
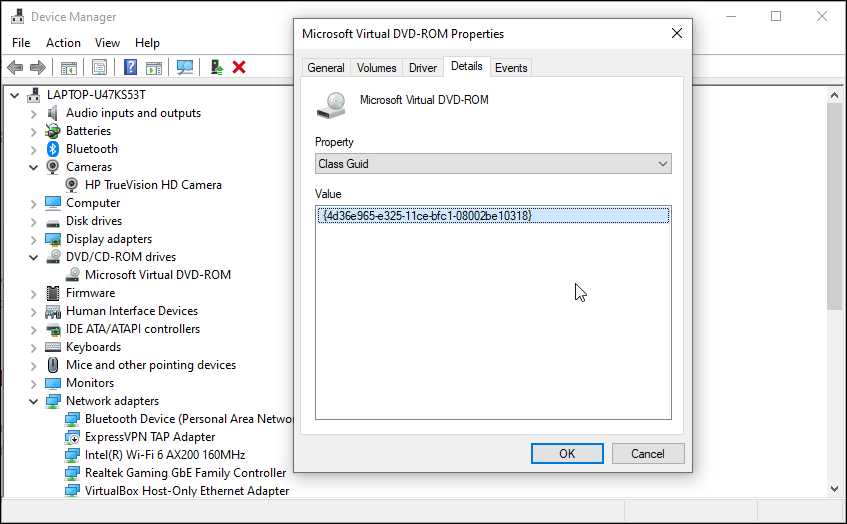
- In Device Manager, expand the device category for which you want to view the Class GUID. Then, right-click on the device driver and choose Properties.
- Open the Details tab. Click the drop-down menu and choose Class GUID.
- The Class GUID will show up under the Value section.
Safely Delete UpperFilters and LowerFilters Registry Values
Device Manager related errors are more common than you think. In most cases, to fix these errors, you need to delete UpperFilters and LowerFilters for the affected device driver.
Working with the Registry Editor may seem tricky initially. But, knowing how it works can come in handy. With a few tweaks, you can enable useful hidden settings that are not available on your Windows system by default.


