The Windows OS automatically recognizes connected external devices and map them accordingly. This saves you from the hassle of mapping external network drives manually. However, at times due to issues with the User Account Control, you may encounter the could not reconnect all network drives error.
A simple disconnect and reconnect of network drives can help you resolve this error. However, if that does not work, you can configure the Logon policy using the Group Policy Editor to resolve the error. Here we will discuss this and more solutions to fix the could not reconnect all network driver error in Windows.
1. Install the Latest Windows Updates

Microsoft recommends installing the latest update to fix the problem on an older version of a Windows computer. Check if you have a new feature update available in the update center and install them to see if that helps fix the error.
To install Windows 11 updates:
- Press Win + I to open Settings.
- Open the Windows Update tab in the left pane.
- Click on Check for updates. Windows will scan for and show pending updates.
- Click on Download & install and wait for the update to complete the installation.
- Once installed, restart your PC and check for any improvements.
2. Disconnect the Network Drives

If you know which drive is causing the error, a simple disconnect and reconnect can help you resolve the error.
To disconnect the drive:
- Press Win + E to open File Explorer.
- In the left pane, right-click on This PC and select Disconnect Network Drive. In Windows 11, select Show more options to view the disconnect drive option.
- Windows will display all the network drives connected to your system.
- Select the drive you want to disconnect and click OK.
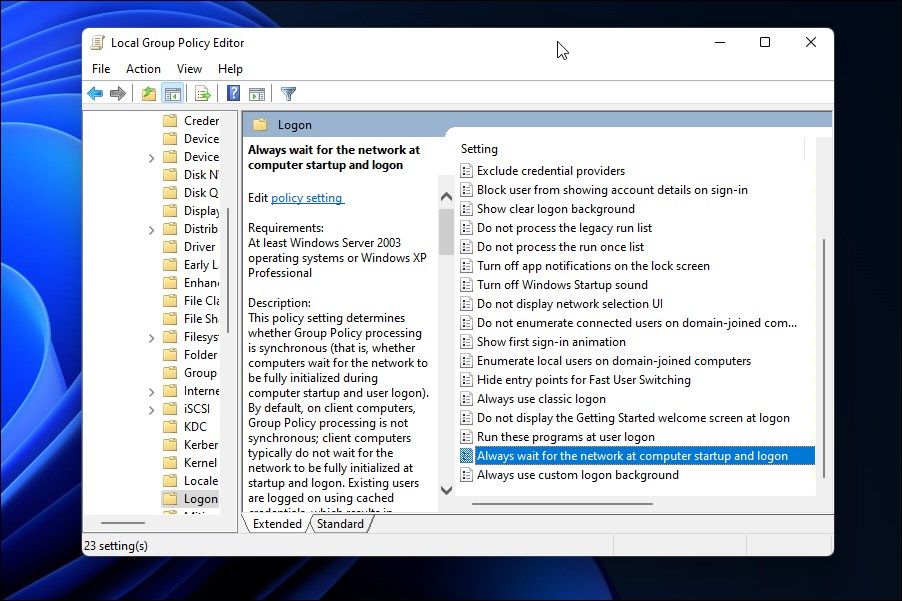
3. Force Windows to Wait for the Network on Computer Startup
As discussed previously, the could not reconnect all network drives error often occurs due to automatic mapping of network drives. To resolve this, you can make Windows wait for the network at the computer startup and log on using Group Policy Editor.
Note that Group Policy Editor is only available on Windows Pro, Edu, and Enterprise editions of the OS. Read our guide on how to enable GPEdit on Windows Home if you are using the Home edition of the OS, and then proceed with the steps below.
To change the Logon policy using GPEdit:
- Press Win + R to open Run.
-
Type gpedit.msc and click OK to open Group Polict Editor.
-
In Local Group Policy Editor, navigate to the following policy:
Computer Configuration > Administrative Templates > System > Logon -
In the right pane, locate and double-click on Always for the network at computer startup and logon policy.

- In the pop-up dialog, select Enabled.
- Click Apply and OK to save the changes.

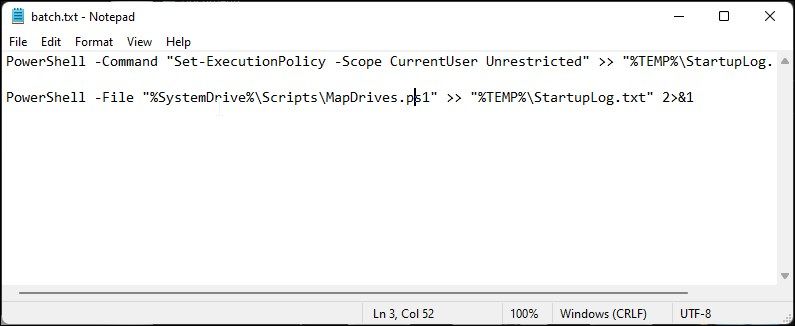
4. Map Drives Using a Batch Script
If tweaking the logon policy in Group Policy Editor did not help, you can use a batch script to fix this error. This method involves creating a new batch script for Command Prompt and PowerShell that will run at startup and map the necessary drives.
To create a batch script to map drives in Windows:
-
Open a new Notepad file. To do this, press Win + R to open Run, type notepad, and click OK.
-
Next, copy and paste the following script:
        PowerShell -Command "Set-ExecutionPolicy -Scope CurrentUser Unrestricted" >> "%TEMP%\StartupLog.txt" 2>&1
PowerShell -File "%SystemDrive%\Scripts\MapDrives.ps1" >> "%TEMP%\StartupLog.txt" 2>&1 -
Next, press Ctrl + S to open the Save dialog.
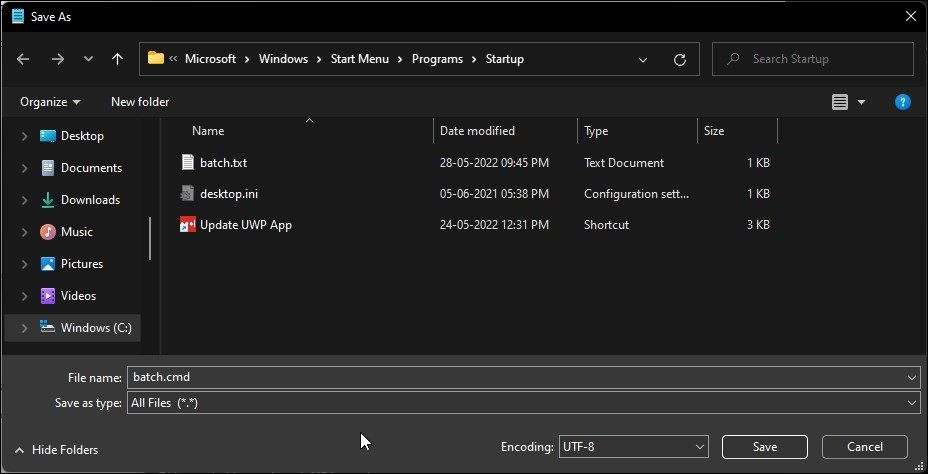
- For the File name, type batch.cmd.
- Next, click the Save as type drop-down and select All Files.
- Click Save to save the file.
-
Next, we will create a powershell script. To do this, open a new Notepad file.
-
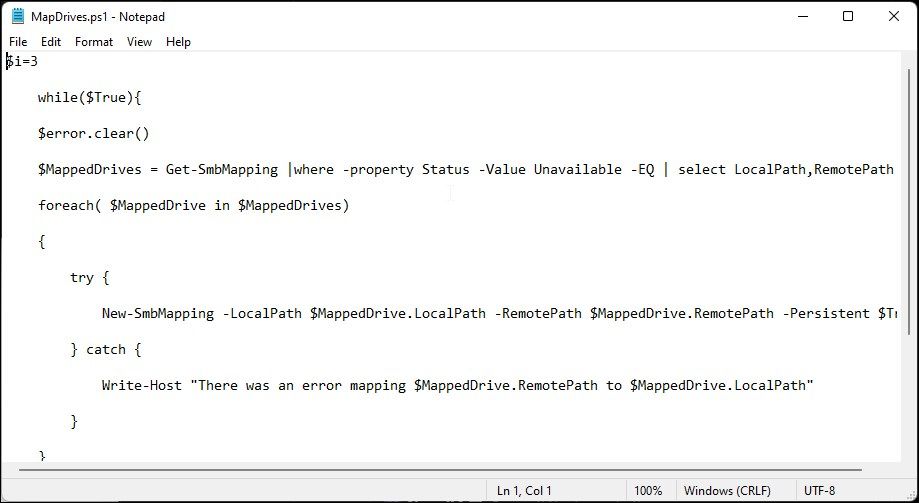
In the Notepad file, copy and paste the following script:
        $i=3

	while($True){

	$error.clear()

	$MappedDrives = Get-SmbMapping |where -property Status -Value Unavailable -EQ | select LocalPath,RemotePath

	foreach( $MappedDrive in $MappedDrives)

	{

	try {

	New-SmbMapping -LocalPath $MappedDrive.LocalPath -RemotePath $MappedDrive.RemotePath -Persistent $True

	} catch {

	Write-Host "There was an error mapping $MappedDrive.RemotePath to $MappedDrive.LocalPath"

	}

	}

	$i = $i - 1

	if($error.Count -eq 0 -Or $i -eq 0) {break}

	Start-Sleep -Seconds 30

} - Again, press Ctrl + S to open the Save dialog.
- Here, type MapDrives.ps1 as the file name.
-
Next, click the drop-down for Save as type and select All Files.
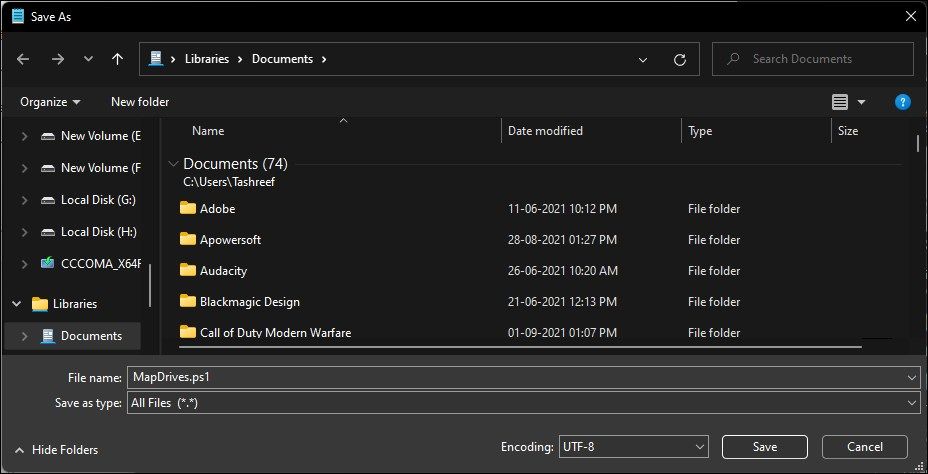
- Click Save to save the file.
- Next, you need to move the batch.cmd file to the Startup folder of your Windows computer.
- To do this, press Win + R to open Run.
-
Next, copy and paste the following path to access the Startup folder:
C:\ProgramData\Microsoft\Windows\Start Menu\Programs\StartUp - Move the batch.cmd file to the Startup folder.
- Next, press Win + E to open File Explorer. In the left pane, click on Windows C under This PC to access the C:\ drive.
- Right-click and select New > Folder.
- Rename the folder as Scripts.
- Now, move the MapDrives.ps1 file to the Scripts folder.


Once done, restart your PC. Windows will run the MapDrives script automatically when the PC restarts and resolve the error could not reconnect all network drives.
5. Use Task Scheduler to Run the Script
If, for some reason, Windows fails to run the MapDrives.ps1 script during startup, you can use the Task Scheduler to perform this task. All you have to do is create a new task to start a program and set it to run the MapDrives script created earlier. Here’s how to do it.
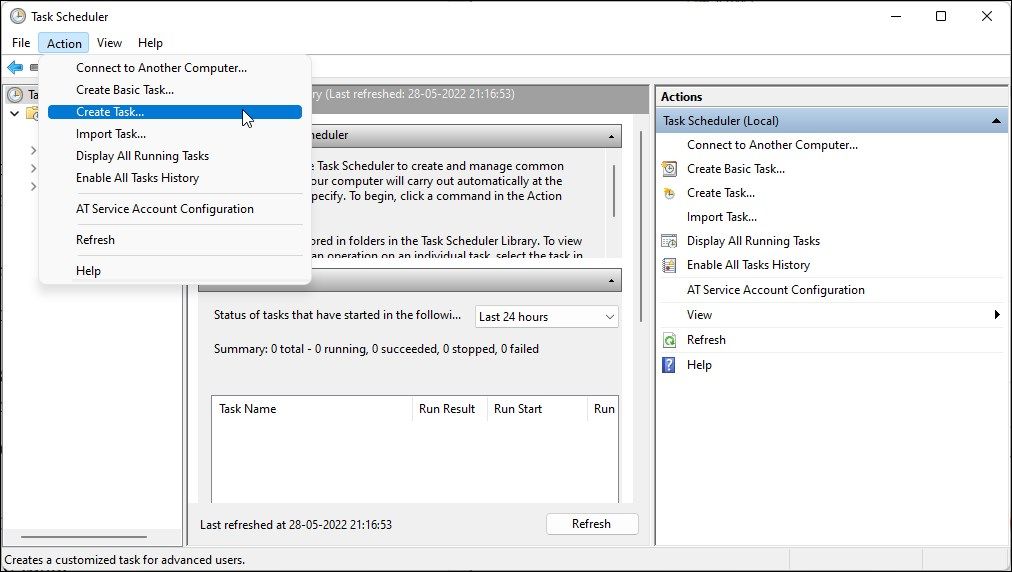
- Press the Win key, and type task scheduler. Then, click on Task Scheduler to launch the program.
-
Next, click on Action and then click on Create Task.
-
In the Name field, type a name for the task.
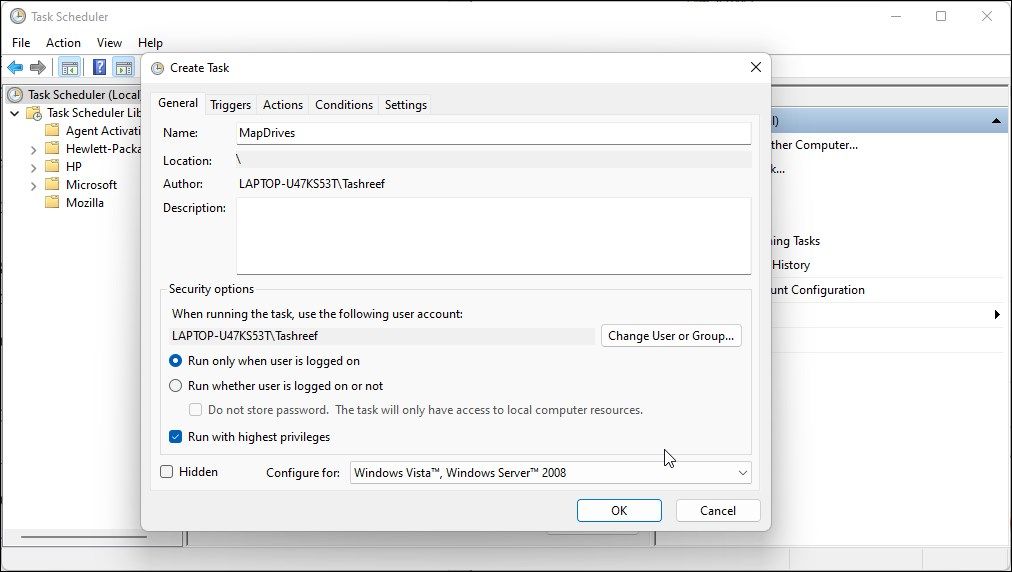
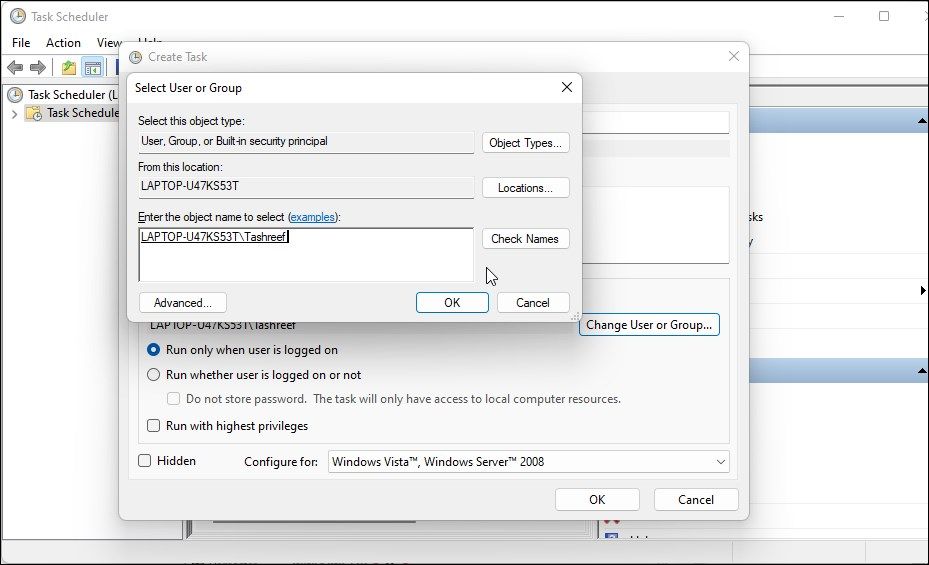
- Next, click on Change User or Group option under Security options.
- Type the username or group you want to assign the task to and click Check Names.
-
Once done, click OK.
- Next, select the Run with the highest privileges option under Security options.
- Next, open the Triggers tab.
- Click on New.
- Click the Begin the task drop-down and select At log on.
-
Next, open the Actions tab and click the New button.
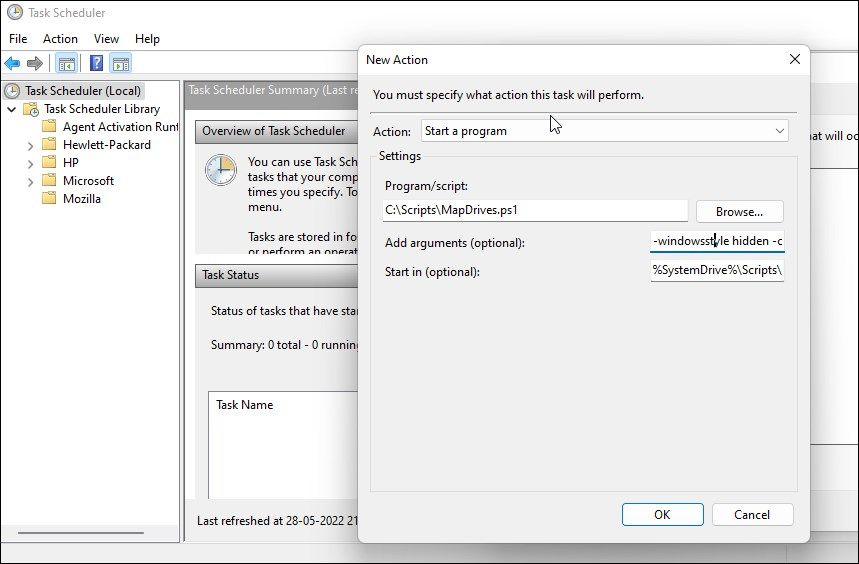
- Here make sure the Action drop-down is set to Start a program.
-
Next, click on the Browse button.
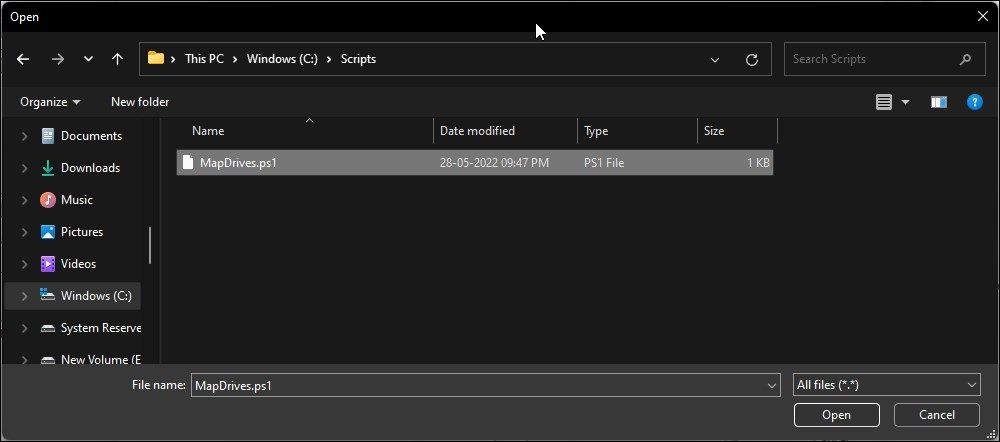
- Now select the MapDrives.ps1 script you created in the previous step and click Open.
-
In the Add arguments field, type the following:
-windowsstyle hidden -command .\MapDrives.ps1 >> %TEMP%\StartupLog.txt 2>&1 -
Next, in the Start in field, type the following:
%SystemDrive%\Scripts\ - Click OK to save the changes.
-
Next, open the Conditions tab.
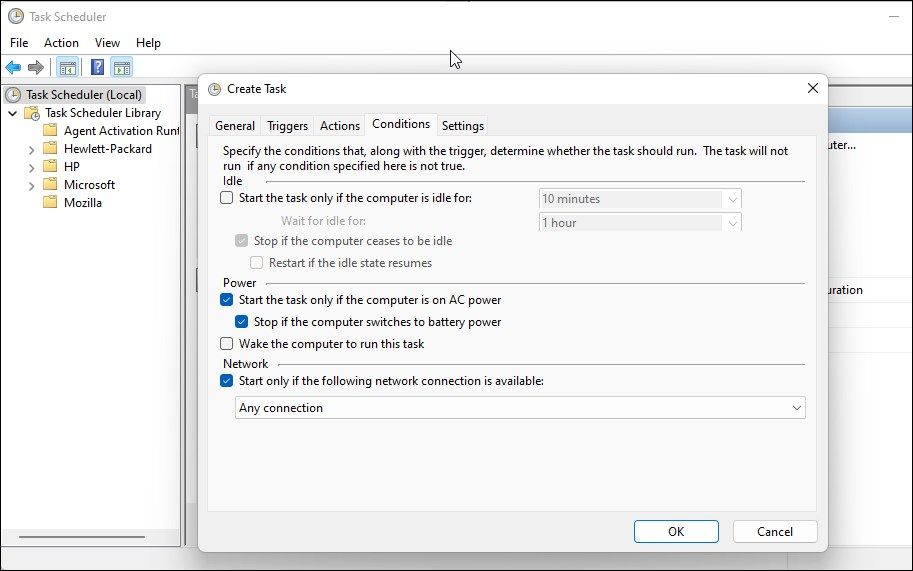
- Here, select the Start only if the following network is available option.
- In the drop-down below, select Any connection
- Click OK to save the changes.


Finally, restart your PC to apply the changes. Task Scheduler will work similarly to the Command Prompt script added to the Startup folder and run the script to map drives during logon.
6. Disable The Network Drive Notification Using Registry Editor
If you want to stop the could not reconnect all network drives notification, you can do it by tweaking a registry entry. Here’s how to do it.
Note that incorrect modification to registry entries can cause system malfunction. We recommend you create a system restore point before proceeding with the steps below.
Alternatively, you can also enable automatic registry backups in Windows 11 to be on the safer side.
Once done, proceed with the steps below to disable could not reconnect all network drives notifications in Windows.
- Press Win + R to open Run.
- Type regedit and click OK to open Registry Editor. Click Yes when prompted by UAC.
-
In the Registry Editor, navigate to the following location:
HKEY_LOCAL_MACHINE\SYSTEM\CurrentControlSet\Control\NetworkProvider - In the right pane, look for the RestoreConnection value. If it doesn’t exist, you will need to create a new value.
-
To create a new value, right-click on the NetworkProvider key and select New > DWORD (32-bit) Value.
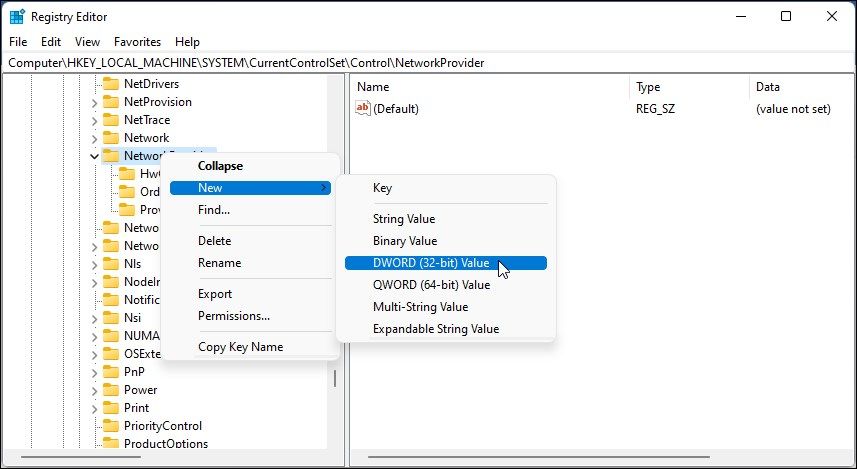
- Rename the value as RestoreConnection.
-
Right-click on RestoreConnection and select Modify.
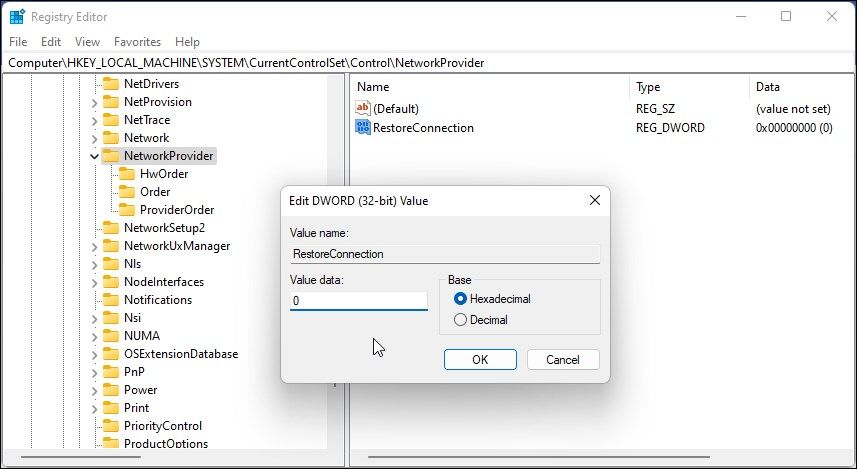
- In the Value data field, type 0 and click OK to save the changes.


Close the Registry Editor and restart your PC. While this will not resolve the error, it will likely prevent the annoying error notification popup each time you log in.
Resolve the "Could Not Reconnect All Network Drives" Error in Windows
While the troubleshooting tips in the article are useful, you can also use a third-party network drive manager for the correct management of network drives. These tools ensure network drives get properly connected after logon and minimize the chances of network drive-related errors.