You might need to convert a disk drive to Dynamic mode for several reasons. One of the main ones is when you want to install a series of hard drives in Raid configuration.
If you're not used to managing partitions, volumes, and disk spaces, just the idea of converting a disk can seem daunting. Thankfully, as long as you are careful, it is actually much easier than it might sound.
What Is the Difference Between Basic and Dynamic Disks on Windows?
Basic and Dynamic are the two available disk configurations available in Windows. They essentially do the same things but in slightly different ways.
Basic disks can have up to four partitions. Or three standard partitions and an extended partition that can contain several logical drives. Basic disks support two types of partition: MBR and GPT. Your laptop or desktop PC most likely uses the Basic disk configuration.
Dynamic disks use volumes rather than standard partitions and are much more flexible in how they use space. Disk volumes can be extended and shrunk more easily. Dynamic disks have a few different volume types available for use, including Simple, Mirror, and Striped. These alternative volume types allow for more advanced storage configurations, such as Raid-5, that aren't available on a basic disk.
1. How to Convert a Dynamic Disk to Basic in Disk Management
The built-in Windows Disk Management tool lets you convert any compatible disk from Dynamic to Basic. All partitions and data will be deleted, so it is best done with a disk that isn't currently being used.
If you need the data on the disk, create a full backup before continuing any further.
- Search for and open Disk Management on your computer. The tool will be labeled as Create and format hard drive partitions in Windows Search.
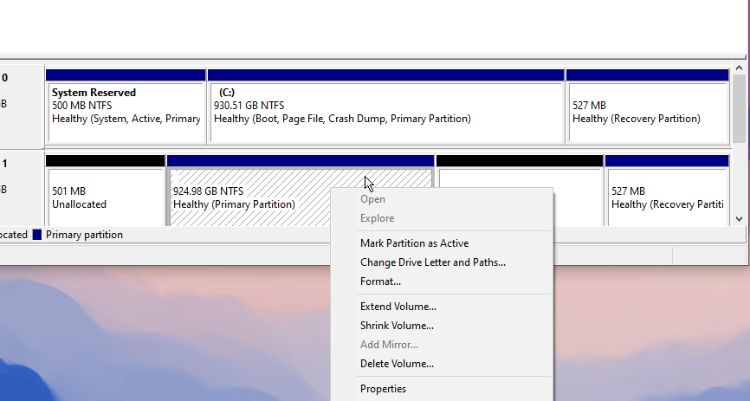
- Locate the Dynamic volume in Disk Management.
-
Right-click on each partition in the dynamic disk and select Delete Volume. Confirm deletion when prompted.
- When all volumes have been deleted, right-click on the disk name and choose Convert to Basic Disk from the menu.

The disk might automatically convert to basic when you delete all of its volumes. It depends on the version of Windows you are currently using.
If you have anything more than a single partition on your hard drive, Windows Disk Management is a very useful tool to understand well. Check out our guides to solving SSD errors and managing external drives with this powerful utility.
How to Convert a Dynamic Disk With Mirror Volumes
If the disk you want to convert from Dynamic to Basic has mirror volumes on it, you will need to break them down before you can convert the disk.
Open Disk Management as detailed previously. Find the mirror volumes on the disk and right-click on each of them. Select Break Mirror Volume from the menu.
Once all mirror volumes have been broken, you can continue to delete partitions, as explained above. Follow the remaining steps to convert the Dynamic Disk to Basic.
We discussed mirror volumes in detail in our piece about what Windows Storage Spaces are.
2. How to Convert a Dynamic Disk to Basic With Command Prompt
You can also use Command Prompt to convert a Dynamic Disk to Basic. This can be useful if you cannot fully access Windows to use Disk Management.
Run the Command Prompt tool as an administrator. You will need elevated access to make changes to disks.
- In Command Prompt, type diskpart. This starts the disk partitioning utility within the terminal.
- If you don't know the label of the disk you want to convert, type list disk and press Enter.
-
Type select disk [number]. Replace [number] in the command with the disk number you want to convert. For example, select disk 1.
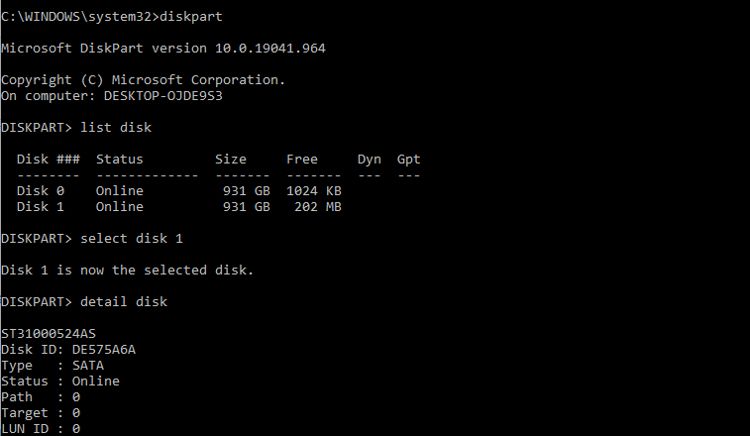
- Now type detail disk to show the different volumes on the disk you selected.
-
Type select volume [number], followed by delete volume [number]. Replace [number] in the command with the actual volume number each time.
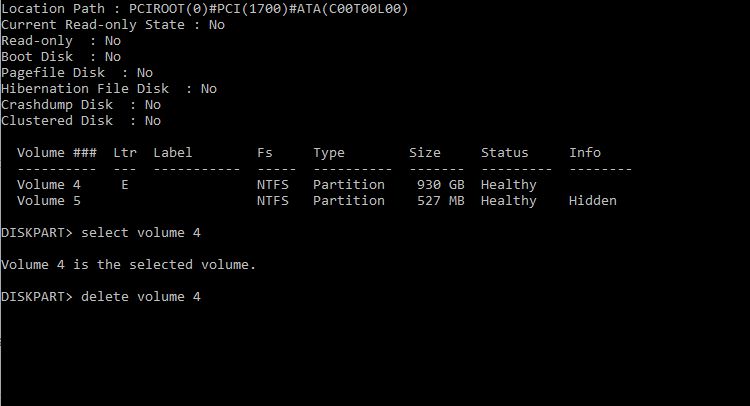
- Repeat this for each volume on the disk until all the existing disk volumes are deleted.
- Finally, type select disk [number] again, then type convert basic.


3. How to Change a Dynamic Disk to Basic Without Losing Data
There are ways to convert a disk from Dynamic to Basic without losing the data it contains, but you will need to use a third-party app. In this example, we are using the EaseUS Partition Master.
- Install the EaseUS Partition Master Suite and then start the Partition Manager.
- Click Disk Converter and choose the type of conversion you want to perform. In this case, Convert Dynamic to Basic.
-
Click Next and select the disk you want to convert. Then click the Convert button.
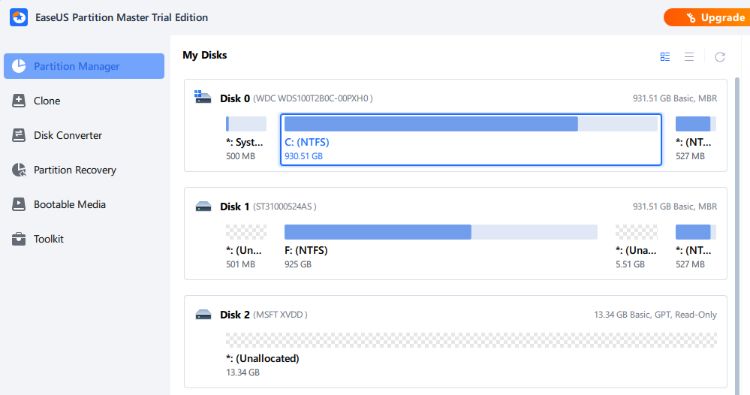

When the conversion process finishes, return to the Partition Manager tab. Here, you can move or resize the partitions that were copied over when converting the disk. Just right-click on the disk partition and choose the option you need from the menu.
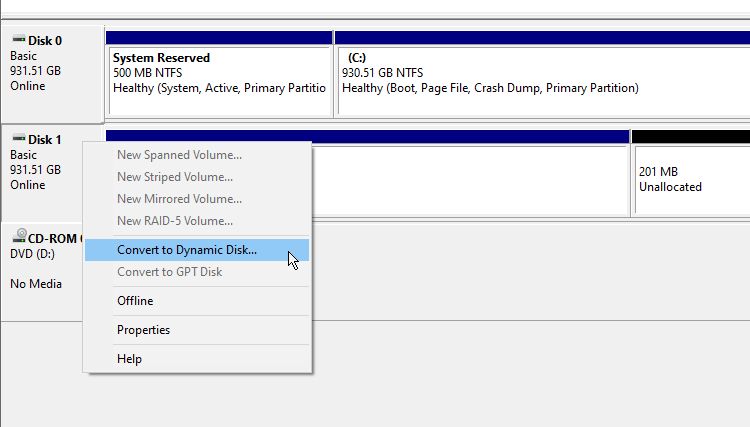
Can I Convert Basic Disks to Dynamic Disks?
Yes, you absolutely can. In fact, basic disks can be converted to dynamic disks without any loss of data. You can do this in the Disk Management tool.
- Right-click on the label of the basic disk you want to convert.
-
Select Convert to Dynamic from the menu and confirm the correct disk is selected.
- Check that everything matches your requirements in the Disks to Convert window. Then click Convert.

You might encounter an error message telling you that "there is not enough space available on the disk for this operation." This is because the process needs to create a database for the dynamic operation. This requires at least 1MB of unallocated space at the end of the MBR disk you want to convert.
There are other possible errors that can occur, but a lack of space is the most common. If you are still struggling to complete this usually straightforward process, tools such as EaseUS Partition Master can help.
Converting Dynamic Storage Disks in Windows
Converting a disk from Dynamic to Basic storage mode sounds like a more complicated process than it actually is. And although it can go wrong if you are not careful about what you do, there are several relatively easy ways to go about it.