Running the check disk (CHKDSK) tool on Windows can help you troubleshoot tons of issues. However, it's frustrating when this tool displays error messages like, “CHKDSK cannot continue in read-only mode.” How do you tackle such issues?
We’ll help you out by exploring the six easy methods you can apply. But first, let’s briefly discover how the CHKDSK scan works.
What Is CHKDSK?
The CHKDSK (Check Disk) feature is a diagnostic tool that helps resolve various Windows system issues. In fact, this is the first tool you often need to use when your PC becomes buggy or slow.
When you run the CHKDSK tool, it scans your entire drive to find and fix errors. In some instances, this tool also scans and tries to repair bad sectors (disk sections that are severely damaged).
However, the CHKDSK tool might often run into its own issues too. In this article, we'll explore the "CHKDSK cannot continue in read-only mode" error.
Here are the methods you can apply to resolve the issue at hand.
1. Close Active Programs and Restart File Explorer
You’ll likely encounter this issue if you’re scanning a disk that’s currently in use. So, the solution would be to close your active programs and see if that helps.
If the issue persists, restart File Explorer through these steps:
- Press Win + X to open the Quick Access Menu.
- Select Task Manager from the options.
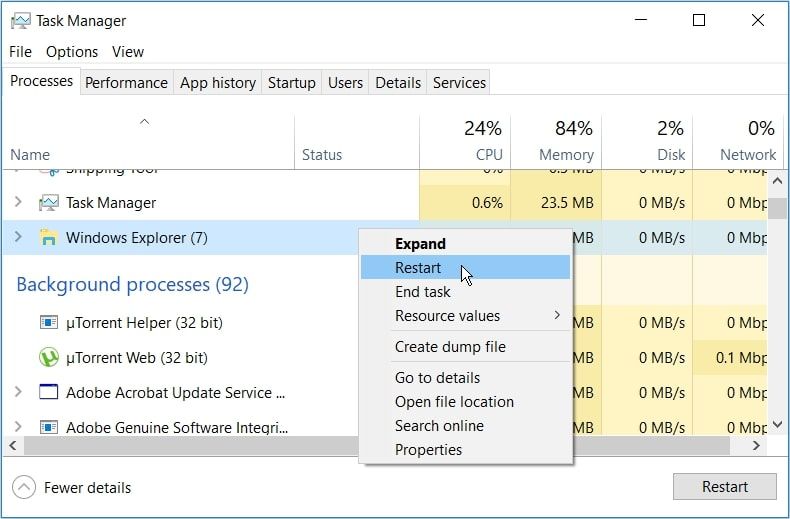
- Right-click on Windows Explorer and then select Restart.
Alternatively, close File Explorer completely and see if that helps. Here are the steps you should follow:
- Open the Task Manager by applying the previous methods.
- Right-click Windows Explorer and select End task.
2. Disable the “Read-Only” Option on Your Removable Storage Devices
Are you encountering this issue while using a removable storage device? To tackle the issue, you'd need to disable the “read-only” mode on the affected disk.
Well, the good news is that Windows allows you to disable read access on your removable storage devices!
Here’s how to disable the “read-only” mode on Windows:
- Press Win + R to open the Run command dialog box.
- Type gpedit.msc and press Enter to open the Local Group Policy Editor.
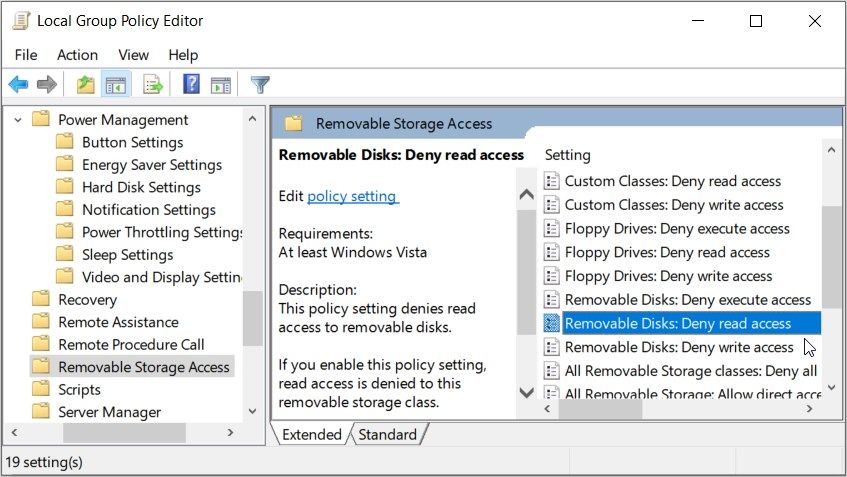
- Navigate to Computer Configuration > Administrative Templates > System > Removable Storage Access.
- Locate the Removable Disks: Deny read access option on the right-hand side.
To disable the “read-only” mode, double-click on the Removable Disks: Deny read access option and select Enabled. Alternatively, select Disabled or Not Configured to enable the “read-only” mode.
From there, press Apply and then press OK. Finally, restart your device to save these changes.
3. Run the CHKDSK Tool in Safe Mode
In some instances, the CHKDSK tool might be disrupted by faulty third-party tools. To resolve the problem, you’d have to run the CHKDSK tool in safe mode.
Here are the steps you need to follow:
- Type Settings in the Start Menu search bar and select the Best match.
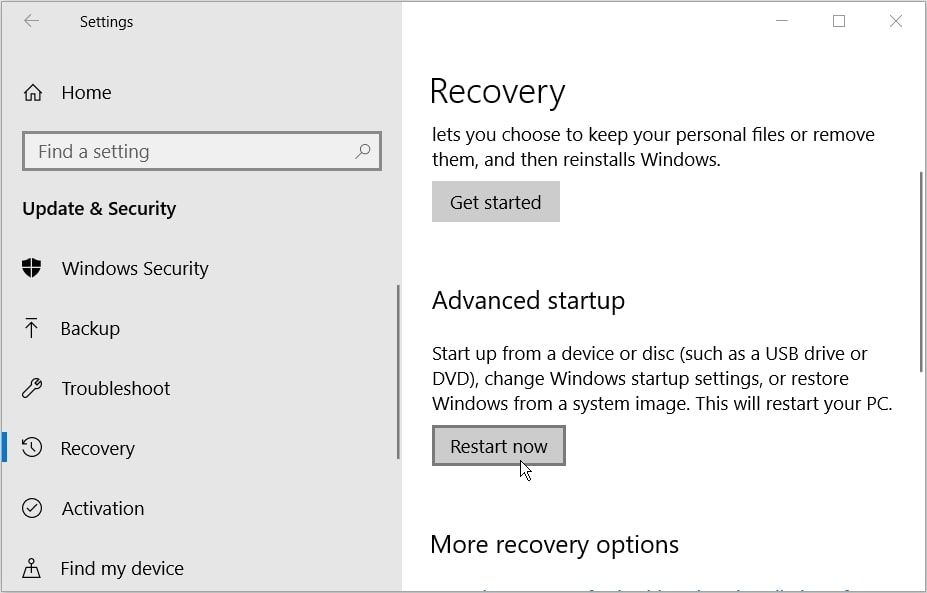
- Select Update & Security and then click Recovery on the left-hand side pane.
- Next, press the Restart Now button on the Recovery window. This will restart your PC in the Recovery Environment.
Next, click Advanced options and select Startup Settings. Finally, press the Restart button and press the F4 key to boot your PC into Safe Mode.
Now, try running the CHKDSK tool and check if the issue is resolved.
To run a normal CHKDSK scan, type the following command and press Enter:
chkdsk C: /f
To run the CHKDSK tool and scan for bad sectors, type the following command and press Enter:
chkdsk C: /r
In each of these steps, you might want to change the C: command with the letter of the relevant drive. For example, use D: instead of C: if you want to scan the D: drive.
If the issue gets resolved, then it’s safe to say that there’s a faulty program on your device. So, the best way to completely tackle this issue is by uninstalling or updating suspicious apps.
4. Schedule a CHKDSK Scan to Run When the Device Restarts
Still struggling to resolve the “CHKDSK” error? You might want to consider scheduling the scan to run immediately when the device boots up. That way, the tool will run freely without any interruptions.
So, here’s how to schedule a CHKDSK scan to run when your device restarts:
- Type Command Prompt in the Start menu search bar.
- Right-click on the Best match result and select Run as administrator.
- Type the following command:
chkdsk /r C:
If you want to scan any other drive other than the C: drive, replace the C: command with the letter of the relevant drive. From there, press Enter. Next, type Y and press Enter to proceed.
Finally, restart your PC. The system should automatically run a CHKDSK scan when it boots up.
5. Scan Your Device via the System Settings
Alternatively, you could run a scan using the Windows settings. This should get rid of the system issues that interfere with the CHKDSK tool.
Here are the steps you need to follow:
- Type Settings in the Start menu search bar and select the Best match.
- Select Update & Security. Next, select Windows Security on the left-hand side pane.
- From there, select Virus & threat protection on the right-hand side.
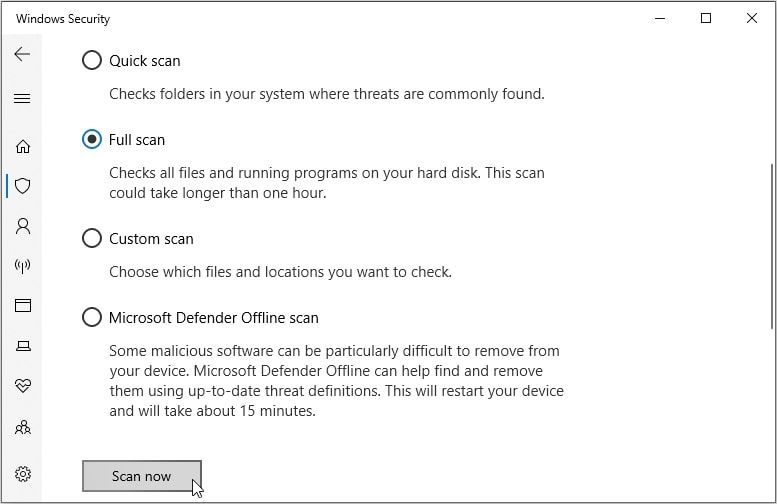
- Next, select Scan options and then choose the Full scan option.
- Finally, press the Scan now button and follow the on-screen instructions.
6. Use the SFC and DISM Tools Instead
There’s no denying that the CHKDSK tool is an incredible feature. However, you can still scan and fix issues using reliable tools such as SFC and DISM.
The SFC and DISM tools help you repair or replace corrupted system files. So, we’ll check out how you can run these tools.
Let’s start with the DISM tool:
- Type Command Prompt in the Start menu search bar.
- Right-click on the Best match result and select Run as administrator.
- Type the following command and press Enter:
DISM /Online /Cleanup-Image /ScanHealth
From there, type the following command and press Enter:
DISM /Online /Cleanup-Image /RestoreHealth
Wait for the DISM scan to complete. From there, restart your device.
Next, run the SFC tool through these steps:
- Open the Command Prompt by applying the previous methods.
- Type the following command and then press Enter:
sfc /scannow
Wait for the scan to complete. Finally, close the Command Prompt and restart your device.
Your “CHKDSK” Problems Are Now Resolved
CHKDSK errors can be quite irritating. But hopefully, the methods we’ve covered should help you resolve your “CHKDSK cannot continue in read-only mode” error.
While you’re at it, you might want to check out the difference between CHKDSK, SFC, and DISM. This will help you determine the best tool to use when your device runs into various issues.


