
When a file is marked as read-only on Windows, you can only view it and not change it in any way. This essentially protects important files from unauthorized changes.
On Windows, you can set or remove the read-only attribute for a file by modifying its properties. Alternatively, you can also run a command in Command Prompt or Windows PowerShell to do the same. In this article, we take a look at all of them.
1. How to Change the Read-Only Attribute for Files by Modifying Properties
The easiest way to set or remove the read-only attribute for a file on Windows is by modifying its properties. Here’s how you can go about it.
- Open File Explorer and navigate to the file for which you want to change the read-only attribute.
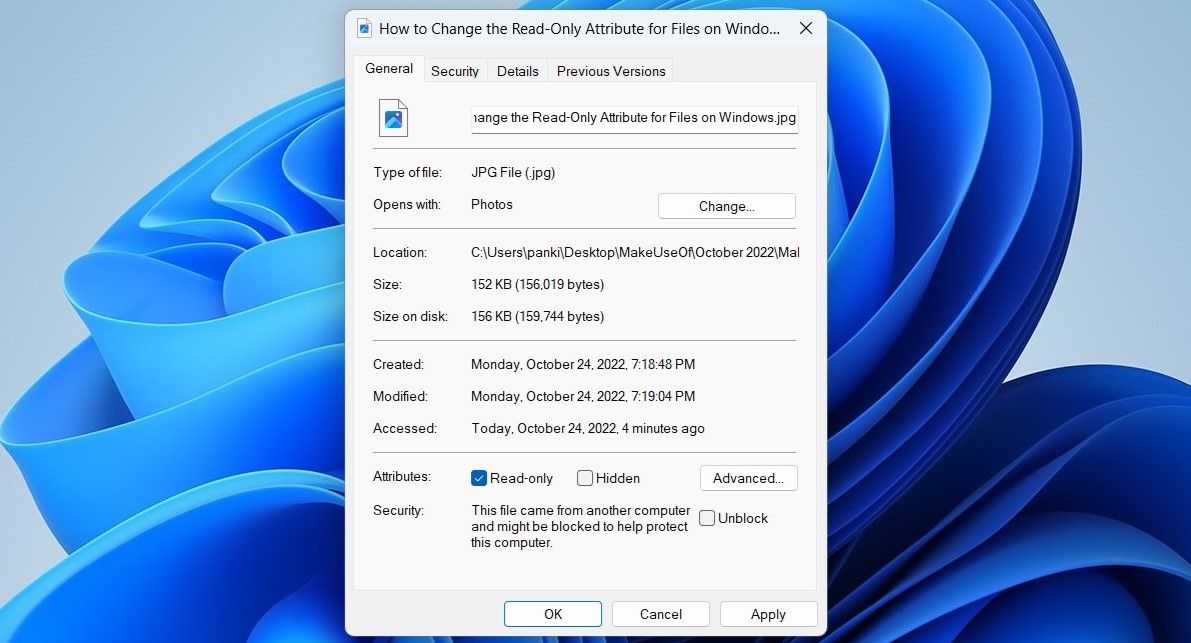
- Right-click on your file and select Properties.
- Under the General tab, check or uncheck the Read-only box.
-
Click Apply followed by OK.

Note that Windows may prevent you from changing the read-only attribute of a file if you don’t have the necessary permissions to modify the folder in which the file is located. In that case, you must take ownership of the folder first. If you need help, check our guide on how to take ownership of folders on Windows.
2. How to Change the Read-Only Attribute for Files Using the Command Prompt
Command Prompt is one of two command-line tools available on Windows. You can use it to run batch files, troubleshoot errors, and perform various other tasks. It also lets you change a file's read-only attribute with a single command. Here are the steps you need to follow.
- Right-click on the file for which you want to modify the read-only attribute and select Copy as path.
- Press Win + X to open the Power User menu.
- Select Terminal (Admin) from the list.
- Select Yes when the User Account Control (UAC) prompt appears.
-
In the console, type the following command and press Enter to set your file as read-only.
attrib +r "FilePath"
Replace FilePath in the above command with the actual path of the file copied earlier.

Once you run the above command, the file will be set as read-only. Likewise, if you want to remove the read-only attribute for a file, use this command:
attrib -r "FilePath"
Once you remove the read-only attribute for a file, you should be able to edit or modify it.
Like using Command Prompt? Check our guide to learn how to master Command Prompt on Windows.
3. How to Change the Read-Only Attribute for Files Using Windows PowerShell
You can also run a command in Windows PowerShell to change the read-only attribute for a file.
To change the read-only attribute using PowerShell:
- Right-click on the file for which you want to change the read-only attribute and select Copy as path.
- Click the magnifying icon on the taskbar or press Win + S to open the search menu.
- Type Windows PowerShell and select Run as Administrator.
- Select Yes when the User Account Control (UAC) prompt shows up.
-
Paste the following command and press Enter to set your file as read-only.
Set-ItemProperty -Path "FilePath" -Name IsReadOnly -Value $True
Replace FilePath in the above command with the actual path of the file copied earlier.

Alternatively, if you want to remove the read-only attribute for a file, use this command:
Set-ItemProperty -Path "FilePath" -Name IsReadOnly -Value $False
Modifying the Read-Only Attribute for Files on Windows
It’s worth noting that most system files on Windows will have the read-only attribute by default. So, make sure you don't modify them by mistake. For your other files, you can pick any of the above methods listed above to set or unset their read-only attribute.