There are many reasons why Windows can't be installed on a disk, but it's not immediately obvious as to what those reasons are. Fortunately, there is a range of different fixes you can try to get Windows installed onto your disk.
Let's explore how to fix the "Windows Cannot Be Installed to This Disk" error and the different forms that it can take.
Why Does the "Windows Cannot Be Installed to This Disk" Error Appear?
There are several iterations of the “Windows cannot be installed to this disk” error. Identifying which iteration you are getting goes a long way to figuring out what you need to do to get Windows installed.
The error occurs when your hard drive partition style doesn’t support your BIOS (Basic Input/Output System) version. BIOS has two versions: Unified Extensible Firmware Interface (UEFI) and Legacy BIOS.
As you can likely tell by the names, UEFI is more modern while Legacy BIOS is pretty old. Each of these versions only works with a certain hard drive partition style. When there’s a mismatch, you get the “Windows cannot be installed to this disk” error.
What Partition Style Will Work for You?
To figure out what you need to do to fix this error, you need to take a look at what the second sentence of the error message reads.
If the second sentence in your error message reads “The selected disk is of the GPT partition style,” it means your PC has a Legacy BIOS. BIOS doesn’t work with the GPT partition style, so you’ll need to convert to MBR.
If the second sentence in your error message reads “The selected disk has an MBR partition table. On EFI systems, Windows can only be installed to GPT disks,” it means your PC has a UEFI BIOS. You can install Windows only on GPT partition-style disks on an EFI system.
How to Fix the "Selected Disk Is of the GPT Partition Style” Error
If your PC uses Legacy BIOS, you can’t install Windows on a GPT partition disk. In this case, you’ll need to convert the drive before you can install Windows.
Check Your BIOS Version to Confirm UEFI Isn’t Available
Before you do that, double-check to see if your PC supports UEFI. You can check your BIOS version by going into the BIOS when your PC boots. Start your PC, and press the BIOS key. The BIOS key may differ among manufacturers, but the most commonly used keys are F1, F2, F10, F12, or DEL.
When you’re in BIOS, you’ll need to look for the Boot mode. Again, there is no one step-by-step process here. You will need to look through all tabs, but generally, there’s a Boot tab, and this is where you’ll find Boot mode.
If your boot mode is set to Legacy and UEFI doesn’t appear as an option, you can’t use your GPT disk partition. At this point, you’ll need to convert it to an MBR partition table.
Convert an MBR Disk to GPT
There are two methods to convert a GPT disk partition to MBR. Unfortunately, both methods wipe the data stored on the disk. Alternatively, you could use third-party software to convert your GPT partition disk to MBR without losing data.
1. Convert From MBR Disk to GPT Using Command Prompt
You can use the command prompt if you don’t have any other operating systems installed on another hard drive. Note that this method will erase all the data stored on the drive you’re about to convert.
- Start by inserting Windows Installation Disk and wait for the Windows Setup screen. Press Shift + F10 to open the command prompt.
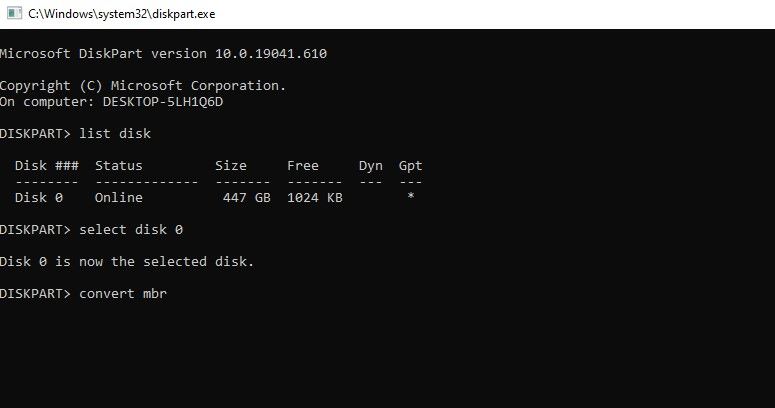
- Type diskpart and press Enter.
- Type list disk to fetch a list of drives on your computer.
- Choose the disk you want to convert to MBR. This should be the disk on which you want to install Windows. You can choose the disk with select disk 0.
- Run clean then convert mbr to convert the partition to MBR.
When you’re done, exit the command prompt. Return to the Windows installation and run the install again.
2. Convert From MBR Disk to GPT Using the Disk Management Utility
If your system already has another copy of Windows on a different drive, you can use the Disk Management Utility on that copy to convert a GTP partition disk to MBR.
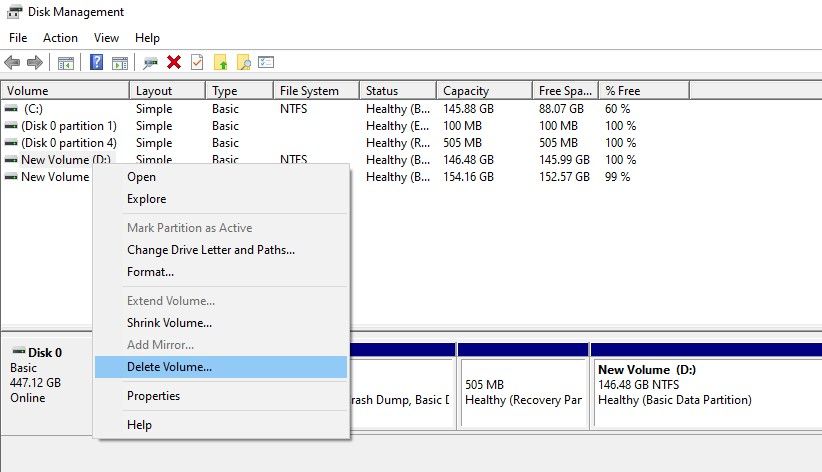
- Type Disk Management in the search bar beside the Start Menu. The first item in the search results will be Create and Format Hard Disk Partitions. Press Enter to open the Disk Management Utility.
- Find the disk you’re trying to convert from the list displayed in the utility. Right-click on it and select Delete volume.
- Next, right-click on the same disk and select Convert to MBR disk.
How to Fix the "Selected Disk Has an MBR Partition Table” Error
If your PC has a UEFI BIOS, you’ll need a GPT partition disk to install Windows. If you have an MBR partition, you’ll need to convert it to a GPT partition disk.
1. Try to Disable EFI Boot Sources
If you don’t want to convert the partition, go to the BIOS and see if it allows you to disable EFI boot sources. When you’re in the BIOS, navigate to the Boot Order section and search for EFI boot sources. Disable it and run Windows installation. Once the installation completes, re-enable EFI boot sources.
If the option to disable EFI sources isn’t available, you’ll need to convert the partition.
2. Convert From MBR to GPT Using the Command Prompt
The method we used to convert the GPT partition to MBR also works here. The only thing that will change is the command in step 5. Instead of convert mbr, type convert gpt instead.
When you’re done with the previous steps, exit the command prompt and continue with the installation.
3. Convert From MBR to GPT Using a Windows Installation Disk
During the installation process, you’ll be asked to select a disk on which you want to install Windows. Select the disk you want to install Windows to and click on Delete.
Next, choose the same disk and click on New and create a partition in GPT style. Click Next and continue with the installation. This should fix the error and you’ll be able to move forward with the installation.
How to Fix "the Computer's Hardware May Not Support Booting to This Disk" Error
When you encounter this error, you'll need to check if hard disk protection is enabled or disabled. If that doesn't work, see if the SATA controller is set up correctly.
1. Disable Hard Disk Protection
If you didn't configure the computer yourself, the best course of action is to speak with the technician who did and request them to disable hard disk protection.
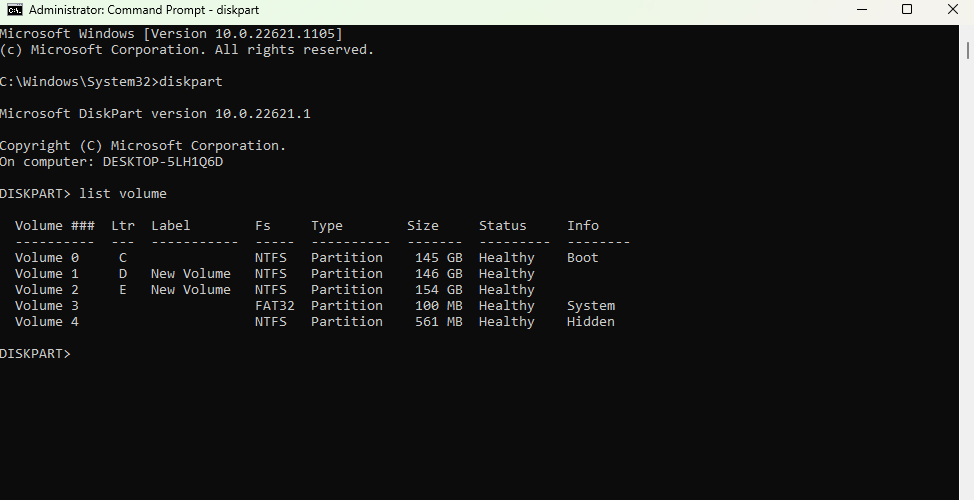
You should also ensure you haven't added protection on writing to the hard disk yourself. Check if you've mistakenly enabled write protection from within Windows and disable it. To do this, search for cmd in the Start Menu and select to launch it as an administrator. Execute the following commands in the same sequence:
diskpart

            list volume
Note the volume number for the drive with write protection enabled and then execute the following commands:
select volume 2

            attributes volume clear read-only

            exit
Replace the drive letter E with the relevant letter.
2. Configure the SATA Controller Mode
The error also results from incorrectly configured SATA Controller mode in BIOS. You can either reset the BIOS to default.
Alternatively, you can manually change the SATA mode or hard disk mode in the BIOS. If the current hard disk state is IDE, change it to AHCI, and vice versa.
In case the hard disk is RAW, Windows won't detect it as System or Boot and automatically give it read-only attributes. Fixing this error requires changing the default SAN policy.
Your Disk Partition Error, Solved
Hopefully, this solved your “Windows cannot be installed to this disk” error. There are various other issues you may encounter during the Windows installation process. However, they are almost always an easy fix.


