
Windows Backup and Restore is a handy way to quickly and easily create backups of your system. However, the utility doesn’t always work as expected. For example, users on operating systems ranging from 7 to 11 will sometimes encounter the 0x8078012D error with Windows Backup and Restore.
The 0x8078012D error arises when users try to create a backup and is accompanied by an “operation failed” message. And until the error gets fixed, afflicted users can't create a backup using the tool. As such, here is how you can fix the 0x8078012D error in Windows 10 and 11.
1. Run a System File Check
Some corrupted system files might be affecting Backup and Restore’s backup process. Fortunately, the System File Checker (SFC) tool is one of the best built-in Windows utilities for solving such problems.
However, before you jump into performing an SFC scan, we recommend running a Deployment Image Servicing beforehand to check for system image issues. Here is how you can run both of those scans in the Command Prompt:
- You will first need to launch the Command Prompt with administer privileges. Check out our article about opening the Command Prompt if further instructions are required.
-
Input this deployment image scan command (pressing Enter to execute):
DISM.exe /Online /Cleanup-image /Restorehealth -
Start the SFC scan by typing the following text in and pressing Enter:
sfc /scannow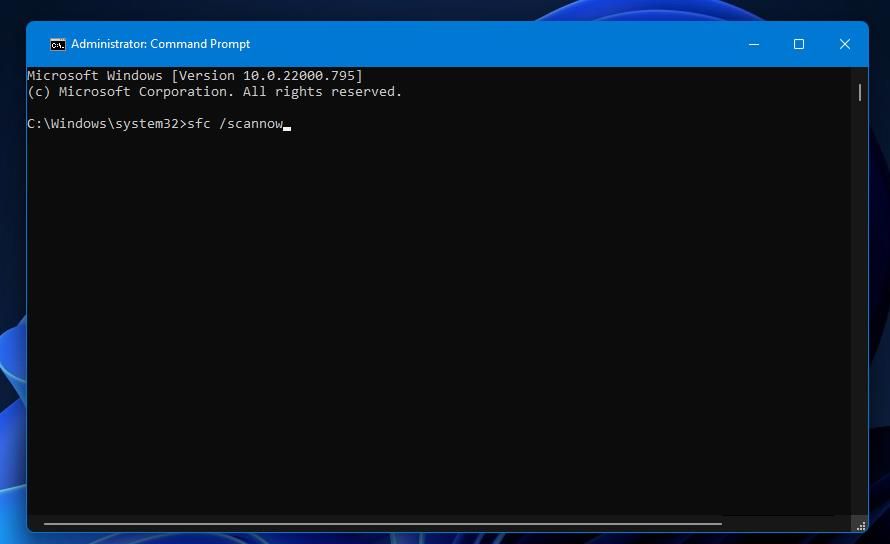
- How long the scan takes can vary, but it will probably take about 15-20 minutes at least. Don’t close this window until the scan reaches 100 percent and shows an outcome message.

2. Run a Check Disk Scan
The 0x8078012D error can arise because of corrupted hard drive sectors. So, you may need to run a Check Disk scan (otherwise known as CHKDSK) to resolve error 0x8078012D. You can run a CHKDSK scan like this:
- Start the Command Prompt app with administrator rights.
-
Input this CHKDSK scan command and hit Return:
chkdsk /r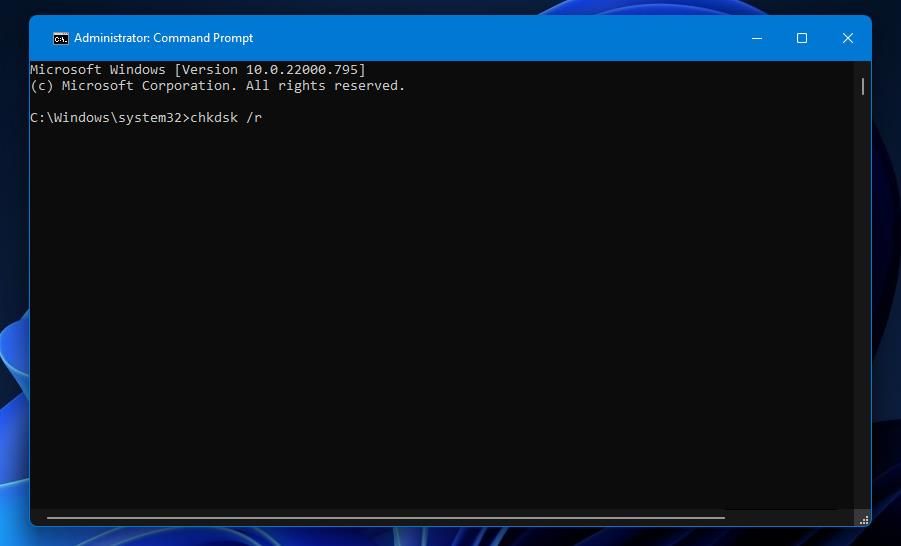
- Press the Y key to schedule the scan for a restart.
- Restart Windows to initiate the scan.

3. Try Selecting a Different Backup Location
If you have a different storage device you can back up to, try using that backup location instead. The Windows Backup tool may carry out the system backup without issues when you select a different location.
You can choose a different location option on the Create a system issue window shown directly below.

4. Check If the Windows Backup and Shadow Services are Enabled
The system image backup operation could be failing because a service required for it is disabled. Both the Windows Backup and Volume Shadow Copy services need to be running for the backup operation to complete without issue.
Here is how you can enable and start those Windows services:
- Start the Run dialog, which has a handy Win + R keyboard shortcut for launching it.
- Open Services by inputting services.msc within the Run’s command box and clicking OK.
-
Double-click the Windows Backup service listed there.

-
Is that service disabled? If yes, select the Automatic option on that service’s Startup type drop-down menu.
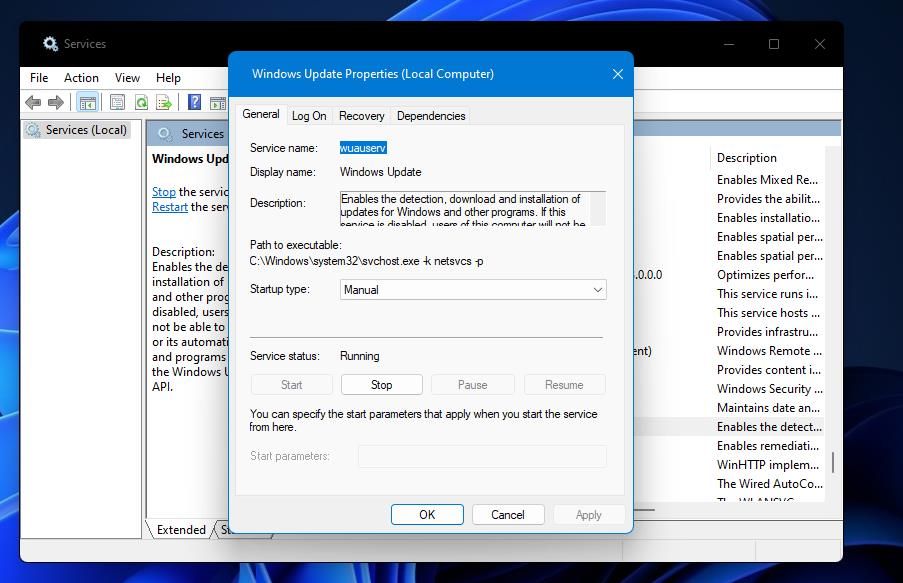
- Click Start in the Windows Backup Properties window.
- Make sure you click the Apply button and then select OK.
- Repeat steps three to six for the Volume Shadow Copy service.


5. Disable Any Third-Party Antivirus Tools
Conflicting third-party antivirus suites are another common cause for the 0x8078012D error. If you have third-party antivirus installed on your PC, disable its protection via its context menu or settings tab.
To turn off real-time scanning, right-click the antivirus software icon you’ll see in your system tray and select the option to disable the shield. The options will vary depending on which antivirus you download, so explore the app or consult the program's official support pages to learn how to do this.
Windows Security is less likely to conflict with Backup and Restore than third-party alternatives. However, you can still temporarily disable that utility’s antivirus scanning just to make sure. You can disable that tool as outlined in our guide for turning off Windows Defender.
6. Set Windows to Clean Boot
Third-party software conflicts can cause the 0x8078012D error. One of the best ways to prevent program conflicts is to configure Windows to boot without any third-party startup items or services, which is called a "clean boot."
Clean-booting Windows will stop any programs or services that were conflicting with Backup and Restore. So, try clean booting your Windows PC like this:
- Bring up the System Configuration window, which is otherwise known as MSConfig. Our guide to opening MSConfig tells you how to open it.
-
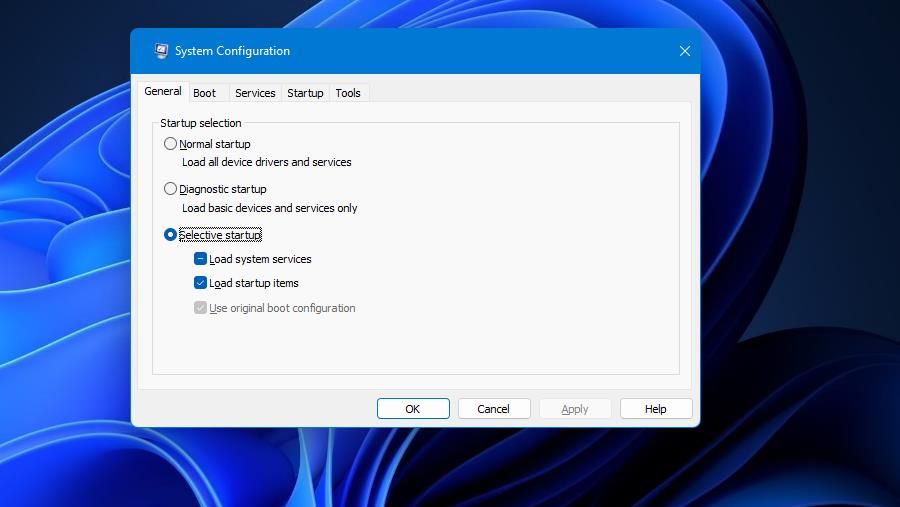
Uncheck (deselect) the Load startup items box you’ll find on the General tab shown directly below.
- Next, switch over to the Services tab.
-
Make sure you select the Hide all Microsoft services setting to exclude more important services from those disabled.
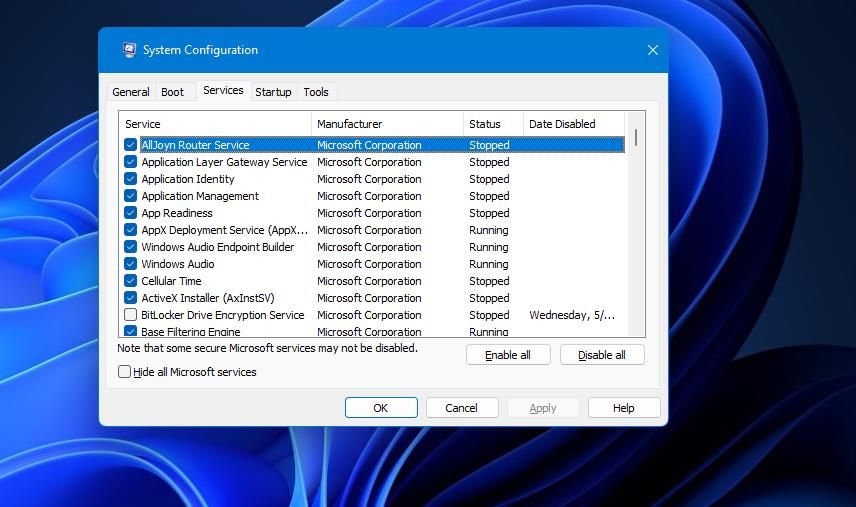
- Press Disable all to uncheck all the boxes for third-party startup services. Or you can selectively disable services without clicking that option.
- Select the System Configuration tool’s Apply option.
- Click OK to close the boot configuration tool.
- Select Restart when prompted to reboot.
- Then try setting up the system image backup again to see if the error is resolved.


You can easily restore the original boot configuration by reversing the selected setting in MSConfig. Re-enable disabled startup programs by selecting MSConfig’s Load startup items option again. Click Enable all to restore the third-party startup services.
7. Uninstall the Shark007 Codec
Shark007 is a codec known to conflict with the Windows backup process and cause the 0x8078012D error. Is Shark007 installed on your PC? If so, uninstall the software as follows:
-
Open Control Panel, and click Small icons on the View by menu.
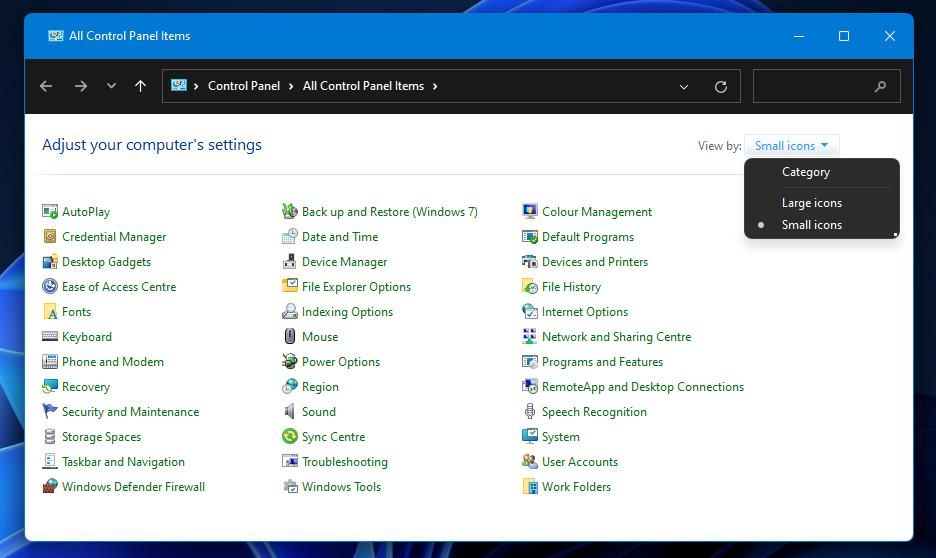
- Select Programs and Features to access that uninstaller utility.
- Click Shark007 in Programs and Features to select it.
-
Press Shark007’s Uninstall button, and select Yes to remove it.
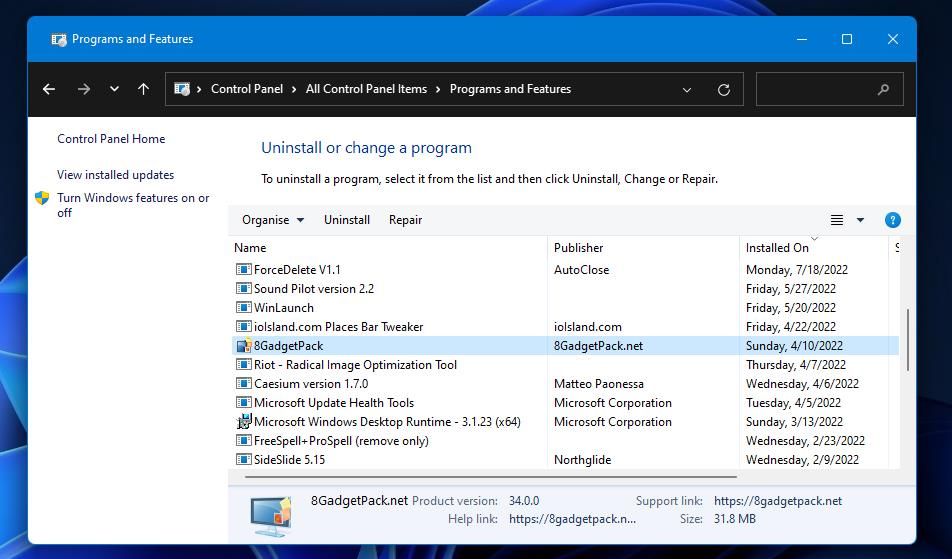
- Click the Restart option after uninstalling Shark007.


8. Reset Windows Components
If none of the above work for you, you may have to reset Windows components. The Reset this PC utility will restore Windows to factory settings and repair corrupted system files. Yet, resetting Windows will also remove user-installed software, but you can select to keep user files intact. You can apply this potential resolution as covered within our Windows factory reset guide.

Create Your Windows System Image Backup
Error 0x8078012D is not a new error, and those resolutions are tried and confirmed methods for fixing that issue. However, note that there are plenty of freely available alternative third-party backup utilities to Backup and Restore. So, you don’t necessarily need to fix the 0x8078012D error to create a Windows system image backup.