Are you seeking a light, ultra-quick, easy-to-access note-taking solution? Search online, and you'll find countless suggestions for such apps. And yet, even the "lightest" ones are often clunky and may come with features you may personally consider useless.
So, let's see how you can create your own ultra-light, blazing-fast, custom note-taking app using AutoHotkey. A simple, no-frills note-taking solution that will be able to pop on your screen instantly with a single key press.
Setting Up a Plan for Note Taking With AutoHotkey
Let's begin by clearly stating our final goal and devising a simple plan for getting there.
For this project, we don't need any fancy text formatting, support for templates, or other "advanced" features. Our goal?
- We want to create an ultra-simple app that will pop on our screen when we press a hotkey combination.
- This window will allow us to jot down a note, and have it saved to a plaintext/MarkDown file.
And that's all—no extra windows, dialogs, menus, or buttons.
Thankfully, such a project is easy to build with AutoHotkey, as we'll see next. Feel free to follow even if you haven't used AutoHotkey before. However, it might be best if you first checked our quick AutoHotkey guide for beginners.
How to Install AutoHotkey
Since AutoHotkey is a third-party solution, to use it, you need to install it.
So, pay a visit to AutoHotkey's official site, and click on the friendly green Download button. Skip both the V1 (deprecated) and V2 (beta) versions, and choose to Download Current Version. Then, install it on your computer.
You won't be able to notice any changes afterward since AutoHotkey only works as a parser for AutoHotkey scripts. In other words, AutoHotkey doesn't "do anything" on its own. Instead, it works as the platform on which the script we will craft next will run.
How to Make a New Script in AutoHotkey
Open your favorite file manager, like Windows File Explorer, and point it to the directory where you want to create your new script. You can choose any directory from your desktop to your personal Documents folder.
The easiest way to create a new AutoHotkey script is by taking advantage of the new option available through the right-click context menu after installing AutoHotkey. Right-click on an empty spot of the file manager's window, and from the menu that appears, choose New > AutoHotkey Script.

Since AutoHotkey scripts are actually plain text files, you can alternatively create a new text file and then rename it, changing its extension from TXT to AHK. The final result will be the same: you will have a new blank AutoHotkey script.
Fire up your favorite text or code editor and open the script there to edit it. For this article, we'll be using Notepad++, but you can use any similar tool, like VS Code or Atom.
Of course, if you prefer keeping things simple, you can always use the good old Notepad that accompanies Windows.
Crafting a GUI in AutoHotkey
To simplify future customization of our script, let's store two essential pieces of information in two variables.
- The first one, which we named NotesPath, is mapped to the full path where we want our script to save our notes. Please, remember to change the path to the one you want to use. Otherwise, your notes will be saved to an unexpected spot, or the script will fail.
- The second, which we named FileNameExtra, holds a string we will use for our notes' filenames. Each note's file will be named after a "sanitized" version of its title, followed by this string.
It should look like this:
        NotesPath = A:\00_Cloud_Storage\Dropbox\Notes\Obsidian\Duckland!Inbox
FileNameExtra = _MUOnote.md

Usually, AutoHotkey is used for affecting other windows, as we saw on our article on how to center any window on your screen with AutoHotkey, or for creating hotkeys, for which you can check our guide on making app-specific hotkeys with AutoHotkey.
However, in this scenario, we'll rely a lot on AutoHotkey's GUI creation capabilities, which many people forget about. AutoHotkey "taps into" Windows' own "window toolkit". This enables the creation of GUIs with all the usual elements you'd expect to find in a "standard" OS window, from text fields and drop-down menus to buttons and scrollbars.
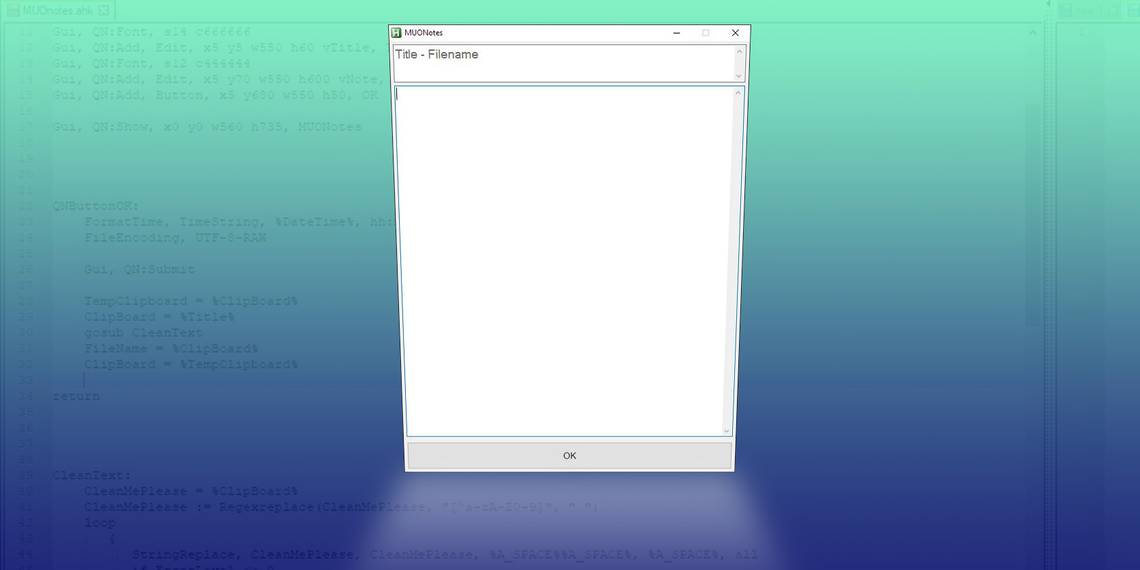
Thankfully, since we're making a simple and "lite" note-taking app, the project won't be complicated and, thus, relatively easy to craft. Our GUI will consist of only three elements:
- One text box for the note's title
- Another one for the note's content
- A button for saving the note.
We won't even add a "Cancel" button since we'll map that function to the Escape key on the keyboard and the action of closing the window.
Add the line below to your script - it basically "tells" AutoHotkey that the font in any element that follows should be "size 14" and "color 666666".
Gui, QN:Font, s14 c666666

Next, the following line:
Gui, QN:Add, Edit, x5 y5 w550 h60 vTitle, Title - Filename
- ...adds an editable text box ("Edit")...
- ...at coordinates 5 pixels horizontal and 5 pixels vertical from the edge of the window ("x5 y5")...
- ...with a width of 550 pixels and a height of 60 pixels ("w550 h60").
- Everything typed in it would be mapped to the Title variable ("vTitle")...
- ...and it will contain the text "Title - Filename".
Next, let's change the font size to 12 and its color to 4444444 for any elements that come after that line.
Then, add a larger editable text box for the actual content of the note, map it to the Note variable, and pre-populate it with anything already in the clipboard.
Finally, add a button under the two text boxes and at the bottom of the app's window, mapped to the script's default OK function.
        Gui, QN:Font, s12 c444444
Gui, QN:Add, Edit, x5 y70 w550 h600 vNote, %Clipboard%
Gui, QN:Add, Button, x5 y680 w550 h50, OK

We've created a GUI, but we also need a window to display it.
For that, the following line "tells" AutoHotkey to create a window at coordinates 0, 0 (horizontal, vertical), with 560 pixels width and 735 pixels height, named "MUONotes".
Gui, QN:Show, x0 y0 w560 h735, MUONotes

The full script up to now should look something like the following:
        NotesPath = A:\00_Cloud_Storage\Dropbox\Notes\Obsidian\Duckland!Inbox
FileNameExtra = _MUOnote.md Gui, QN:Font, s14 c666666
Gui, QN:Add, Edit, x5 y5 w550 h60 vTitle, Title - Filename
Gui, QN:Font, s12 c444444
Gui, QN:Add, Edit, x5 y70 w550 h600 vNote, %Clipboard%
Gui, QN:Add, Button, x5 y680 w550 h50, OK
Gui, QN:Show, x0 y0 w560 h735, MUONotes
Making the Buttons Do Something in AutoHotkey
Our GUI is ready—you can check it out by double-clicking on your script.

As you will see, the main note's area will be pre-populated with the clipboard's contents. However, the app itself will be useless because we haven't yet added support for saving anything.
Fix that by adding the following to your script:
        QNButtonOK:
FileEncoding, UTF-8-RAW
Gui, QN:Submit
TempClipboard = %ClipBoard%
ClipBoard = %Title%
gosub CleanText
FileName = %ClipBoard%
ClipBoard = %TempClipboard%
FinalFilename = %NotesPath%\%FileName%%FileNameExtra%
FileDelete, %FinalFileName%
FileAppend, %Note%, %FinalFileName%
return
Let's disassemble that:
- "QNButtonOK:" states that what comes after is what AutoHotkey "should do" when the default OK button of the GUI is clicked.
- The "FileEncoding" line sets the created text file's encoding.
- "Gui, GN:Submit" grabs the status of every GUI element, meaning it also "grabs" anything typed in the two text fields.
- We then temporarily copy the clipboard's actual contents to the TempClipboard variable.
- We do the above because we want to copy the note's title to the clipboard, used as an intermediary for sending it to a function we'll add next. This function will "sanitize" the text, removing non-alphanumeric characters and allowing us to use the title's text as a filename.
- The sanitization function will return the "clean" title to the clipboard, from where we map it to the FileName variable.
- We then return its original content to the clipboard from the TempClipboard variable.
- To get the full path and filename of the target file, we "sandwich" the newly-assembled FileName variable between the NotesPath and the FileNameExtra variables. That's why we defined them at the beginning of the script.
- We preemptively delete any previous file with the same path & filename.
- We append the Note variable's content to the FinalFileName file.
Sanitizing the Text in AutoHotkey
The "sanitization" function we mentioned above is the following:
        CleanText: CleanMePlease = %ClipBoard%
CleanMePlease := Regexreplace(CleanMePlease, "a-zA-Z0-9", " ")
loop
{
StringReplace, CleanMePlease, CleanMePlease, %A_SPACE%%A_SPACE%, %A_SPACE%, all
if ErrorLevel <> 0
break
}
ClipBoard = %CleanMePlease%
Return
To go through it line-by-line:
- "CleanText:" is the name of the function that "contains" the actions that follow.
- We first map the clipboard's content to the CleanMePlease variable.
- We use a RegEx rule to remove all non-alphanumeric characters from the CleanMePlease variable.
- Since the above can introduce double spaces, we use a loop to comb through the CleanMePlease variable once more, replacing them with single spaces. That's the bit with the two "%A_SPACE%", followed by a single one, and the word "all".
- The ErrorLevel line "tells" AutoHotkey to "break the loop" when it can't find more double spaces in the text.
- Finally, we return the "sanitized" version of the CleanMePlease variable to the clipboard.
Making the Final Tweaks to Your Note-Taking App
Your note-taking script is ready to use, but if you try it out, you might see its window pop up and instantly disappear. That's because you also need to "return" each function you defined in it.

So, place the word "return" (with no quotation marks) under:
- The GUI-creating part of the script, under the GUI, "QN:Show..." line.
- The "QNButtonOK" function, under the final "FileAppend..." line.
- The CleanText function, under the last "ClipBoard =..." line.
However, if you try running your script now, you'll see it still lingers in the Windows tray after using it. To have the app close and the script fully exit, add the following at the very end:
        QNGuiEscape:
QNGuiClose:
ExitApp
return

Finally, to have the app instantly run whenever you need it, create a shortcut for your script on your desktop. Then, right-click on it, choose Properties, click in the Shortcut key field, and hit your desired button combination.
Congratulations on Making Your First App in AutoHotkey
It might have initially sounded like a complicated project, but as we saw, creating a "lite" note-taking app was pretty straightforward.
All thanks to AutoHotkey's human-friendly syntax and ability to take advantage of Windows' default GUI-related elements.