A winter wonderland is always a pretty sight on your desktop, no matter what the season. And while you can’t make a snowman on Windows 11’s desktop, you can turn it into a stunning snowscape with falling snowflakes to reflect the season.
Here is how you can add delightful animated snowflakes to Windows 11’s desktop with DesktopSnowOK, Snowy Desktop 3D, and Cursor Snowflakes.
How to Add Snowfall to the Desktop With DesktopSnowOK
DesktopSnowOK is a freeware customization software for adding falling snowflakes to your Windows desktop. It includes a wide variety of flakes to choose from, with additional customization settings for them. You can add falling snow to your desktop with DesktopSnowOK by extracting and running the software like this:
- Open the DesktopSnowOK download page and download the file.
- Double-click DesktopSnowOK.zip inside the Downloads tab to open its archive within Explorer.
-
Select File Explorer’s Extract all option for the ZIP file.
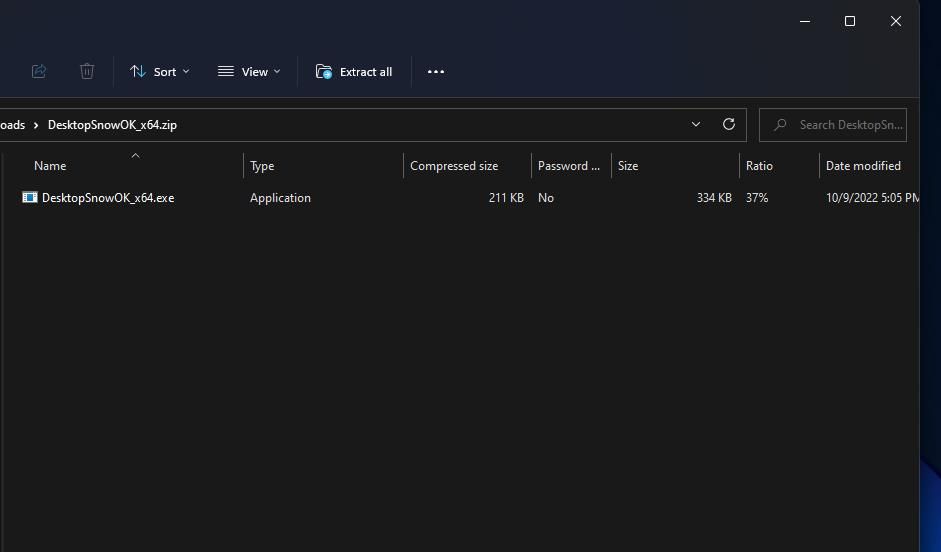
- Extract the file.
-
Double-click DesktopSnowOK_x64.exe to open the window shown directly below.
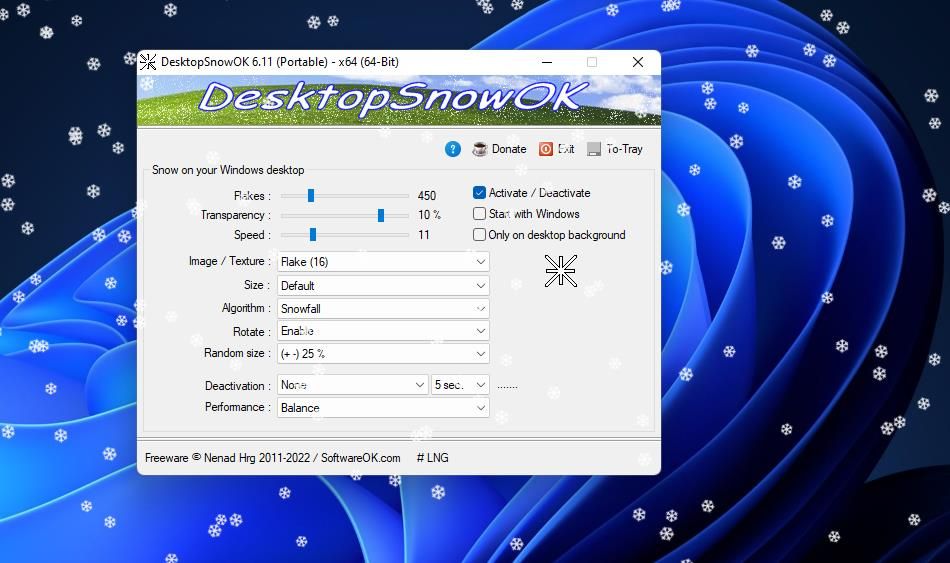
- If the Activate/Deactivate option isn’t selected by default, click that checkbox to start the snow falling in Windows 11. You can also turn it off by deselecting that option.


Now you’ll see animated snowflakes falling over the Windows 11 desktop area and taskbar. Those snowflakes will also fall over open software windows unless configured otherwise. You can confine the animated snowfall to the background wallpaper by selecting Only on desktop background.

You can change the number of flakes, the speed they fall, and their transparency level with the three bar settings on DesktopSnowOK’s window. Drag the slider on the Flakes bar to increase or decrease the number of snowflakes. You can change the speed of the snowflakes by dragging the Speed bar’s slider. To make the flakes more transparent, drag the Transparency bar’s slider leftwards.
If you want to resize the snowflakes, click the Size drop-down menu. Then select a pixel option on that menu to make them bigger or smaller.
You can select a different snowflake by clicking the Image / Texture drop-down menu. That menu includes various flakes for you to choose from. Some aren’t snowflakes, as the menu includes flowers, hearts, leaves, stars, pumpkins, and balls, among other flake options.

To set the snowflakes to fall automatically, select Start with Windows. That option adds the DesktopSnowOK software to Windows 11’s startup. Then you won’t need to manually run the software to get the snowflakes falling after signing in to Windows 11.
How to Add Snowfall to the Desktop With Snowy Desktop 3D
Snowy Desktop 3D adds animated wallpapers to the Windows 11 desktop with 3D falling snowflakes. It includes a selection of nine snowy landscape backgrounds for users to choose from. This software also has a falling snowfall screensaver you can set to come on at idle intervals.
Alas, Snowy Desktop 3D is shareware trial software that displays a trial version watermark on its wallpaper after a few minutes. You’ll need to purchase and register the software to stop the watermark from appearing. This is how to try out Snowy Desktop 3D in Windows 11:
- Bring up Snowy Desktop 3D’s download page and download the installer.
- Double-click SnowyDesktop3D_setup.exe to view its setup wizard.
-
Click the I accept option and Next.
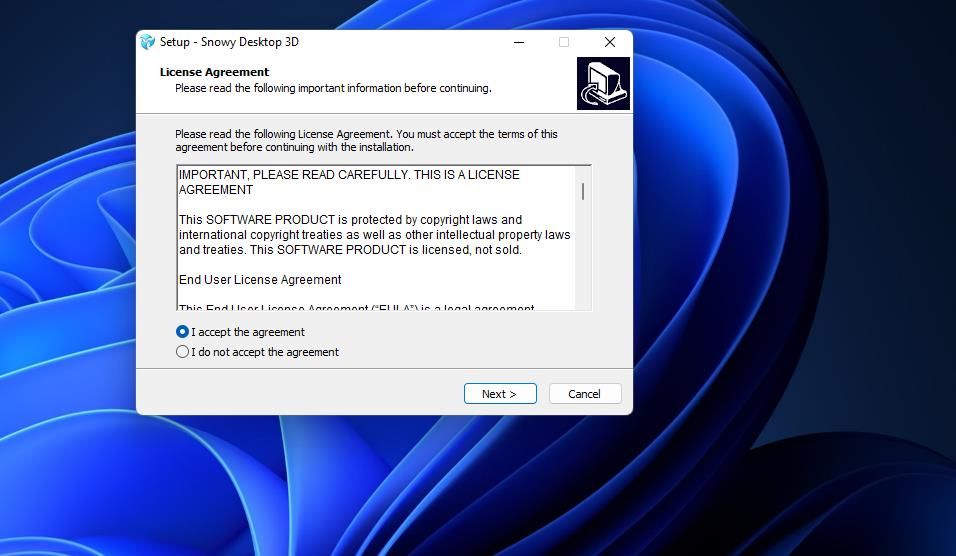
- Select Next again to install Snowy Desktop 3D.
- Next, select the Launch Live Wallpaper checkbox if it’s not selected by default in the setup wizard.
- Press the setup wizard’s Finish button to start Snowy Desktop 3D.

Now you’ll see Snowy Desktop 3D’s animated snowflakes fall on Windows 11’s desktop. Those flakes are three-dimensional ones that rotate as they fall. They also respond to your mouse cursor movements with Snowy Desktop 3D’s Cursor effect setting enabled, which is a nice touch. Moving your cursor pushes flakes in the same direction you move it.

To configure the snowflakes, double-click Snowy Desktop 3D’s system tray icon. Then you can drag the Density bar’s slider to increase or decrease the amount of snow. Drag the slider on the Brightness bar for snow left to reduce the flake’s brightness.
By default, Snowy Desktop 3D is set to your current background. However, you can change Windows 11's desktop wallpaper to nine winter landscape alternatives. Select one of the Snowy Desktop wallpapers in the menu on the left of the Live Wallpaper Settings window to add one to the desktop. Or you can select Shuffle to activate a slideshow for those wallpapers that changes the background at a set interval.

You can also set a Snowy Desktop 3D animated snowfall screensaver to come on when the PC is idle. To do that, apply the software’s screensaver in the following steps:
- Press the search tool’s taskbar button (the one with a magnifying glass).
- Type the phrase screensaver inside the search text box.
-
Click Change screen saver to open the window below.

- Select Snowy Desktop 3D Screensaver on the drop-down menu.
- Set an idle time interval for the screensaver in the Wait box.
- Then click Apply to set the screensaver.

How to Add Snowfall to the Desktop With Cursor Snowflakes
Cursor Snowflakes is a freeware app that adds a nice falling snowflakes effect to your mouse’s cursor. This software doesn’t add a regular stream of animated snow to Windows 11’s desktop like SnowDesktopOK and Snowy Desktop 3D. It enables you to generate animated snowfall on the desktop by moving the cursor. You can add falling snow to Windows 11 with Cursor Snowflakes like this:
- Bring up the Cursor Snowflakes page on Softpedia.
- Select Download Now near the top left of the page and download the ZIP file.
- Extract the software’s ZIP archive. You can do that as outlined in steps five to seven for extracting DesktopSnowOK.
- Double-click CursorSnowflakes.exe in its extracted folder.
- Now start moving your cursor across the Windows 11 desktop. Snowflakes will fall from the cursor whenever you move it around.
Cursor Snowflakes’ flakes are quite small compared to those from Snowy Desktop 3D. However, you can still whip up a pretty big snowstorm by moving the cursor relentlessly around the desktop. The more you move the cursor, the more snow will fall from it. Select a dark theme and wallpaper background in Windows 11 for better effect.

You can select a few snowfall settings from Cursor Snowflakes’ context menu. Right-click the Cursor Snowflakes icon in the system tray to view that software’s options. Move the cursor over the Speed of snowflakes submenu there to select a different speed setting. You can also apply transparency to the snow by selecting Options > Transparent and a percentage setting.

Customize Windows 11’s Desktop With a Beautiful Snowfall
Adding animated snowfall to the desktop is a good way to customize Windows 11 for the winter (or you can keep it all year round). The snowflakes generated by DesktopSnowOK, Snowy Desktop 3D, and Cursor Snowflakes are pretty groovy and add a touch of winter magic to Windows 11. You can also combine their animated snowfall with Christmas wallpapers, widgets, screensavers, and sound effects to decorate your PC for the festive season.