You can capture screenshots in Windows 11 with the Print Screen key or the Game Bar. Taking screenshots with either automatically saves the images to default folder locations. However, the locations of those folders are customizable.
This is how you can change where Windows 11 saves screenshots taken with the Print Screen key and Game Bar.
How to Change Where Print Screen Screenshots Are Saved
Pressing the Win + Print Screen hotkey automatically saves a snapshot to the Screenshots folder. The default path (location) for that folder is: C:\Users\[User Folder]\Pictures\Screenshots. Would you prefer your screenshots to save somewhere else? If so, you can select to move the save location for Print Screen snapshots like this:
- Open File Explorer at the press of the Win + E hotkey.
- Delete the current folder path in Explorer’s address bar.
- Then input C:\Users\%userprofile%\Pictures in the folder path bar, and press the Enter key.
-
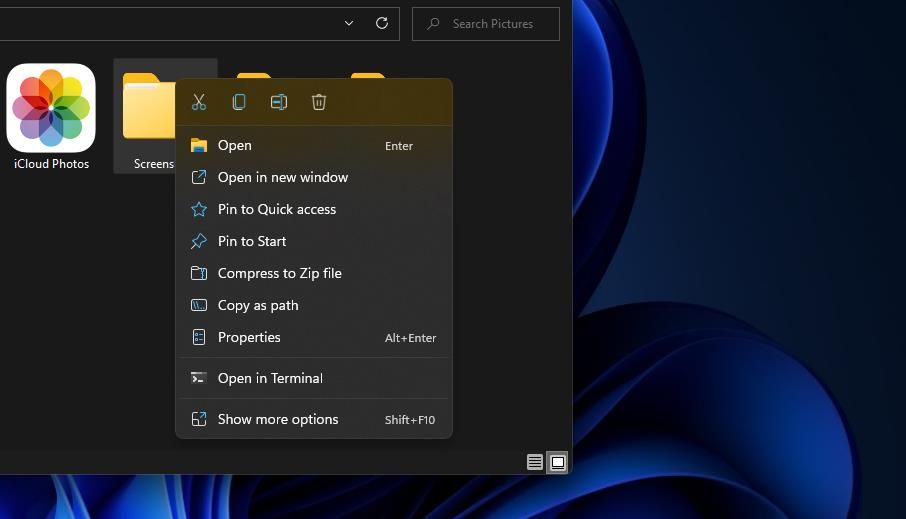
Right-click the Screenshots folder to select its Properties option.
-
Click the Location tab shown directly below.
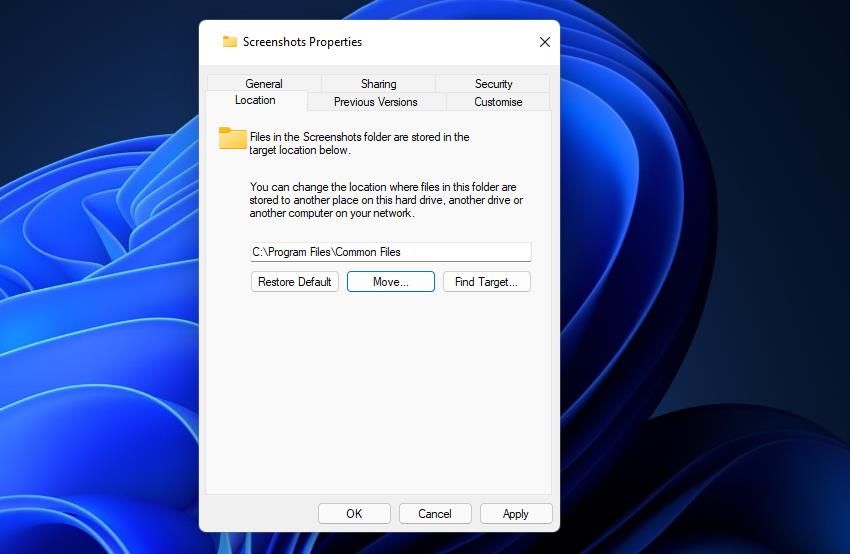
- Press the Move button on that tab.
- Then choose a folder location for the screenshots to save in.
- Press the Select Folder button.
-
Click Yes when asked to move all files in the Screenshots folder to the new location.
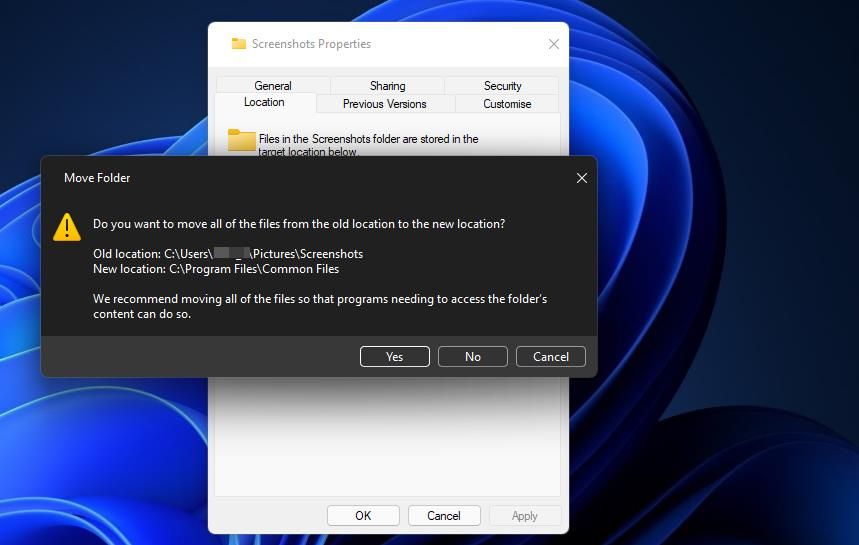
- If you’ve selected to move to a system folder, you’ll see a second dialog box confirmation prompt. Read that prompt carefully, and click Yes only if you’re sure.


Any screenshots you capture with the Win + Print Screen hotkey will now save to the new folder you selected. Open the folder you’ve redirected your screenshots to save in to access them from there. To find it quickly, input shell:screenshots within Explorer’s path bar and press Enter.
How to Restore the Default Screenshots Folder
As noted in the final step above, a second confirmation prompt (shown directly below) might open. That dialog box warns that you’ve selected to redirect the Screenshots subfolder to another special system folder. If you select Yes, you won’t be able to restore the original save location via the properties window. Only select Yes on that prompt if you’re sure you want your screenshots to save in the chosen folder.

For that reason, it’s recommended to set up a new non-system subfolder in whatever directory you want the screenshots to save in. To do that, open a directory in Explorer and right-click an area in it to select New > Folder. Enter Screenshots to be your new folder’s title. Select your Print Screen snapshots to save in the new Screenshots folder you set up.
You can only restore the original Screenshots folder location from the properties windows of non-system subfolders. To do so, follow these steps:
- Launch the File Explorer app, and navigate to the new folder you selected your snapshots to save in.
- Right-click the new folder and select Properties.
- Click the Restore Default location button on the Location tab.
- Press the Apply button.
- Click Yes to confirm the recreation of the original Screenshots folder.

How to Change Where Game Bar Screenshots Are Saved
The Game Bar’s Capture option comes in handy for taking in-game snapshots. Selecting that option saves screenshots to a Captures subfolder in the Videos folder. Neither the Game Bar nor Settings include an option to change where those screenshots to save to.
However, you can change the Game Bar’s snapshots to save in a different location much the same as the Print Screen screenshots. To open the Captures folder, bring up Settings and select Gaming > Captures > Open folder. Right-click an area inside the Captures folder and select Properties. Then you can change the location for Game Bar screenshots as outlined in steps five to 10 above.

Choose Where You Prefer Your Screenshots to Go
So, you don’t have to stick with the default save locations for Print Screen and Game Bar screenshots. Instead, you can select those snapshots to save in an external drive or cloud storage folder. Or you can redirect those screenshots to save in new folders on Windows 11’s desktop to make them more directly accessible. Choose wherever you prefer to have your captured snapshots.