
By default, Windows assigns generic names to all your network adapters. However, if you find those names confusing, you can always change them later.
Giving your network adapters descriptive names makes it easier to identify them. Here we show you six different ways to rename a network adapter on Windows 11.
1. How to Rename the Network Adapter via the Settings App
The easiest way to rename a network adapter on Windows 11 is through the Settings app. This is something that isn’t possible in previous versions of Windows.
Here are the steps you need to follow.
- Open the Start menu and click the gear-shaped icon to launch the Settings app.
- Switch to the Network & internet tab using the left sidebar.
- Click on Advanced network settings.
- Expand the Wi-Fi or Ethernet adapter you wish to rename.
-
Click the Rename button.
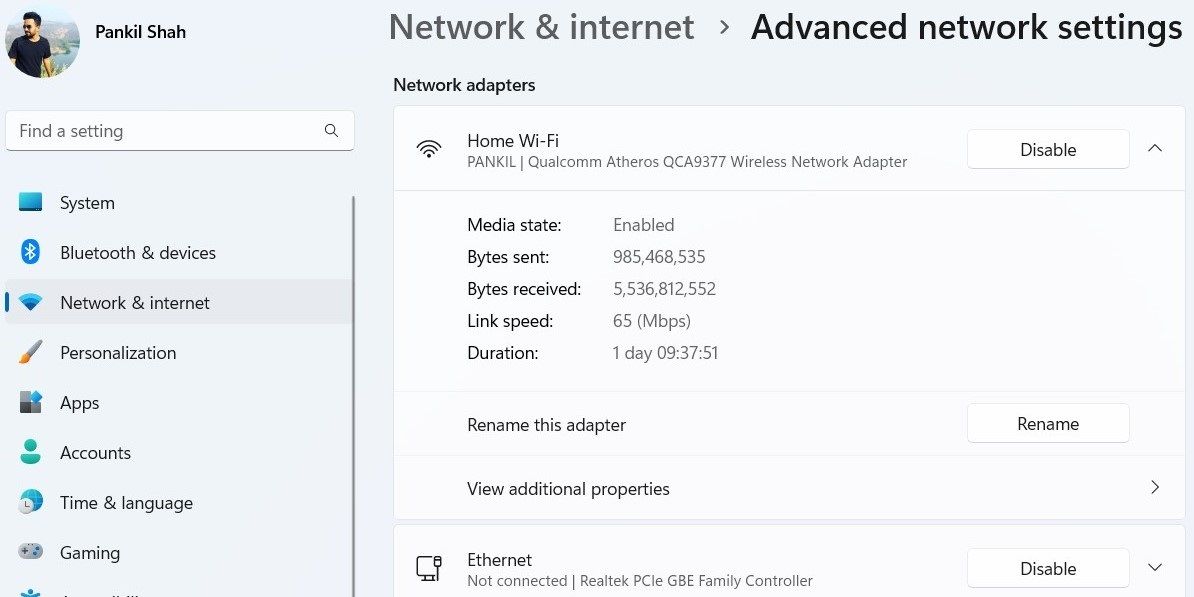
- Type in a new name for the network adapter. You can use a combination of letters, hyphen spaces, and numbers to name your network adapter.
- Click on Save.

Once you complete the above steps, the updated network adapter name should reflect right away.
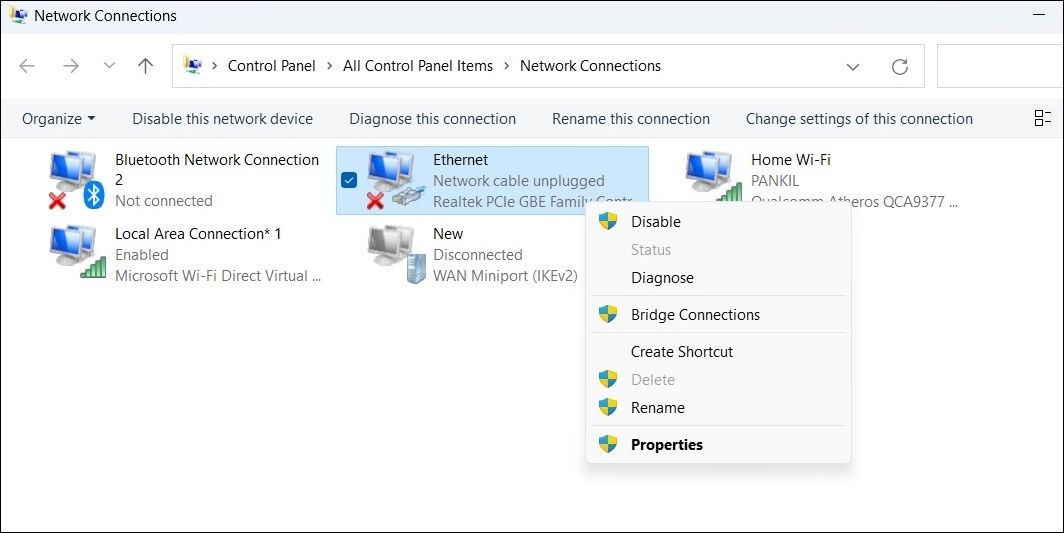
2. How to Rename the Network Adapter With the Control Panel
Control Panel provides another way to rename the network adapter on Windows. This method looks similar to Windows 10 network adapter settings, and many of you might already be familiar with it.
To rename a network adapter using Control Panel:
- Press Win + S to open the search menu.
- Type control panel and select the first result that appears.
- Navigate to Network and Sharing Center > Change adapter settings.
- In the Network Connections window, right-click on your network adapter and select Rename from the context menu.
-
Specify a new name for the network adapter and press Enter to save it.

3. How to Rename the Network Adapter Using the Command Prompt
If you’re someone who likes using the command-line interface, you can also rename the network adapter on Windows by running a few commands. Fortunately, this isn't as intimidating as it might sound.
Follow these steps to rename a network adapter using Command Prompt:
- Right-click on the Start icon or press Win + X to open the Power User menu.
- Select Terminal (Admin) from the list.
- Select Yes when the User Account Control (UAC) prompt shows up.
-
In the console, run the following command to view a list of network adapters on your PC.
netsh interface show interface - Note down the name of the network adapter you want to rename from the Interface Name column.
-
Execute the following command to rename your network adapter:
netsh interface set interface name="OldName" newname="NewName"
Replace OldName in the above command with the current name of the network adapter noted in the last step. Similarly, replace NewName in the above command with the name that you want to use.
For example, if you were to rename the network adapter from Wi-Fi to Office Wi-Fi, here's what your command should be:
netsh interface set interface name="Wi-Fi" newname="Office Wi-Fi"

Once you run the above command, your network adapter will be renamed. If you'd like to get more out of this tool, be sure to check out the Windows Command Prompt commands you must know.
4. How to Rename the Network Adapter Using Windows PowerShell
Windows PowerShell is a command line shell that allows you to automate various tasks on your computer. Similar to Command Prompt, you can use Windows PowerShell to rename a network adapter on your PC. Here's how:
- Click the search icon on the taskbar to open the search menu.
- Type in Windows PowerShell and select Run as administrator.
- Select Yes when the User Account Control (UAC) prompt appears.
-
Run the following command to view all the network adapters on your PC:
Get-NetAdapter | Format-List -Property Name - Note down the name of the network adapter you want to rename.
-
Run the following command to rename your network adapter:
Rename-NetAdapter -Name "OldName" -NewName "NewName"
Replace OldName in the above command with the current name of your network adapter. Likewise, replace NewName in the above command with the name that you want to use.
So, for instance, if you wanted to rename your network adapter from Wi-Fi to Home Wi-Fi, you would enter this command:
Rename-NetAdapter -Name "Wi-Fi" -NewName "Home Wi-Fi"

5. How to Rename the Network Adapter With the Registry Editor
Lastly, you can also rename network adapters using the Registry Editor. However, it’s not as straightforward as the other methods listed above.
As you may be aware, the Registry Editor holds essential files for Windows and its services. Carelessly editing registry files can cause irreversible damage to your system. Hence, you should only use this method if you are familiar with editing registry files.
Before you use this method, you should consider creating a restore point just in case. If you need help, refer to our guide on how to create a restore point in Windows 11 and follow the steps outlined there.
Once you’ve done that, follow the steps below to rename the network adapter.
- Press Win + R to open the Run dialog. Type regedit in the text box and press Enter.
- Select Yes when the User Account Control (UAC) prompt appears.
- Use the left pane to navigate to HKEY_LOCAL_MACHINE > SYSTEM > CurrentControlSet > Control > Network.
- Expand the first key within the Network key. Windows lists all network connections with a unique ID.
-
Expand all those keys one by one and then select the Connection key within it. Look for the Name variable on the right side. The value under the Data column identifies the current network name.
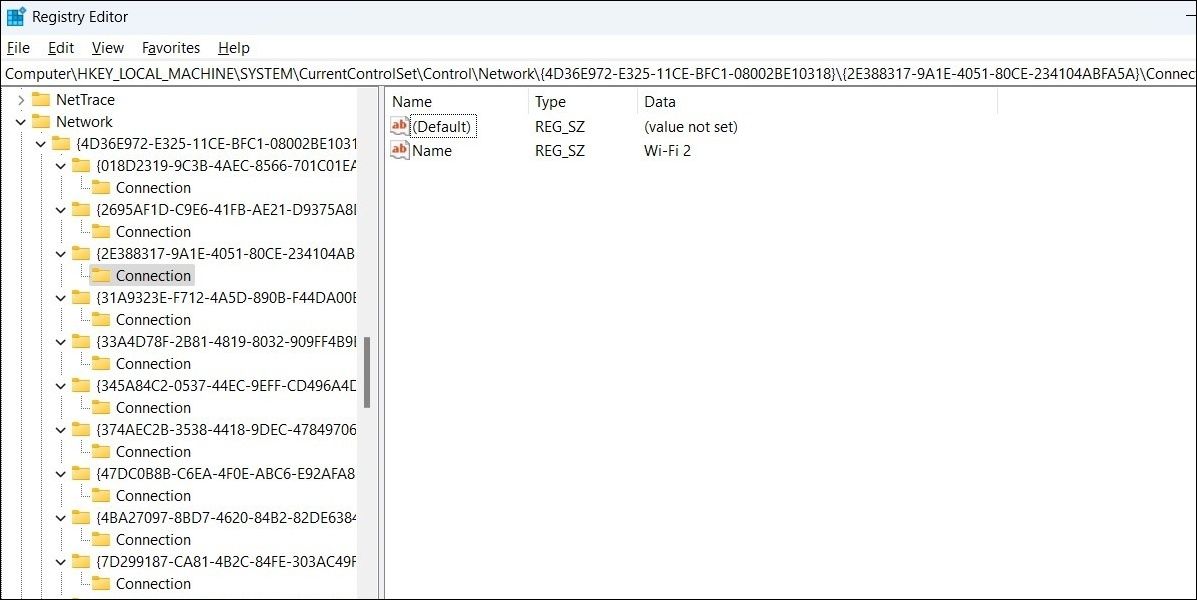
- Once you have located the key for the network adapter you want to rename, double-click the Name entry.
-
In the Value data field, enter a name for your network adapter and hit OK.


Exit the Registry Editor window and the name change should reflect right away. If it doesn’t, then you may need to reboot your PC.
Renaming Network Adapters on Windows
A network adapter is an essential hardware component that allows your computer to communicate with different devices. If your system has several network adapters, you may want to give each one a descriptive name to keep things organized. Thankfully, Windows 11 offers ample ways to rename network adapters.
Another way to keep track of your active adapters is to remove old network adapters that you on longer need.