Windows 11 offers tons of customization options. You can change the feel and look of your desktop from the Personalization tab. This includes changing themes, background color, fonts, start menu customization, and more. However, you can do much more if you know your way around the Windows Registry Editor.
In this guide, we show you the best registry hacks for Windows 11 that will allow everything from restoring the original right-click context menu to disabling the lock screen completely in your Windows system.
How to Open the Registry Editor
There are many ways to open the Registry Editor in Windows 11. But the easiest one is using the Run command. To open the Registry Editor using the Run dialog:
- Press Win + R to open the Run dialog.
- Type regedit and click OK to open the Registry Editor.
- Click Yes when the User Account Control prompt appears.
- With the registry editor running, go through the registry tweaks below and follow the steps to apply the one you like the most.
Note that incorrect modification to your system registry entries can cause system malfunction. Make sure to create a system restore point or enable automatic registry backups to revive your system if something goes wrong.
1. Restore the Classic Right-Click Menu
One of the major changes in Windows 11 was a new right-click context menu. While the new menu is minimal and modern, some are still in love with the classic right-click context menu from Windows 10.
Windows 11 hasn’t completely removed the classic right-click context menu. Instead, it is hidden under the Show more options given in the new menu. However, if you want to restore the old right-click context menu in Windows 11, you can do so via a registry tweak.
2. Disable the Windows 11 Lock Screen
The lock screen in Windows 11 serves two purposes. First, it adds an extra layer of security and shows an image with the date and time to make your desktop look good when idle.
However, if you mind the extra step required to reach the password screen after restart, you can disable the lock screen in Windows 11. This, again, requires a registry tweak.
To disable Windows 11 locks screen:
-
Open the Registry Editor and navigate to the following location. You can also copy and paste the registry path into the address bar for quick navigation:
HKEY_LOCAL_MACHINE\SOFTWARE\Policies\Microsoft\Windows -
Next, right-click on the Windows key and select New > Key.
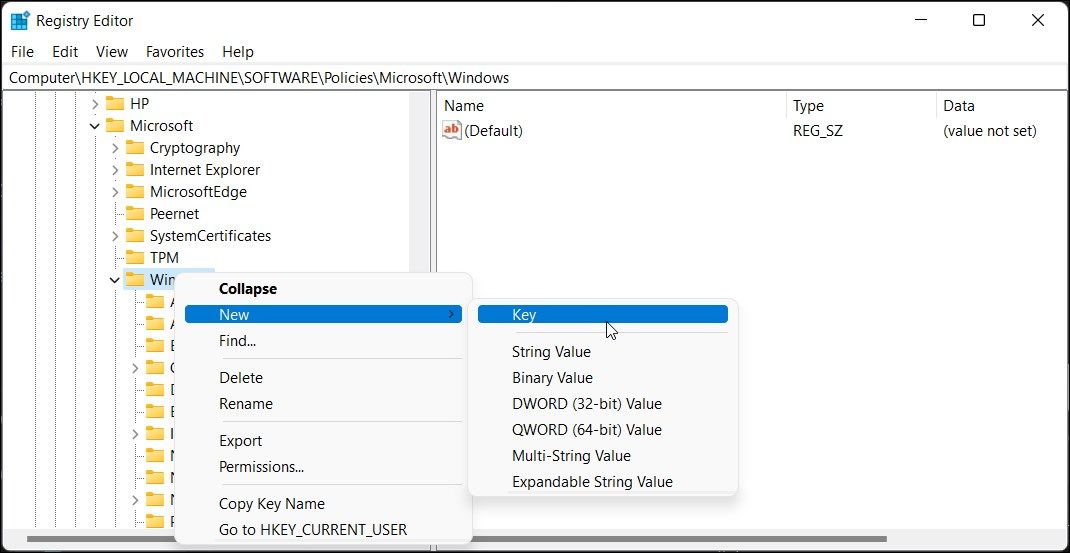
- Rename the key as Personalization.
-
Right-click on Personalization and New > DWORD (32-bit) Value.
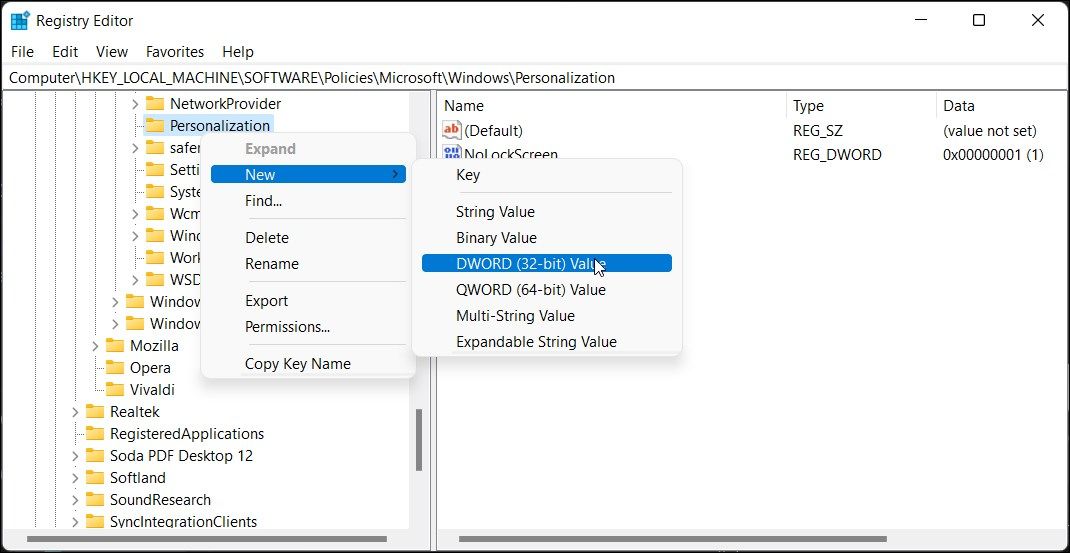
- Rename the value as NoLockScreen.
-
Right-click on NoLockScreen and select Modify.
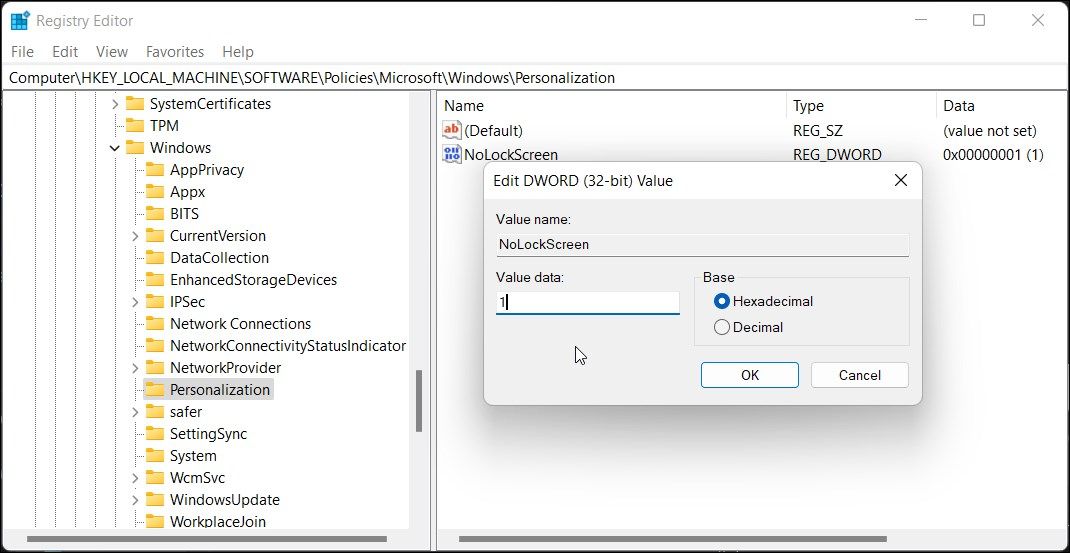
- In the Value data field, type 1 and click OK to save the changes.
- This will disable the lock screen on your PC. To enable the lock screen, set the value for NoLockScreen to 0 again.


To see the changes, restart your PC, and it will skip the lock screen and show the password screen.
3. Enable the Windows Photo Viewer in Windows 11
Microsoft replaced the classic Photo Viewer app with the new Photos app. However, if you don’t like the new Photos app, you can restore the classic Photo Viewer app in Windows 11 using the Registry Editor.
To restore the Photo Viewer app in Windows 11:
-
Open a new Notepad file. To do this, press Win + R, type "notepad," and click OK.
-
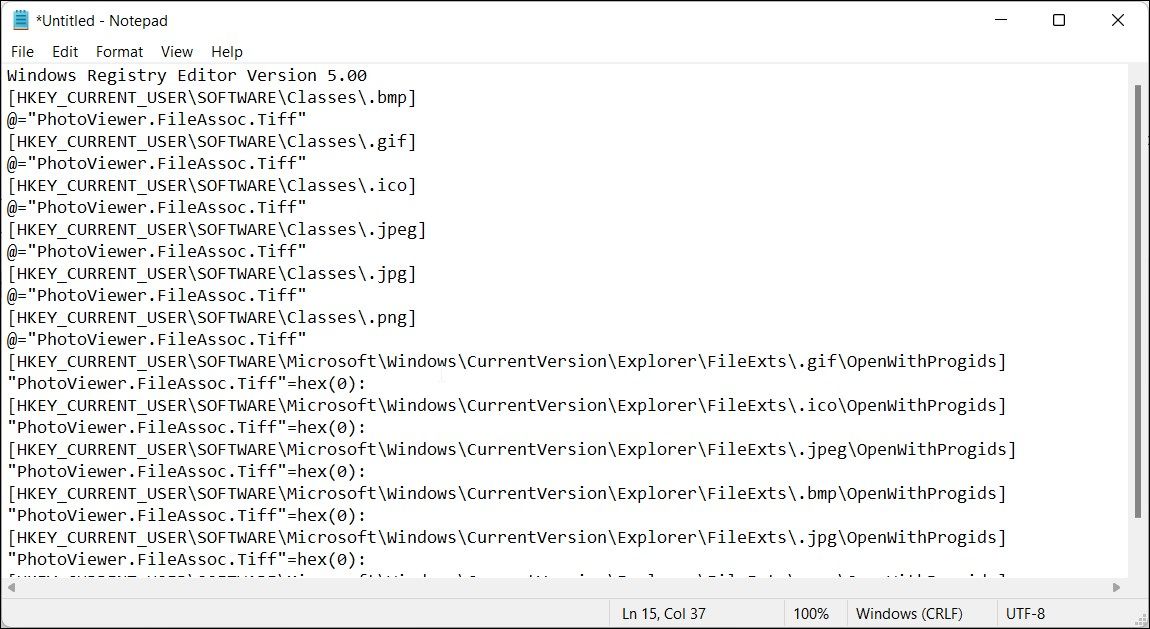
In the Notepad file, copy and paste the following commands:
         Windows Registry Editor Version 5.00
	[HKEY_CURRENT_USER\SOFTWARE\Classes\.bmp]
	@="PhotoViewer.FileAssoc.Tiff"
	[HKEY_CURRENT_USER\SOFTWARE\Classes\.gif]
	@="PhotoViewer.FileAssoc.Tiff"
	[HKEY_CURRENT_USER\SOFTWARE\Classes\.ico]
	@="PhotoViewer.FileAssoc.Tiff"
	[HKEY_CURRENT_USER\SOFTWARE\Classes\.jpeg]
	@="PhotoViewer.FileAssoc.Tiff"
	[HKEY_CURRENT_USER\SOFTWARE\Classes\.jpg]
	@="PhotoViewer.FileAssoc.Tiff"
	[HKEY_CURRENT_USER\SOFTWARE\Classes\.png]
	@="PhotoViewer.FileAssoc.Tiff"
	[HKEY_CURRENT_USER\SOFTWARE\Microsoft\Windows\CurrentVersion\Explorer\FileExts\.gif\OpenWithProgids]
	"PhotoViewer.FileAssoc.Tiff"=hex(0):
	[HKEY_CURRENT_USER\SOFTWARE\Microsoft\Windows\CurrentVersion\Explorer\FileExts\.ico\OpenWithProgids]
	"PhotoViewer.FileAssoc.Tiff"=hex(0):
	[HKEY_CURRENT_USER\SOFTWARE\Microsoft\Windows\CurrentVersion\Explorer\FileExts\.jpeg\OpenWithProgids]
	"PhotoViewer.FileAssoc.Tiff"=hex(0):
	[HKEY_CURRENT_USER\SOFTWARE\Microsoft\Windows\CurrentVersion\Explorer\FileExts\.bmp\OpenWithProgids]
	"PhotoViewer.FileAssoc.Tiff"=hex(0):
	[HKEY_CURRENT_USER\SOFTWARE\Microsoft\Windows\CurrentVersion\Explorer\FileExts\.jpg\OpenWithProgids]
	"PhotoViewer.FileAssoc.Tiff"=hex(0):
	[HKEY_CURRENT_USER\SOFTWARE\Microsoft\Windows\CurrentVersion\Explorer\FileExts\.png\OpenWithProgids]
"PhotoViewer.FileAssoc.Tiff"=hex(0): - Next, press Win + S to open the Save dialog.
-
In the File name field, type Enable Photo Viewer.reg. Again, it is important to include the .reg extension at the end of the filename, or the script will not work.
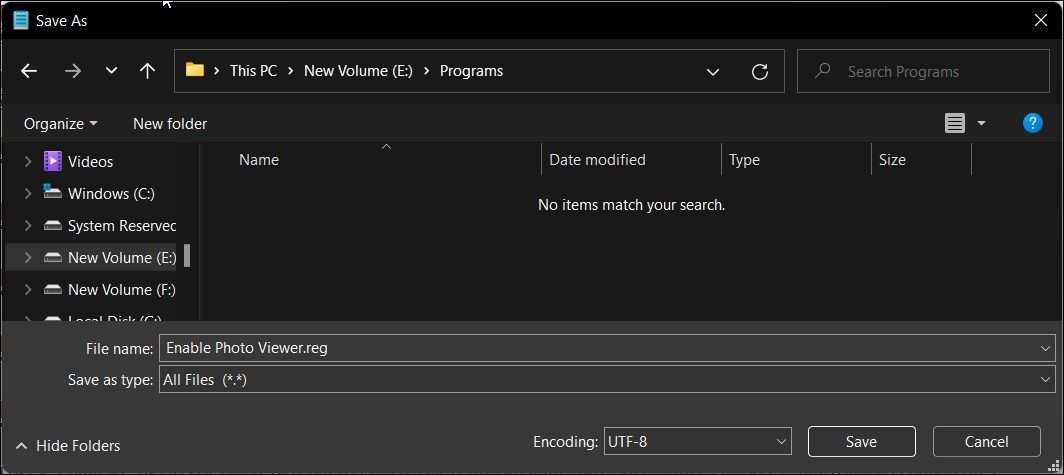
- Next, click the Save as type drop-down and select All files.
- Click the Save button.
- Once the file is saved, double-click on the Enable Photo Viewer.reg file. Then, click Yes to confirm the action.


The script will run and execute the included commands in the file in the given order. These commands will make necessary modifications to your Registry Editor and enable the Photo Viewer app.
You can search for the app in the Windows search bar or right-click on an image and select Open With > Photo Viewer.
4. Add Apps to the Context Menu
By default, the context menu in Windows 11 features a limited set of options. If you open the context menu and go to New, you can find the option to quickly access a few apps like Notepad and Word. But what if you want to add another app to the context menu?
You can use a registry tweak to add your preferred app to the right-click context menu for quick access. Follow this guide to add apps to the right-click context menu in Windows 11.
5. Disable Bing Web Searches in Windows 11
Microsoft has integrated its web search engine, Bing, with the Windows search bar. While it may look like a nifty option offering access to web searches directly from the desktop, it is unnecessarily intrusive and unhelpful for many.
If you like to restrict the Windows search bar to find local results, you can disable the Bing search from the search bar. You will need to tweak a registry entry associated with File Explorer to get rid of Bing web search results in Windows 11 search.
6. Move the Taskbar Position

By default, you can change the Taskbar alignment in Windows 11 to Left and Center. However, you cannot move the taskbar to any other position, at least not via the Settings.
Fortunately, a little tweak to the right registry entry can help you move the taskbar to the top, left, right and bottom.
To change the taskbar position:
-
Open the Registry Editor and navigate to the following location;
Computer\HKEY_CURRENT_USER\Software\Microsoft\Windows\CurrentVersion\Explorer\StuckRects3 - In the right pane, double-click on the Settings binary value to open its properties.
- In the value data field, locate the fifth value in the 00000008 row. By default, it is set to 03.
-
Double-click on the 03 value to edit it. Set the value to one of the following to set your preferred taskbar position:
        00 Left side
01 Top
02 Right side
O3 Bottom - After changing the value, click OK to save the changes and exit the Registry Editor.
- For the changes to apply, you need to restart your PC. If you don’t want to restart your PC, you can restart Windows Explorer to apply the changes.
To restart Windows Explorer, press Win + X and click on Task Manager. Here, right-click on Windows Explorer and select Restart. The taskbar will change its position as Windows Explorer restarts.
Additionally, you can also change your taskbar size using the registry editor.
7. Enable Verbose Status Messages During Startup and Shutdown
A verbose status message appears during start-up and shutdown to help you understand the background system process. Some common verbose status messages you may have seen include “preparing your desktop,” “applying computer settings,” etc. It is useful to troubleshoot the system for slow start-up and shutdown issues.
To enable the verbose status messages:
-
In the Registry Editor, navigate to the following location:
HKEY_LOCAL_MACHINE\SOFTWARE\Microsoft\Windows\CurrentVersion\Policies\System -
Right-click on the System key and select New > DWORD (32-bit) Value.

- Rename the value as verbosestatus.
-
Next, right-click on the verbosestatus value and select Modify.
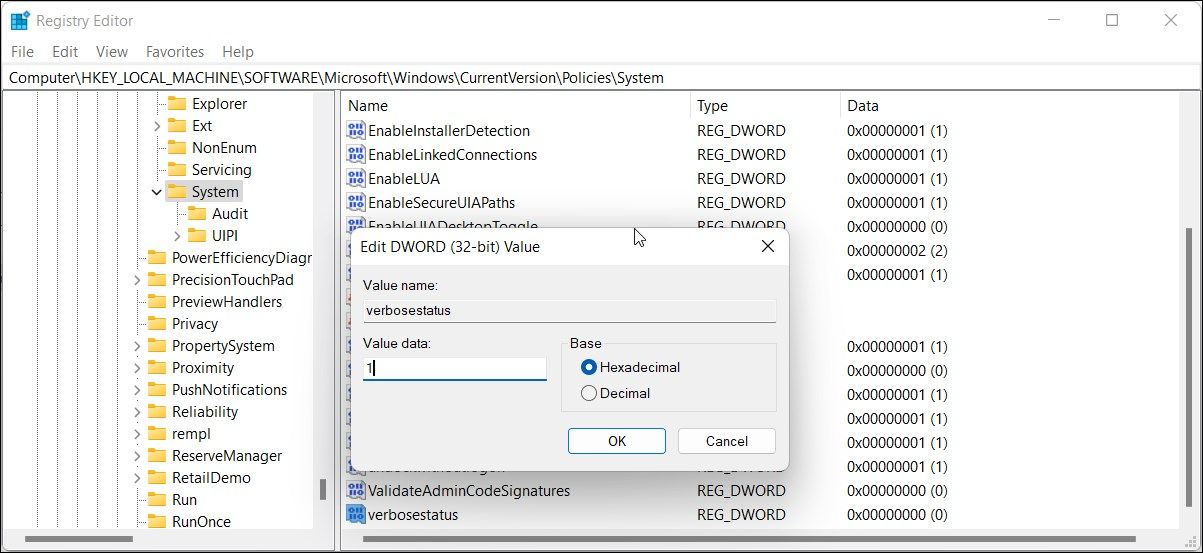
- In the Value data field, type 1 and click OK to save the changes.


The next time you restart your PC, it will show the current status of your system so that you know what process is taking all the time.
8. Stop Automatic Updates in Windows 11
Windows 11 offers a few ways to delay feature updates on your computer. For example, you can pause the updates for up to 5 weeks or set up a metered connection to prevent Windows from downloading updates automatically.
Additionally, you can also defer updates using the Registry Editor in Windows 11. With this, you don't have to set up a metered connection or use the pause update feature frequently.
Customize Windows 11 With These Registry Hacks
You can personalize your Windows 11 PC beyond what’s allowed by Microsoft using the Registry Editor. These little registry tweaks offer access to hidden settings that you can’t access otherwise from the Settings panel.
That said, it is necessary to exercise extreme caution when modifying your registry entries. If you end up breaking your system, resetting the Windows Registry is a painful process.