Windows 11 supports a basic level of device encryption on all compatible systems. This is different from the more robust BitLocker device encryption, which is only available in the premium edition of the OS. However, on some PCs, you may find the device encryption feature missing.
If you go to the System Information panel, you will likely see the "PCR7 binding is not supported" message. This message indicates issues with your secure boot. Here we show you how to fix the "PCR7 binding is not supported" message and enable device encryption.
Why Is the Device Encryption Feature Missing on My Computer?
Unlike BitLocker, Device Encryption requires compatible hardware to work. Before you troubleshoot your system for Device Encryption not working issue, check if your system meets the requirement to enable Device Encryption.
Your system must support the following to enable Device Encryption:
- TPM Module 2.0 (Trusted Platform Module) Enabled
- Modern Standby support
- UEFI firmware (legacy BIOS is not supported)
If you have installed Windows 11, you likely meet most of the requirements for Device Encryption, including TPM 2.0 and UEFI firmware support.
However, you may still need to enable TPM in the BIOS setup utility to resolve the PCR7 binding is not supported message.
How to Enable Secure Boot in Your BIOS
Secure Boot is a safety feature available on your computer required to install Windows 11. It ensures that your PC boots using your manufacturer-approved firmware. However, if you have disabled secure boot for any reason, you will likely encounter the PCR7 binding not supported message.
To fix this, you will need to enable Secure Boot in your PC’s BIOS menu.
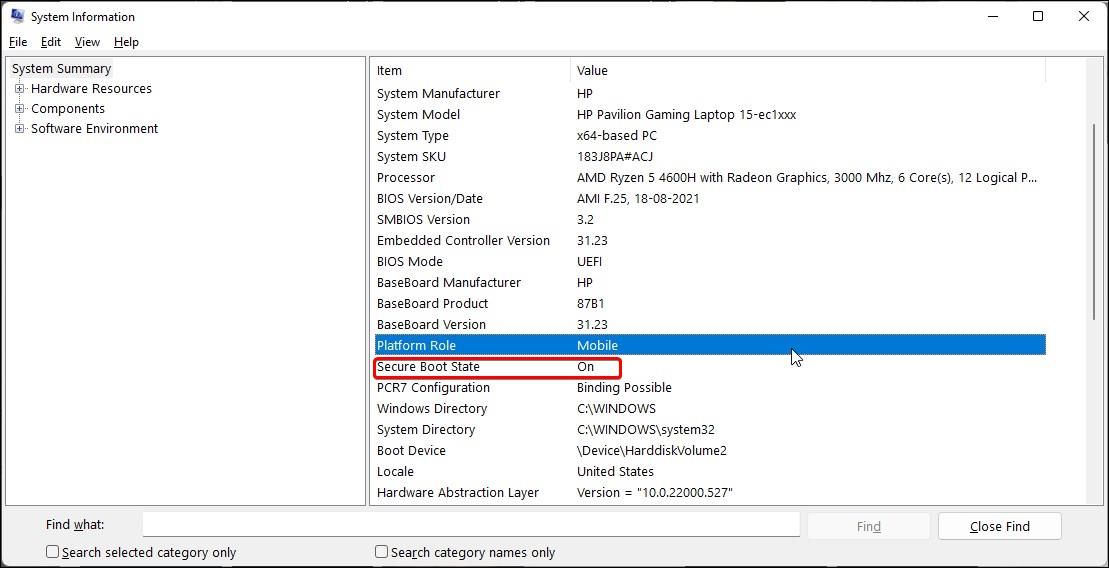
Before that, you can verify if Secure Boot is enabled or disabled in your system using the System Information panel. Here’s how to do it.
- Press the Win key and type System Information.
- Next, right-click on the System Information app from the search result and select Run as administrator.
- In the right pane, scroll down and locate Secure Boot State. If it is set to Off, you will need to enable it in the BIOS menu. If it is On, skip to the next step.
To enable Secure Boot in Windows 11:
- Save any unsaved work and shut down your PC.
- Press the power button to turn on your computer and start pressing F10 (HP laptop) to access the BIOS menu. The hotkey to access the BIOS menu differs from manufacturer to manufacturer. You can use F2, F12, F1, or Del depending on your computer manufacturer.
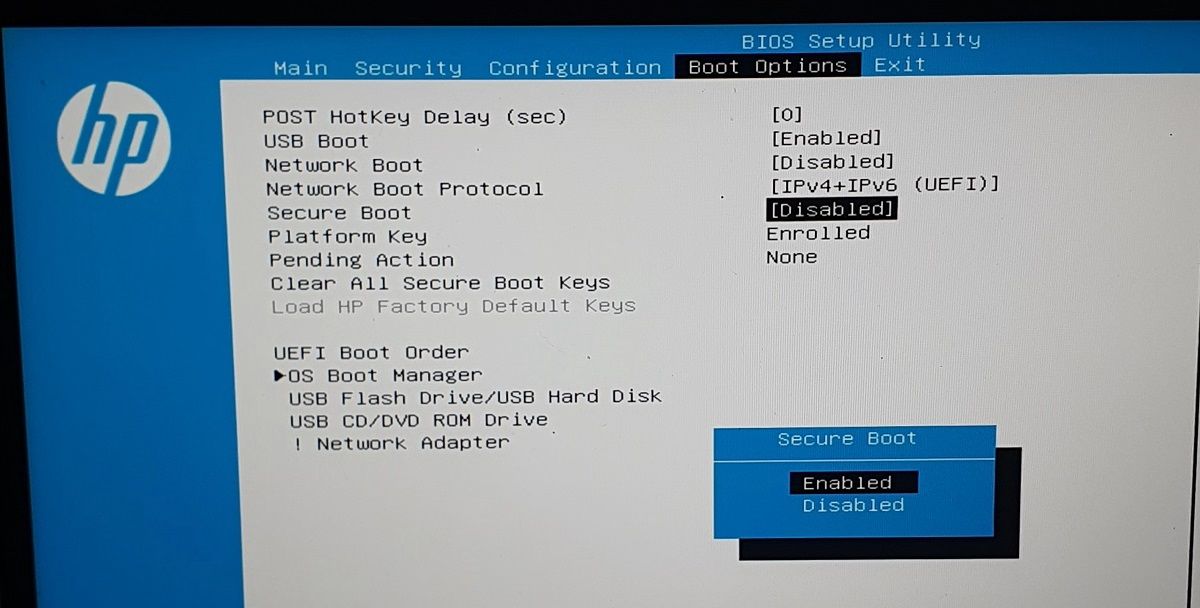
- Once in the BIOS menu, use the right-arrow key and open the Boot Options tab.
- Now use the down-arrow key and press Enter to select Secure Boot.
- Highlight Enabled and press Enter to select the option.
- Save the changes and exit BIOS.
After the restart, open System Information to see if the PCR7 binding is not supported device message is resolved.
If you see the Hardware Security Test Interface failed, and the device is not Modern Standby supported message, it often means your system hardware does not support Device Encryption.
In this instance, you are left with a few options. First, you can upgrade to Windows 11 Pro. It comes with BitLocker device encryption and is not hardware dependent. If not, you can use third-party encryption tools, including VeraCrypt and Diskcryptor.
Fixing the "PCR7 Binding Is Not Supported" Message in Windows 11
The built-in Device Encryption feature is a handy way to protect sensitive data on your computer. In case of loss or theft, the damage is mostly limited to your hardware, not data.
However, if your system does not support Device Encryption, you can use BitLocker or third-party device encryption software to protect your data.


