Live Captions are a new feature to the Windows series, added with the Windows 11 22H2 update. Once enabled, your computer will automatically generate text captions for almost any video that plays on your Windows 11 computer; even videos running in your chosen browser.
Here's how to get started using Live Captions on any video in Windows 11.
How to Enable Live Captions for Audio and Video
Before you can see Live Captions for your videos, you need to enable the tool in Windows 11. This is a new feature of the 22H2 update, so you can only access it if you have updated your copy of Windows. You can enable the feature in three ways.
Go to Settings > Accessibility > Captions and use the slider switch to enable the Live Captions. The first time you enable them, you will need to do it from here, as you also need to install a language pack.

Subsequently, you can start using Live Captions by pressing the keyboard shortcut Windows + Ctrl + L. This opens the Live Caption Bar, even if the feature is not enabled in Settings.
There is also a new control in Quick Settings on the Taskbar. Open the Quick Settings panel and click the Accessibility button to find it.
How to Use the Live Caption Bar
The captions are displayed in a separate bar rather than on top of the video itself. You can position the caption bar where it suits you best.
- Open the caption bar by pressing Windows + Ctrl + L. The bar will open, floating on top of any other open windows.
-
You can move it around by clicking and dragging it to your preferred position.

- To snap it to the top or bottom of the screen, click Settings (gear icon) > Position, and choose an option. Any open windows will be moved to make space.
- Also in the settings menu are the caption options, where you'll find a profanity filter for the Live Captions.
- There is no button to minimize the caption bar, so if you want to hide it you have to close it. Otherwise, the caption bar remains on screen and active even if you close the windows where the video is playing.

You can also caption your speech through a connected microphone. To enable this, turn on Include microphone audio in the caption bar settings. As you speak into the microphone your words will appear on the screen.
If you notice captions aren't appearing quickly, or there is lag and jittering, try disabling any intensive background apps you have running.
How to Change the Style of the Live Captions
You can change the caption text style and color, the background of the caption, and the color and opacity of the caption bar.
- Open Settings > Accessibility > Captions. Below the switch to enable Live Captions, click the Edit button in Caption Style.
- You can give your caption style a name. It will be selectable from the drop-down menu for caption style.
-
Select the element you want to edit from Text, Background, or Window using the tabs.
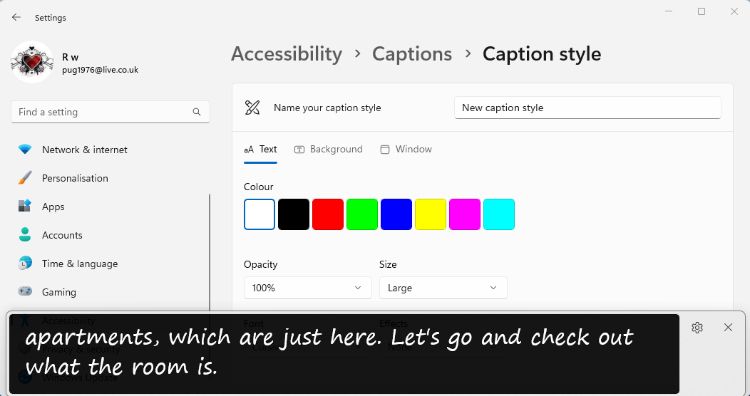
- You can then change the options for that element. The options will vary to include font style, opacity, size, and effects.
- You don't need to save your new caption style. Return to the previous settings page to see it in the drop-down selection menu.

You can access the caption styles from the settings menu in the caption bar.
Using Live Captions in Windows 11
Live Captions may have been created as an accessibility feature, but the feature haves uses for anyone. You can use them to keep track of speech on a video while you work on something else. You can even use captions to scan the content of a video for important keywords more easily.