
Windows 11 includes an Automatically hide the taskbar option you can select in Settings. The option hides the taskbar from the bottom of the screen when selected. However, users can still access the taskbar by moving their cursor to the bottom of Windows 11’s desktop.
That option is seemingly only accessible within the Taskbar behaviors section in Settings. However, you can set up shortcuts for enabling and disabling the Automatically hide the taskbar option. Here is how you can set up the desktop, keyboard, and context menu shortcuts for the Automatically hide the taskbar option in Windows 11.
How to Set Up an "Automatically Hide Taskbar" Desktop Shortcut
When you select the Automatically hide the taskbar option, Windows runs two Command Prompt commands in the background to do the job. Because of this, you can set up desktop shortcuts for the auto-hide taskbar feature using those two commands.
Here is how to add a desktop shortcut that turns on the Automatically hide taskbar option in Windows 11:
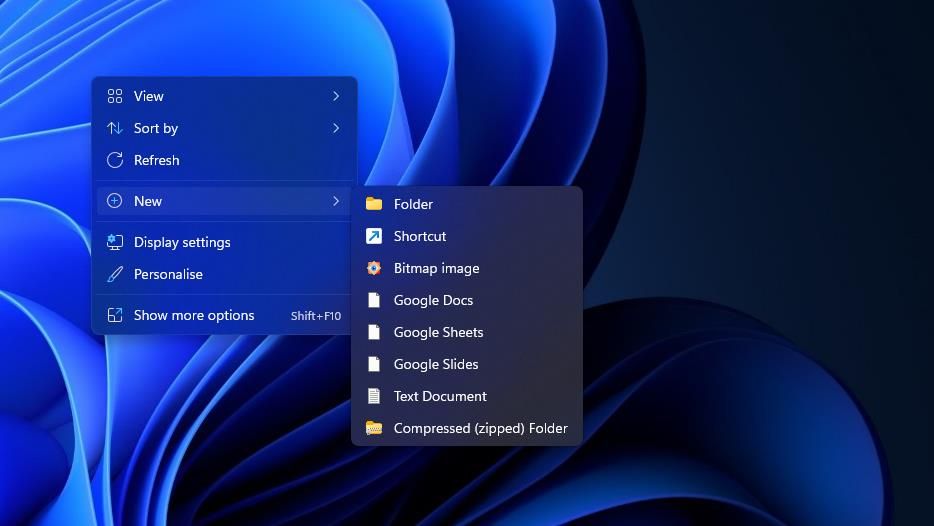
- Click anywhere on your desktop’s wallpaper with the mouse’s right button to select New.
-
Select the submenu’s Shortcut option.
-
Input (or copy and paste) this auto-hide taskbar command in the location box:
powershell -command "&{$p='HKCU:SOFTWARE\Microsoft\Windows\CurrentVersion\Explorer\StuckRects3';$v=(Get-ItemProperty -Path $p).Settings;$v[8]=3;&Set-ItemProperty -Path $p -Name Settings -Value $v;&Stop-Process -f -ProcessName explorer}"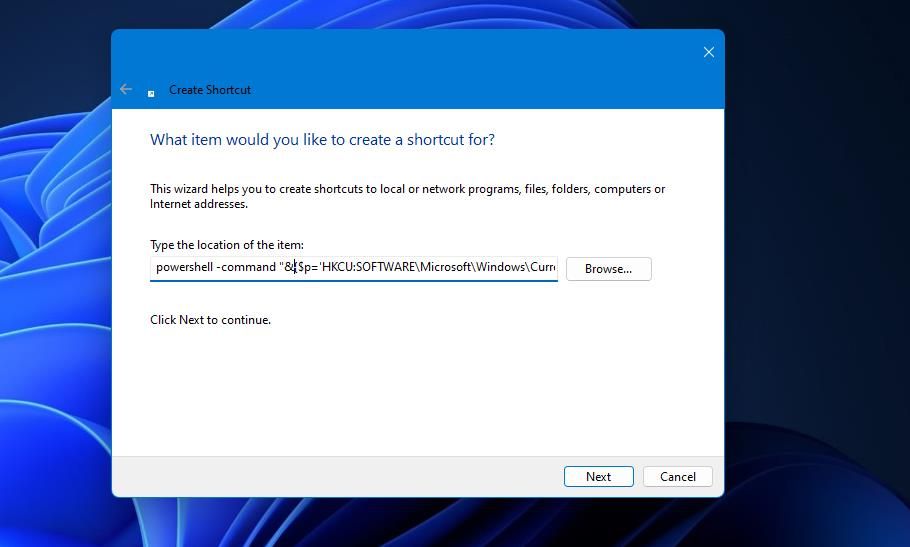
- Select Next to bring up the Type a name for this shortcut box.
- Input Turn On Auto-Hide Taskbar in the text box.
- Press Finish to add the Turn On Auto-Hide Taskbar shortcut.


Now you can click the Turn On Auto-Hide Taskbar shortcut on your desktop to activate the feature. The taskbar will disappear after double-clicking the shortcut, but it’s still there. Moving the cursor to the bottom of the desktop will bring up the taskbar again.

To disable the feature again, you’ll need to set up a second shortcut based on a different command. Repeat the steps above for creating a desktop shortcut. However, input this command to disable the auto-hide taskbar feature instead:
powershell -command "&{$p='HKCU:SOFTWARE\Microsoft\Windows\CurrentVersion\Explorer\StuckRects3';$v=(Get-ItemProperty -Path $p).Settings;$v[8]=2;&Set-ItemProperty -Path $p -Name Settings -Value $v;&Stop-Process -f -ProcessName explorer}"
Do you prefer your shortcuts to be in the taskbar and Start menu, instead of on the desktop? If so, select the Turn On Auto-Hide Taskbar desktop shortcut and press Shift + F10. You can select Pin to Start and Pin to taskbar options on the classic context menu that opens. Then you can click an auto-hide taskbar option on the taskbar or in the pinned app section of the Start menu.
How to Set Up a Keyboard Shortcut to Automatically Hide the Taskbar
Did you know that you can assign keyboard hotkeys to desktop shortcuts? After setting up an "automatically hide the taskbar desktop" shortcut, you can assign a hotkey to enable the auto-hide taskbar feature like this:
- Add a Turn On Auto-Hide Taskbar shortcut to Windows 11’s desktop as covered for method one.
- Right-click the Turn On Auto-Hide Taskbar shortcut and select Properties on its context menu.
- Then click inside the Shortcut tab’s key box.
-
Press the H key (for a Ctrl + Alt + H hotkey).
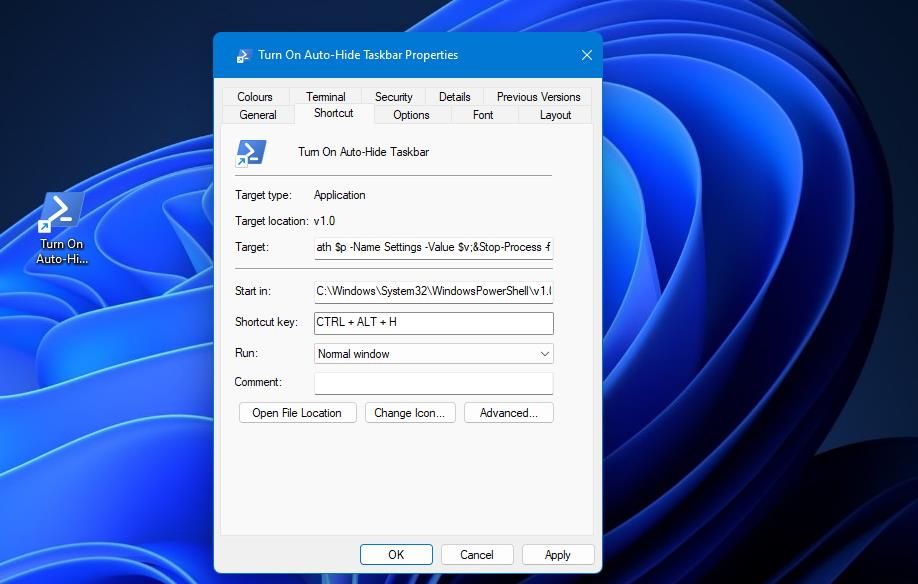
- Click Apply to save the Ctrl + Alt + H key combo.
- Select OK to close the properties window and its Shortcut tab.

Pressing the Ctrl + Alt + H keys simultaneously will activate the auto-hide taskbar option. You can set up a hotkey for disabling that feature much the same. Set up a "Turn Off Auto-Hide Taskbar" desktop shortcut and right-click it to select Properties and assign a hotkey
However, don't forget that you're creating hotkeys that activate a desktop shortcut. As such, if you delete the desktop shortcut, your hotkey will vanish alongside it. The shortcuts must remain intact for the hotkeys to work.
How to Add an "Automatically Hide the Taskbar" Shortcut to the Classic Context Menu
You can add all kinds of shortcuts and options to Windows 11’s classic context menu by editing the registry. The context menu can include an Automatically hide taskbar submenu with options for enabling and disabling the feature.
Here is how you can that auto-hide taskbar shortcut to the context menu with a script that edits the registry:
- Press Win + S to open Windows Search.
- Type Notepad into the search tool’s text box.
- Right-click the Notepad app when it appears in the search tool and select Run as administrator.
-
Copy and paste this code into a blank Notepad page:
        Windows Registry Editor Version 5.00


	[HKEY_CLASSES_ROOT\DesktopBackground\Shell\HideTaskbar]

	"Icon"="imageres.dll,-80"

	"MUIVerb"="Automatically hide taskbar"

	"Position"="Bottom"

	"SubCommands"=""


	[HKEY_CLASSES_ROOT\DesktopBackground\Shell\HideTaskbar\Shell]


	[HKEY_CLASSES_ROOT\DesktopBackground\Shell\HideTaskbar\Shell\001flyout]

	"MUIVerb"="Turn on"


	[HKEY_CLASSES_ROOT\DesktopBackground\Shell\HideTaskbar\Shell\001flyout\command]

	@="powershell -command \"&{$p='HKCU:SOFTWARE\\Microsoft\\Windows\\CurrentVersion\\Explorer\\StuckRects3';$v=(Get-ItemProperty -Path $p).Settings;$v[8]=3;&Set-ItemProperty -Path $p -Name Settings -Value $v;&Stop-Process -f -ProcessName explorer}\""


	[HKEY_CLASSES_ROOT\DesktopBackground\Shell\HideTaskbar\Shell\002flyout]

	"MUIVerb"="Turn off"

	"CommandFlags"=dword:00000020


	[HKEY_CLASSES_ROOT\DesktopBackground\Shell\HideTaskbar\Shell\002flyout\command]

@="powershell -command \"&{$p= 'HKCU:SOFTWARE\\Microsoft\\Windows\\CurrentVersion\\Explorer\\StuckRects3' ;$v=(Get-ItemProperty -Path $p).Settings;$v[8]=2;&Set-ItemProperty -Path $p -Name Settings -Value $v;&Stop-Process -f -ProcessName explorer}\"" -
Save the file by clicking File on Notepad’s menu bar, then select the Save as option.

-
Next, select the All Files option by clicking the Save as type drop-down menu, and type Turn on Auto-Hide Taskbar.reg in the file title text box.
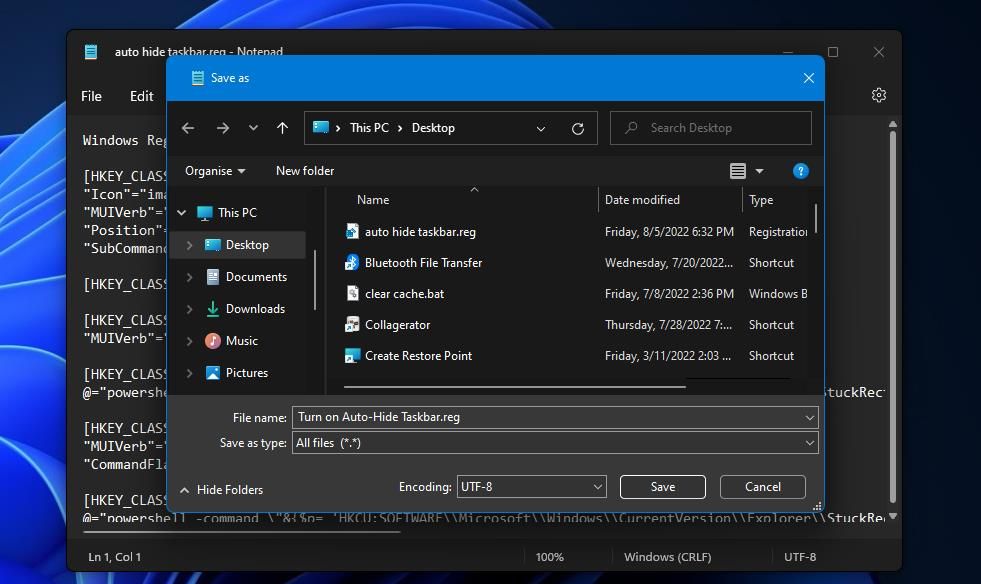
- Save the file to the desktop, then close Notepad.
- Double-click the Turn on Auto-Hide Taskbar.reg registry script file that’s on your desktop, and select Yes when prompted about continuing.


It's time to try out the new Automatically hide taskbar shortcut on your desktop’s classic context menu. Right-click an empty part of Windows 11’s desktop and select Show more options. Then, move the cursor over the new Automatically hide taskbar submenu you’ll see on the classic menu.
You can select Turn on or Turn off options there to enable or disable the auto-hide taskbar.

You can remove that submenu from the classic context menu by deleting the key for it. To do that, open Registry Editor and navigate to the HKEY_CLASSES_ROOT\DesktopBackground\Shell\HideTaskbar key shown below. Right-click the HideTaskbar key to select a Delete option for it. Click the Yes button on the Confirm Key Delete dialog box that opens.

Make the Auto-Hide Taskbar Option More Accessible With Shortcuts
Setting up shortcuts to enable or disable the Automatically hide the taskbar option will make that feature more directly accessible in Windows 11. Such shortcuts will come in handy for users who frequently toggle the option on/off.