
Guest accounts are great for times when you need to lend your PC to someone. By giving them their own account, you don't need to hover over them to make sure they don't snoop around or do stuff they aren't supposed to.
Creating a guest account on Windows 11 isn’t as easy as it was in previous versions of Windows However, that does not mean you cannot create any at all. Below, we have listed two methods of creating a guest account in Windows 11 that will help you set up a temporary account in no time.
What Is a Guest Account?
Keeping your data safe in Windows can be tricky. And while you can hide files and folders on Windows, a guest account is the perfect way to accommodate visitors on your computer.
A guest account is a user account that only offers temporary and limited access to your computer. The users using the guest account cannot install new software, access your files, or make system-level changes on your device. Once the user shuts the PC down after using the guest mode, all the data within the account created during the session is automatically erased.
The Guest mode has been around since Windows 7 and Windows 8. Creating a guest account with a restricted environment in both these versions was quite simple. However, Microsoft hid this feature in Windows 10 and now its successor, Windows 11 does not come with it as well.
Instead, you can create a local guest account in Windows 10 and 11, that offers the same features. This can be done by using the Command Prompt, Windows Settings, Windows Powershell (Admin), and Computer Management. Below are discussed these methods in detail. Proceed with the one that suits your situation the best.
1. Use the Command Prompt
Command Prompt, also known as cmd.exe, is a command-line interface used to communicate with the system. It is often used to perform advanced functions since it takes just a couple of keystrokes to execute the commands.
1. How to Create a Windows 11 Guest Account via Command Prompt
Here is how you can use the Command Prompt to create a guest account on your PC:
-
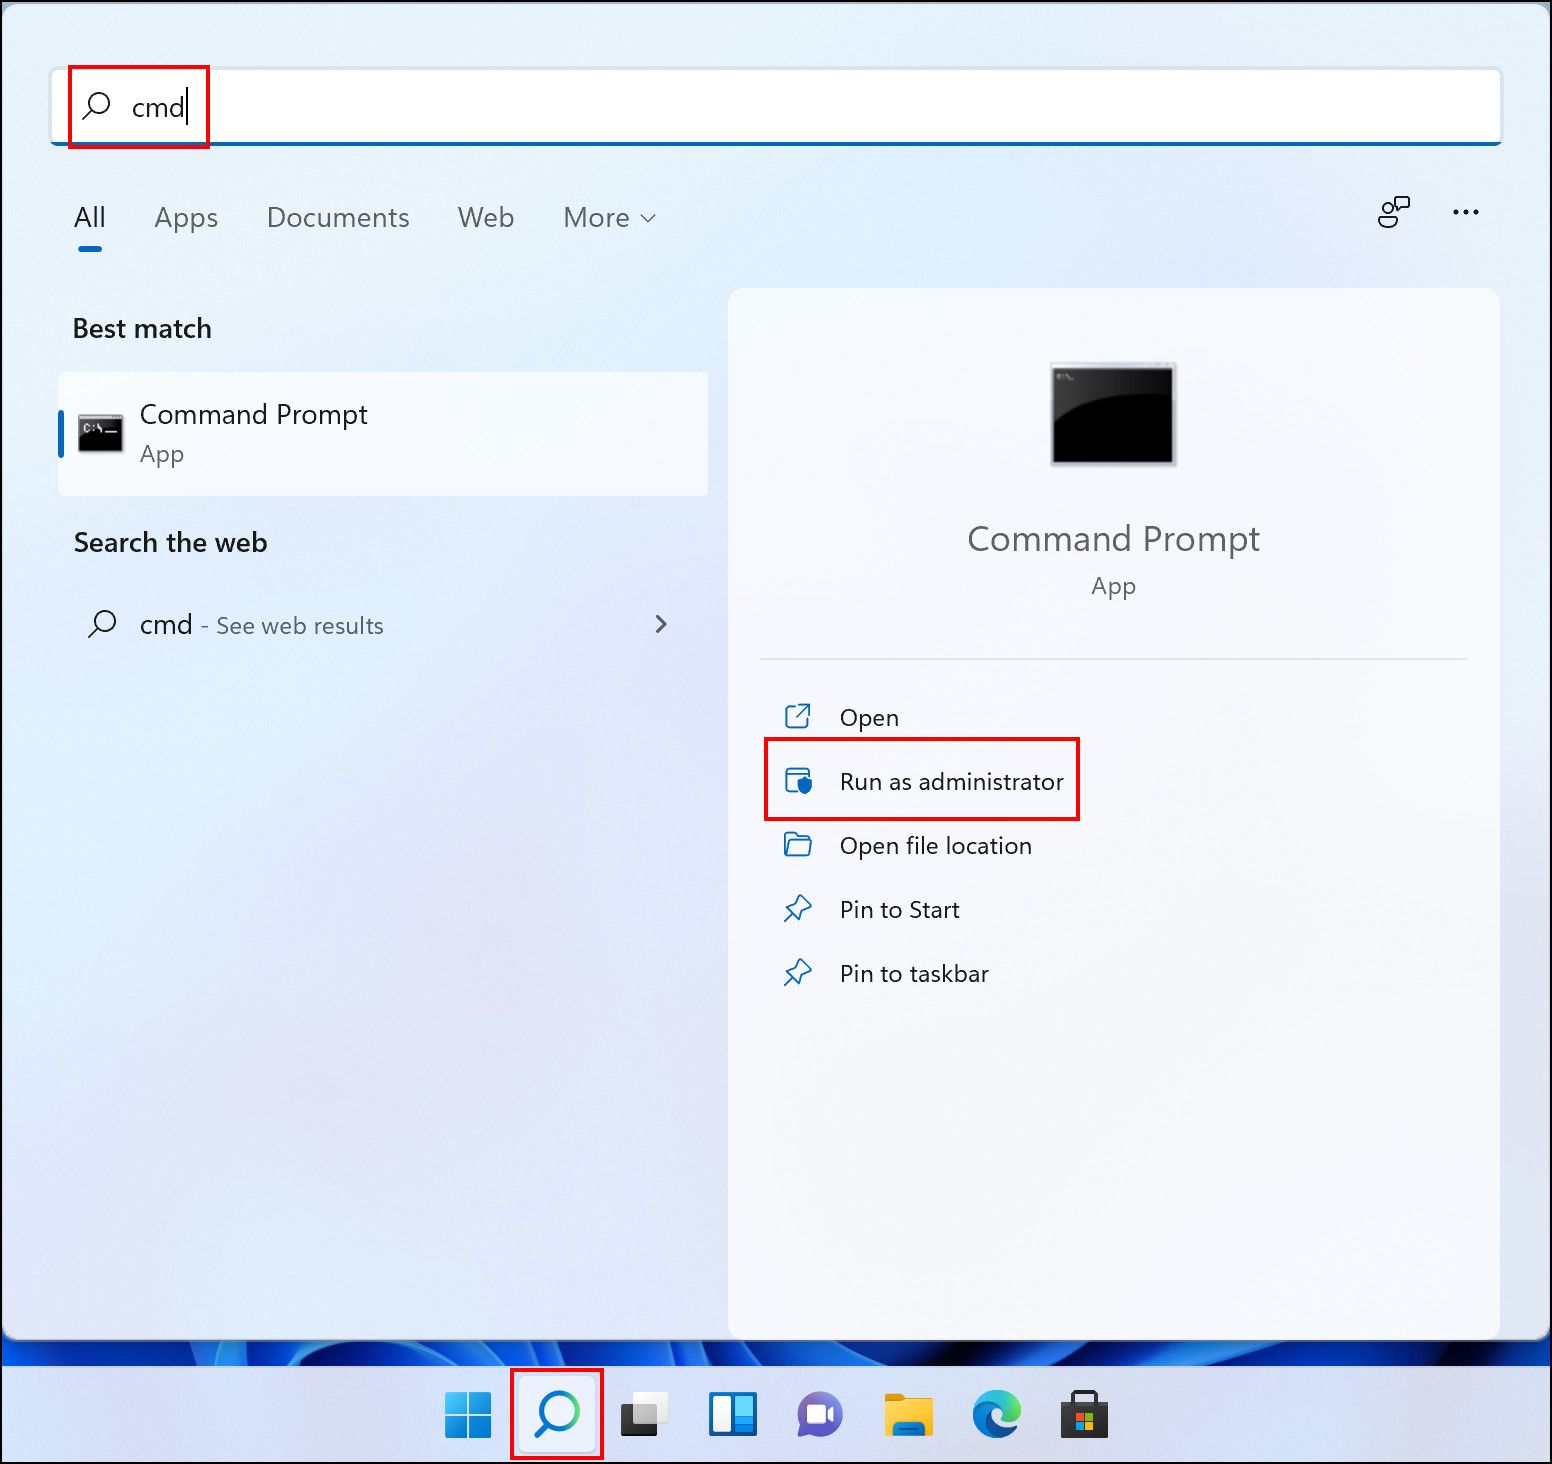
Type cmd in the search area of your taskbar and click Run as administrator. This will launch Command Prompt with administrative privileges.
-
Inside the Command Prompt window, type the command mentioned below and hit Enter to execute it. This should create a guest account successfully.
net user Visitor /add /active:yes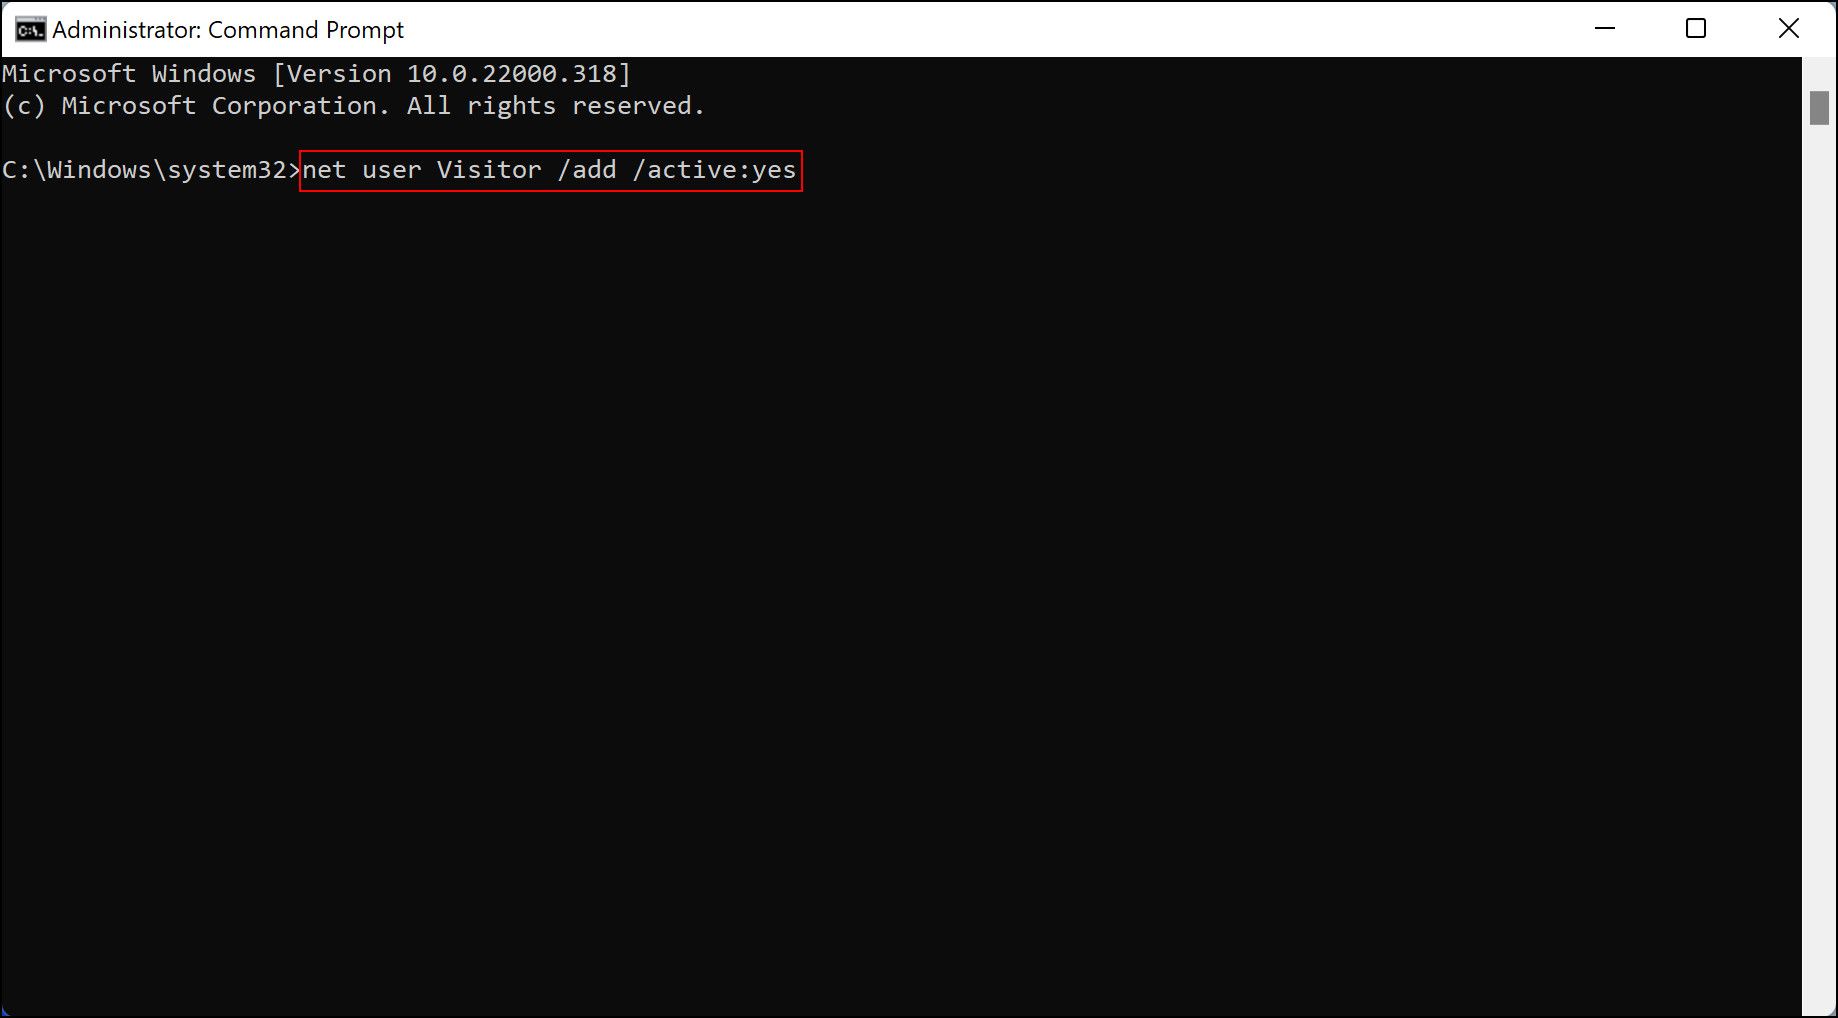
-
To secure your guest account, you can set up a login password as well, but this is optional. If you wish to proceed, execute the command below in the same window.
net user Visitor *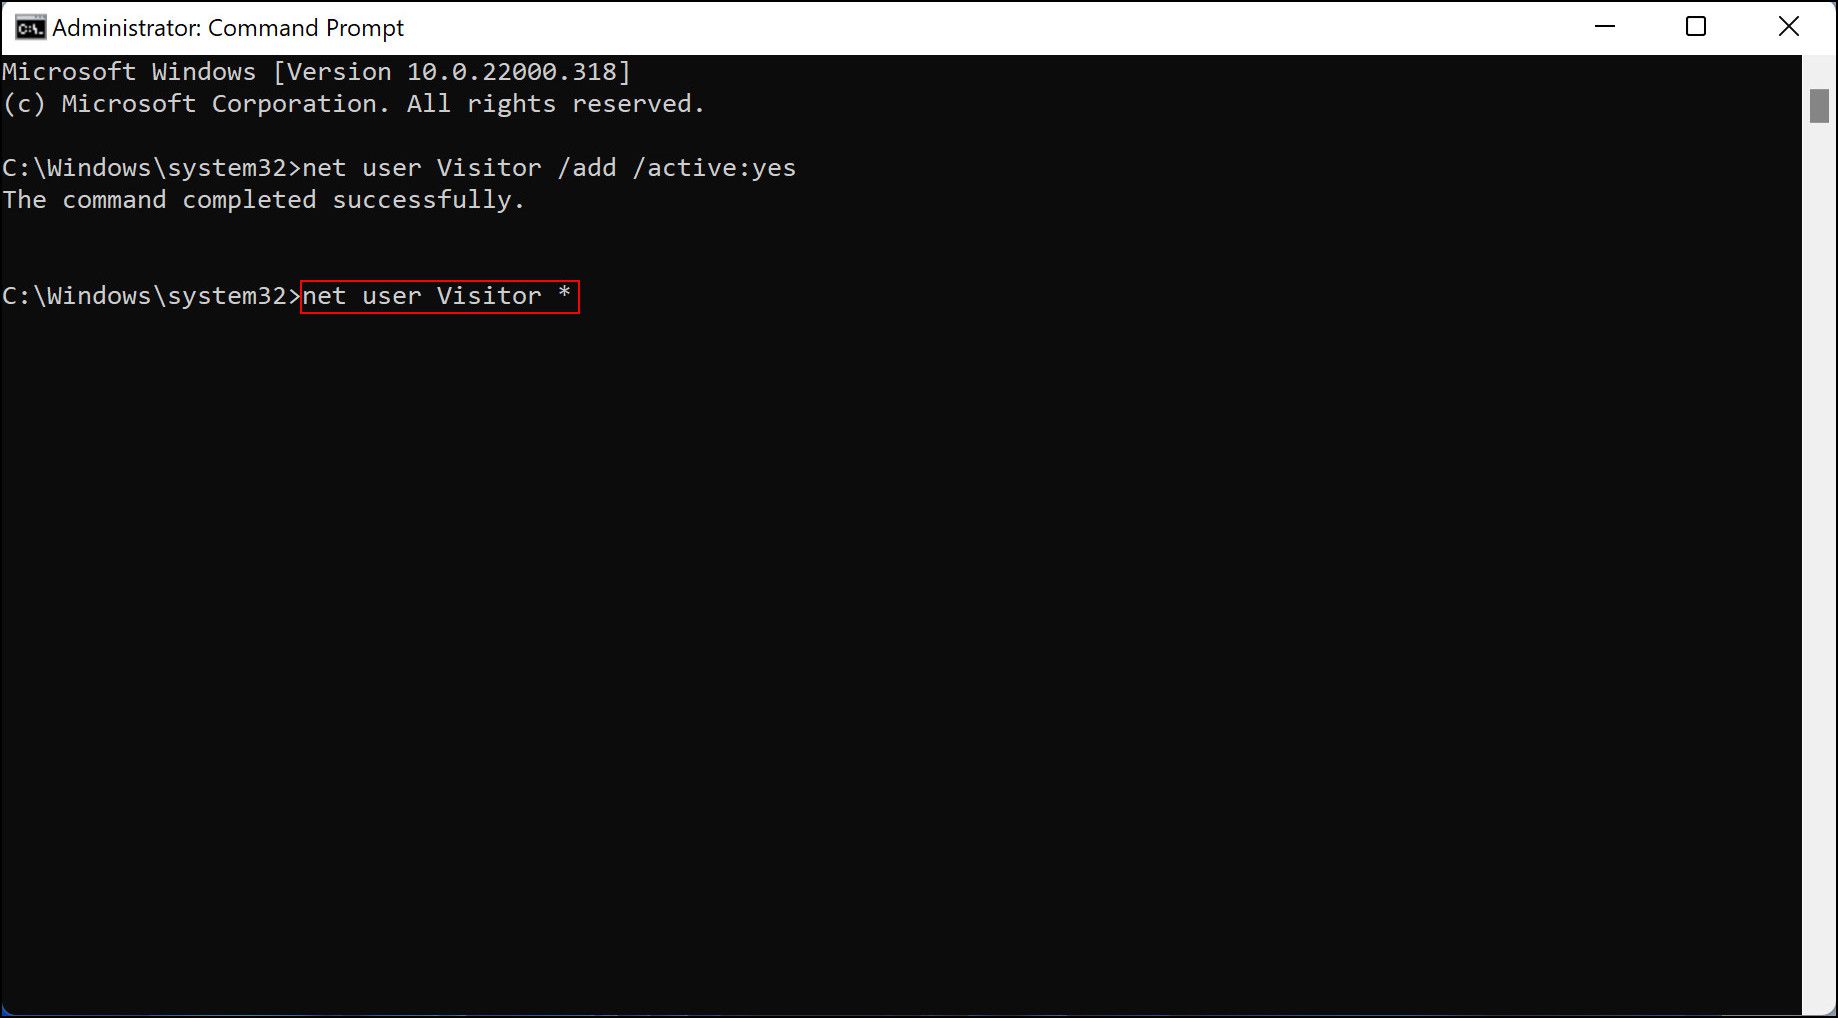
-
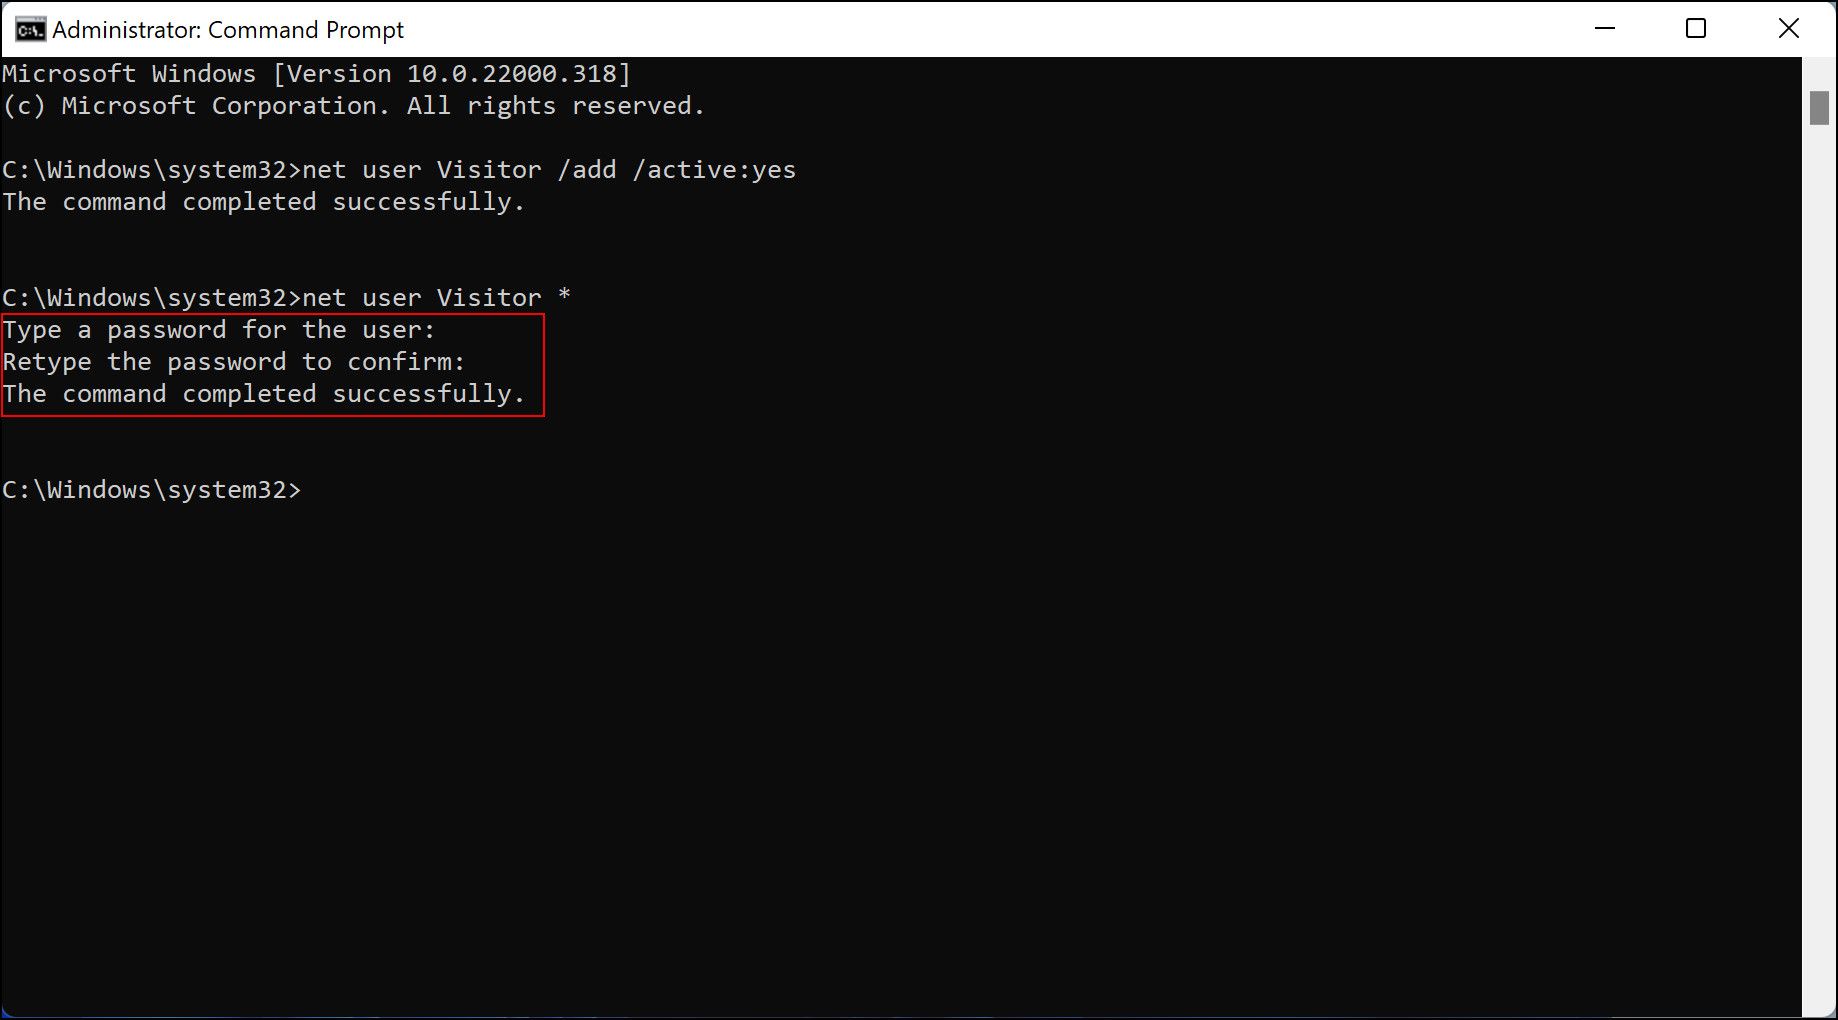
Add and confirm the password in Command Prompt.
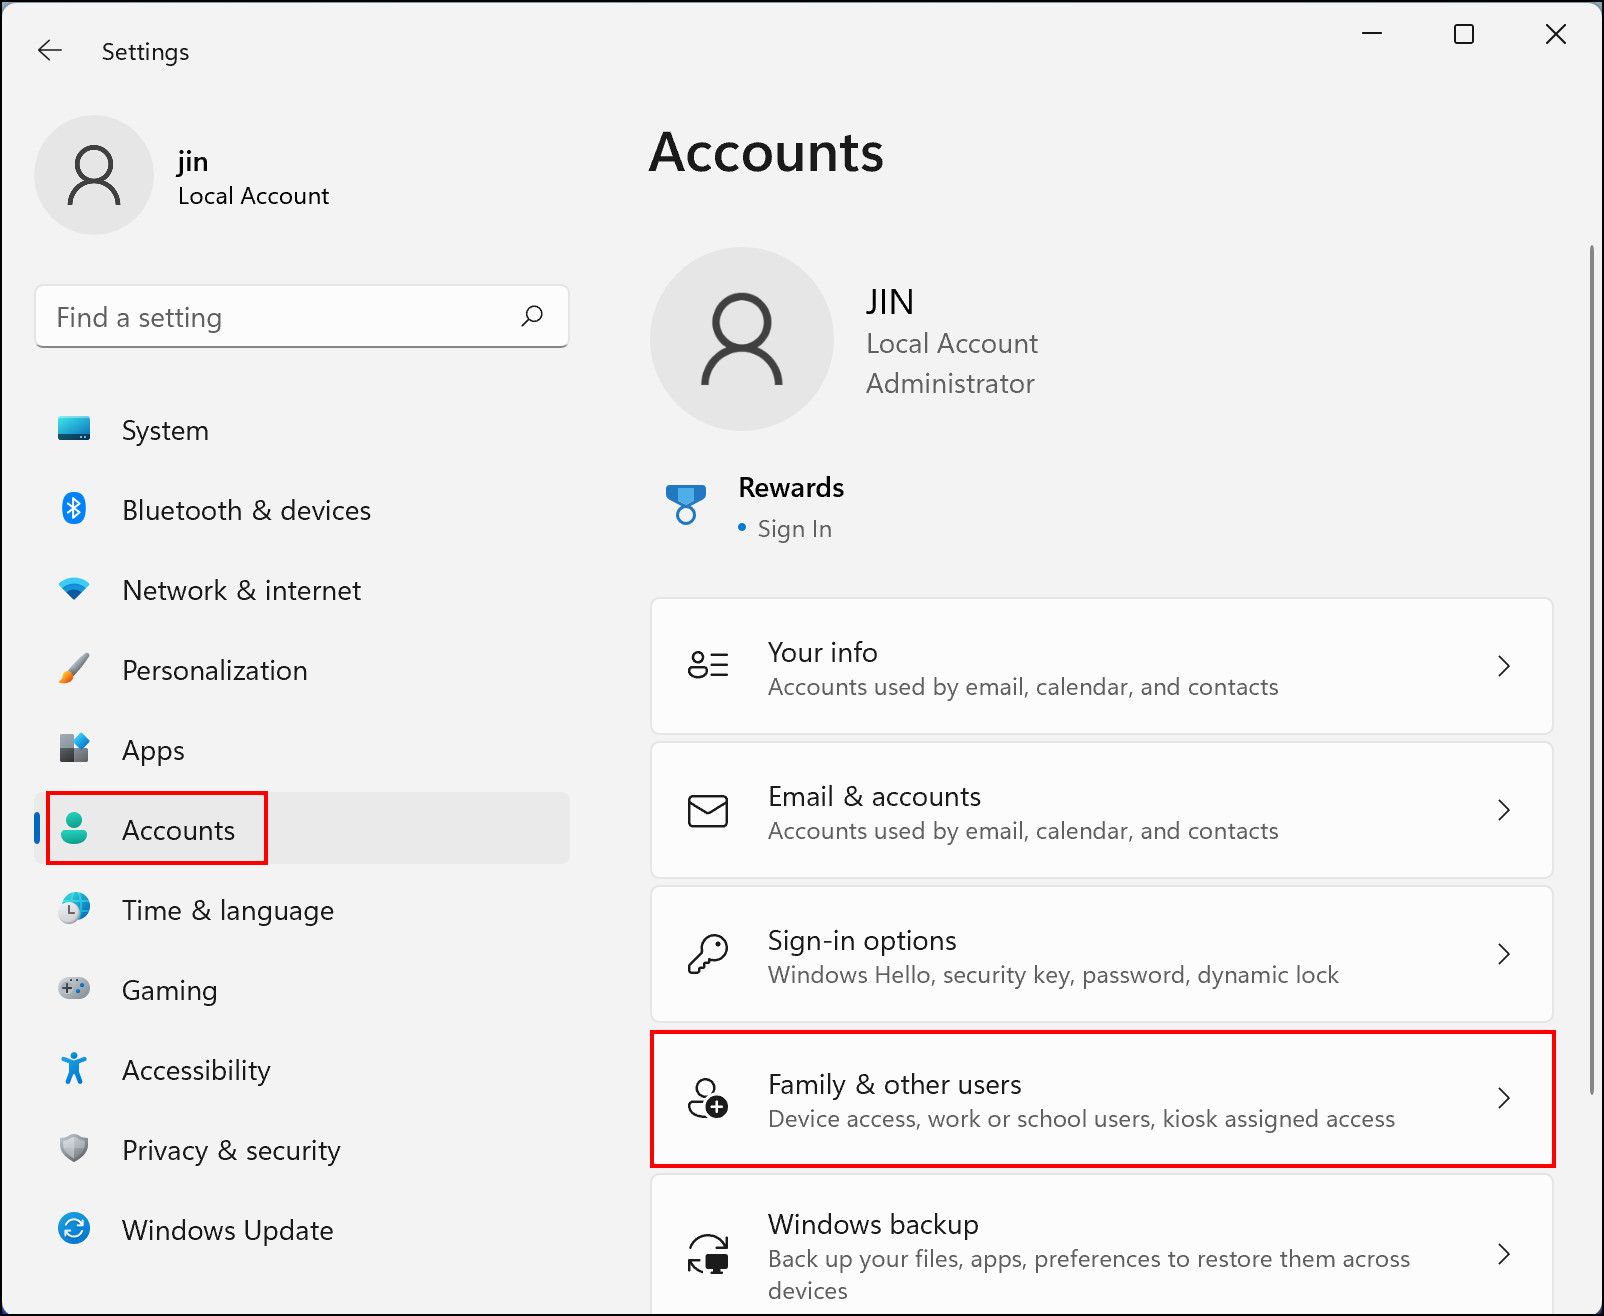
- To view the guest account, head over to Windows Settings and navigate to Accounts.
-
Choose Family & other users as shown below.
-
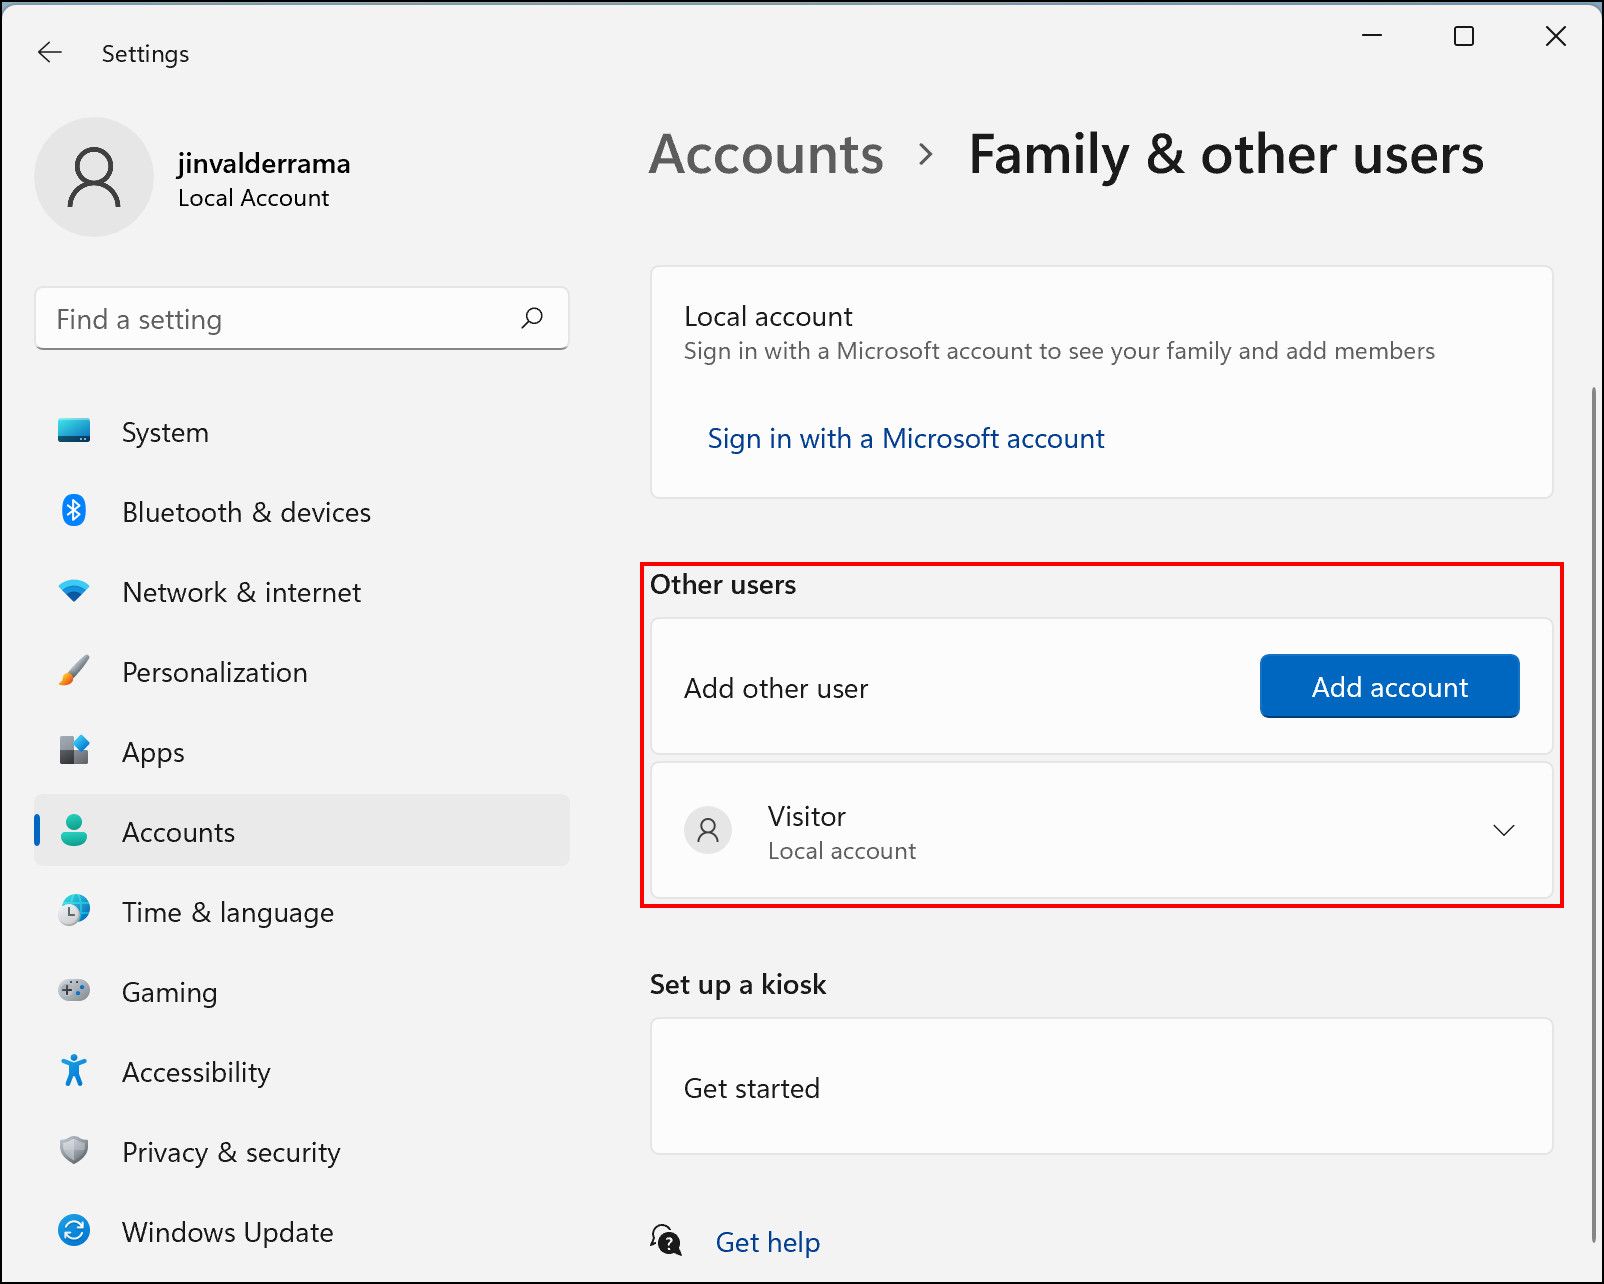
Navigate Other users, and you should see the guest account listed there. The account will now also be shown on your sign-in screen.


2. How to Delete a Windows 11 Guest Account via Command Prompt
If you wish to remove the account either now or any time in the future, you can do so by using Command Prompt again.
Here is what you need to do:
- First, launch Command Prompt with administrative privileges.
-
Type the command mentioned below and hit Enter to execute it inside the Command Prompt window. This should remove the account successfully.
net localgroup users Visitor /delete

2. How to Create a Guest Account Using Windows Settings
Another way to create a local guest account in Windows 11 is via Windows Settings. Follow the steps listed below to proceed with this method.
1. How to Create a Windows 11 Guest Account via Settings
Here is how you can create a guest account using Windows Settings:
- Press Win + I simultaneously to launch Windows Settings.
- Choose Accounts from the left panel and select Family & other users on the right side of the window.
-
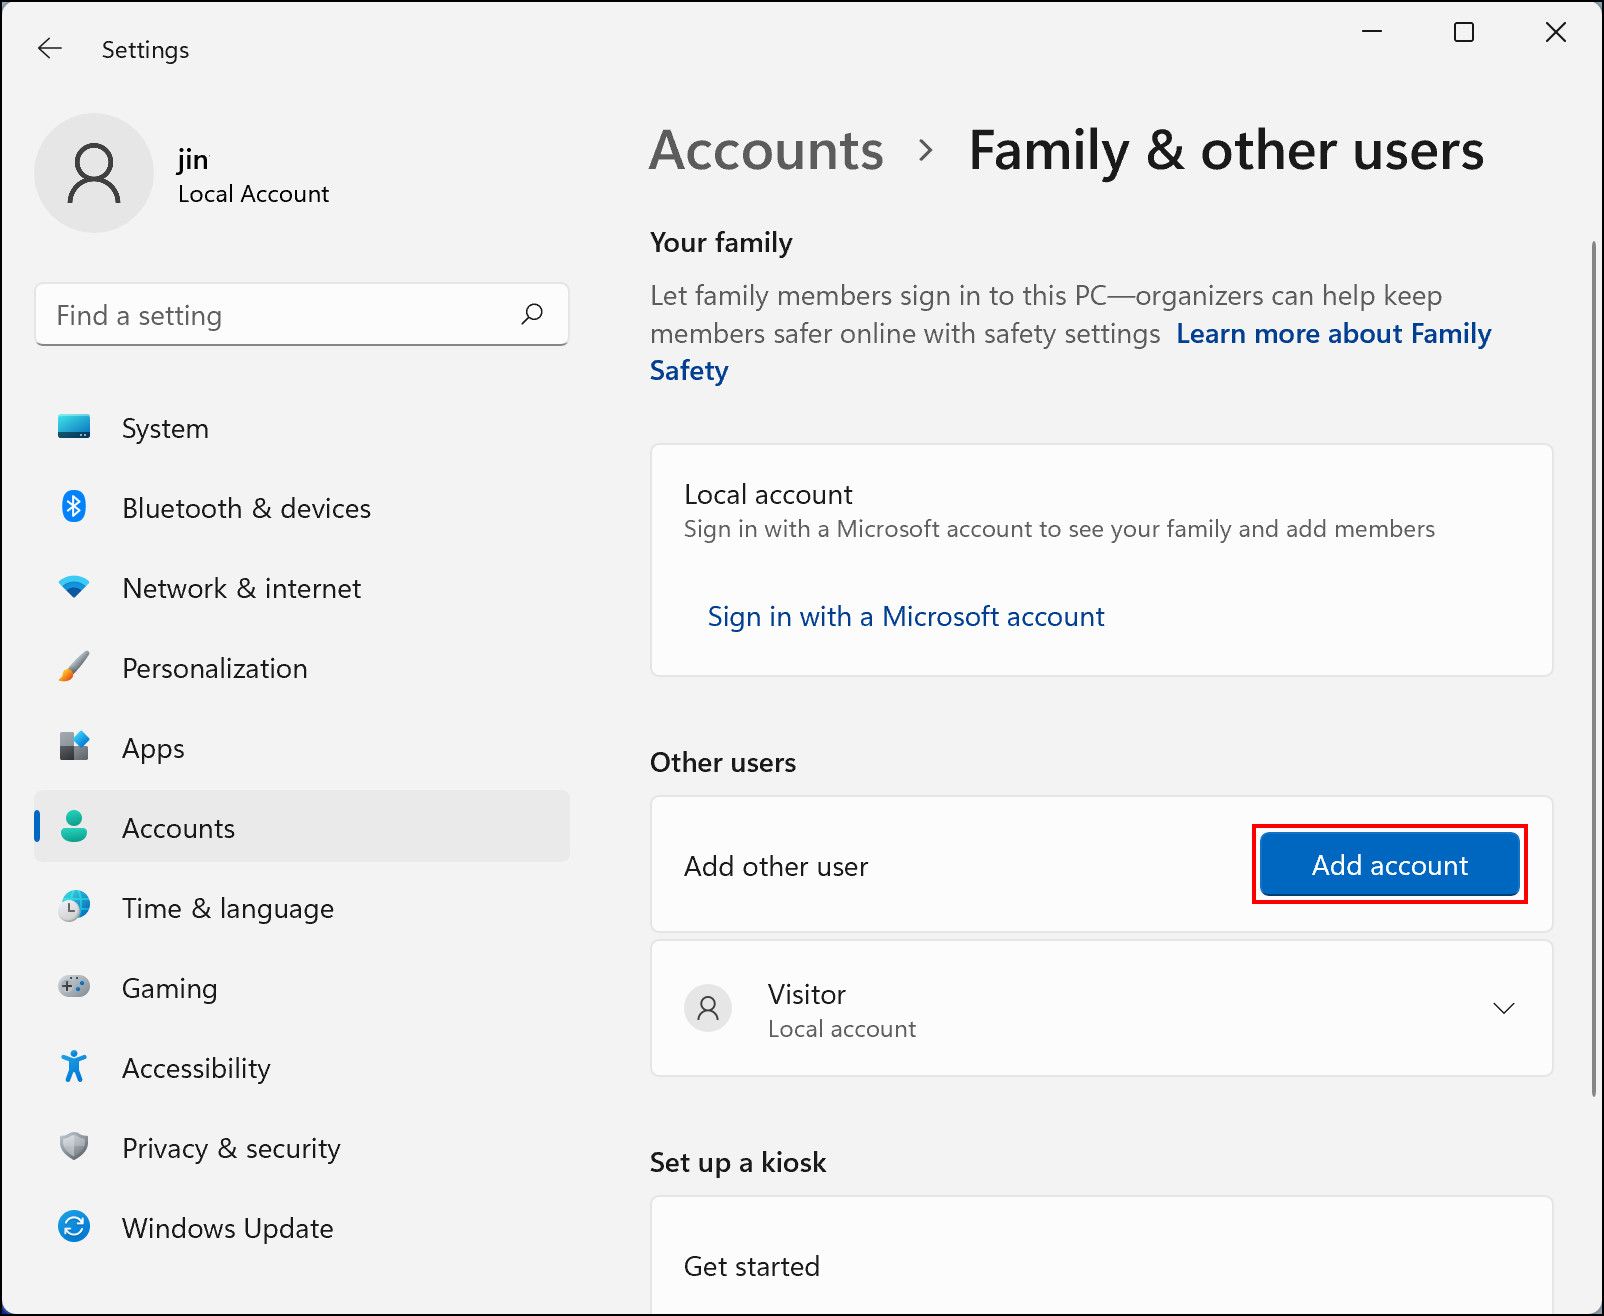
Click on the Add account button under Other users.
-
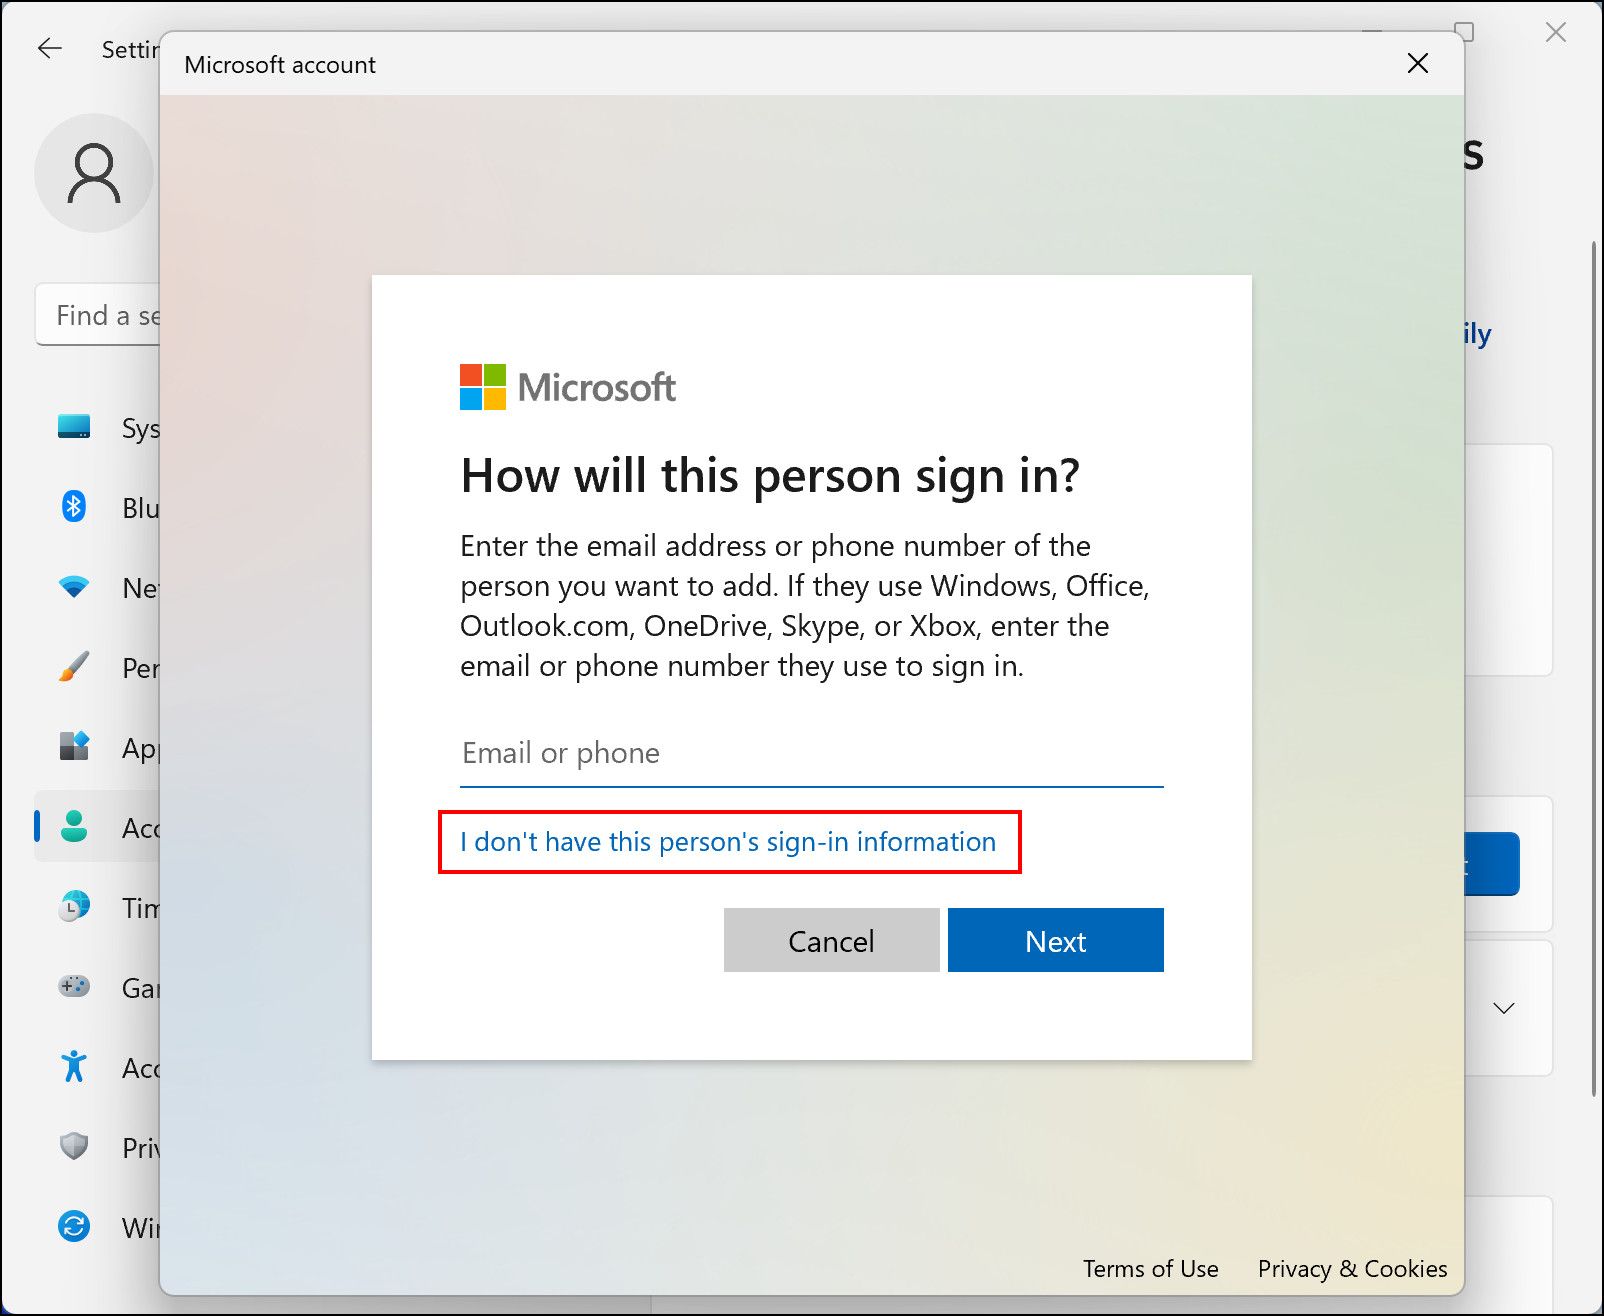
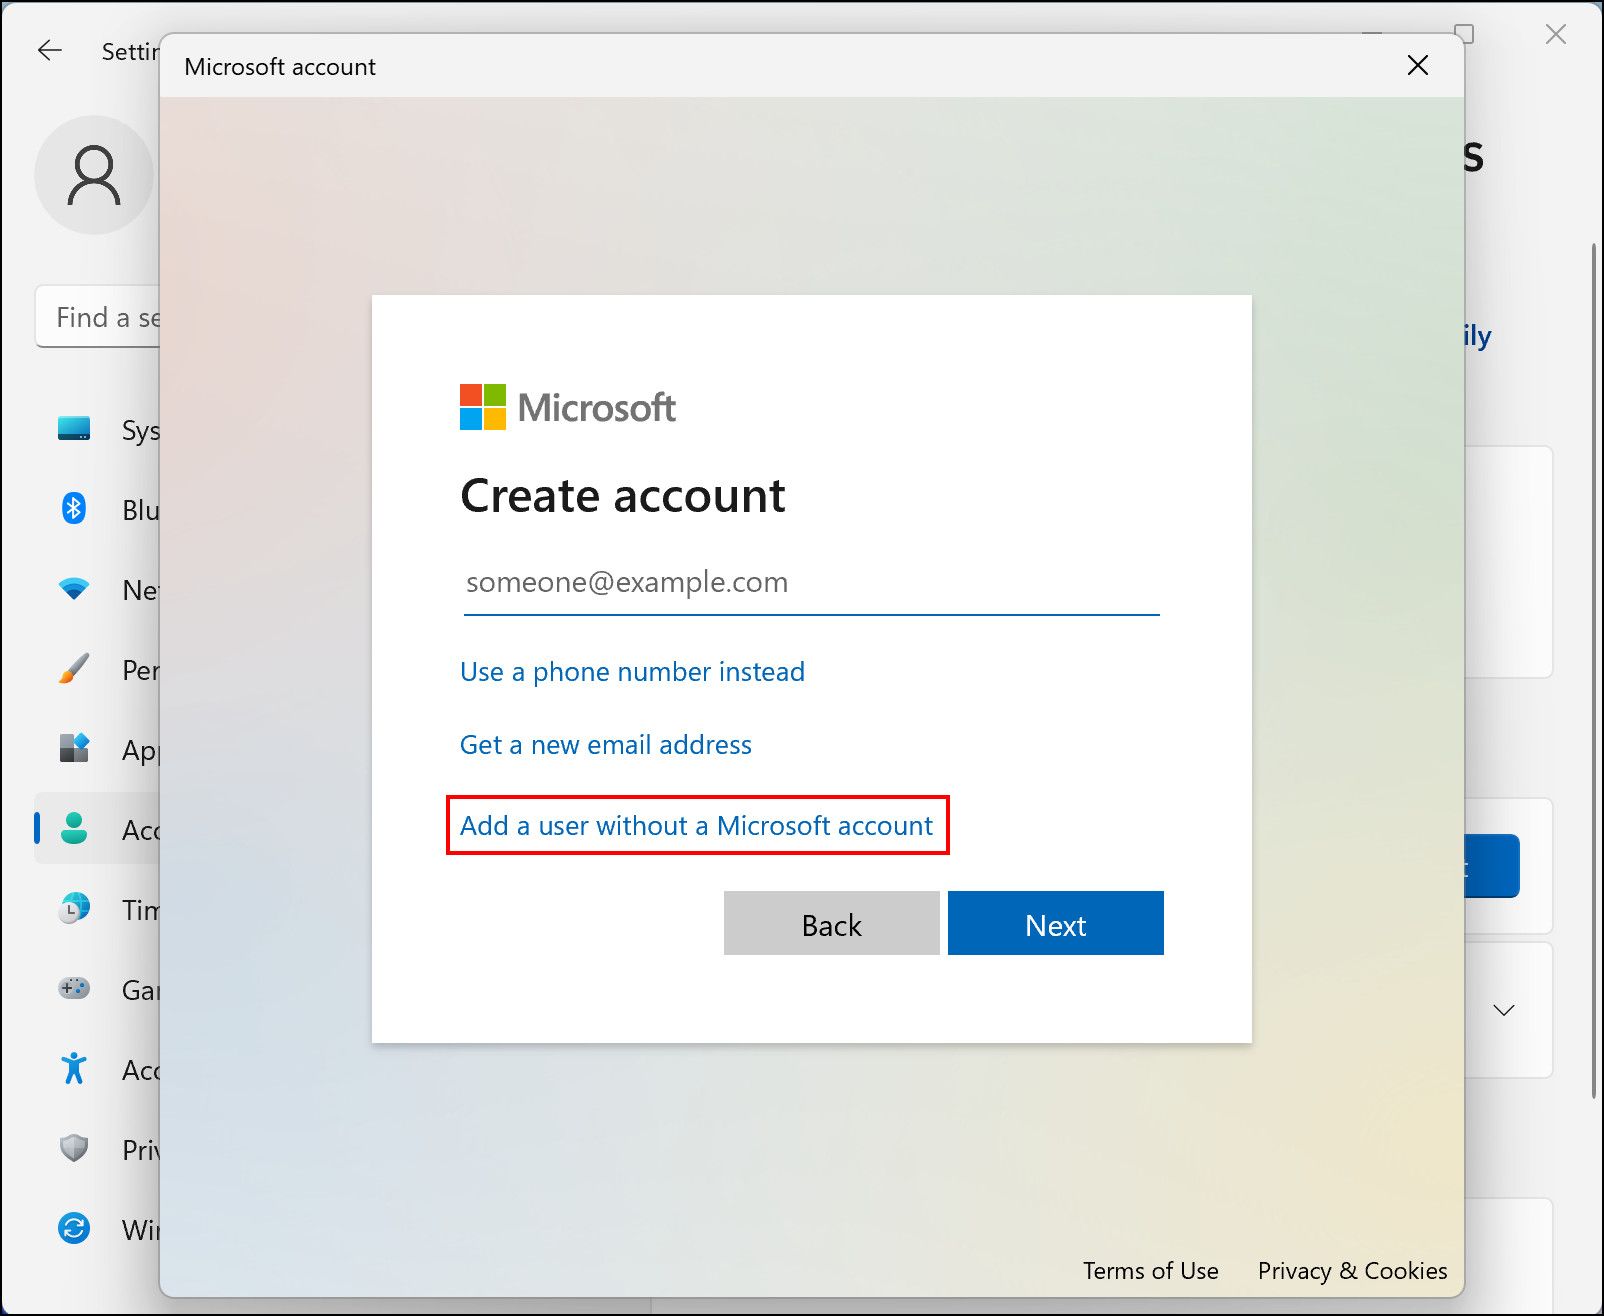
In the dialog box that pops up on your screen, select I don’t have this person’s sign-in information.
-
Then, choose Add a user without a Microsoft account.
-
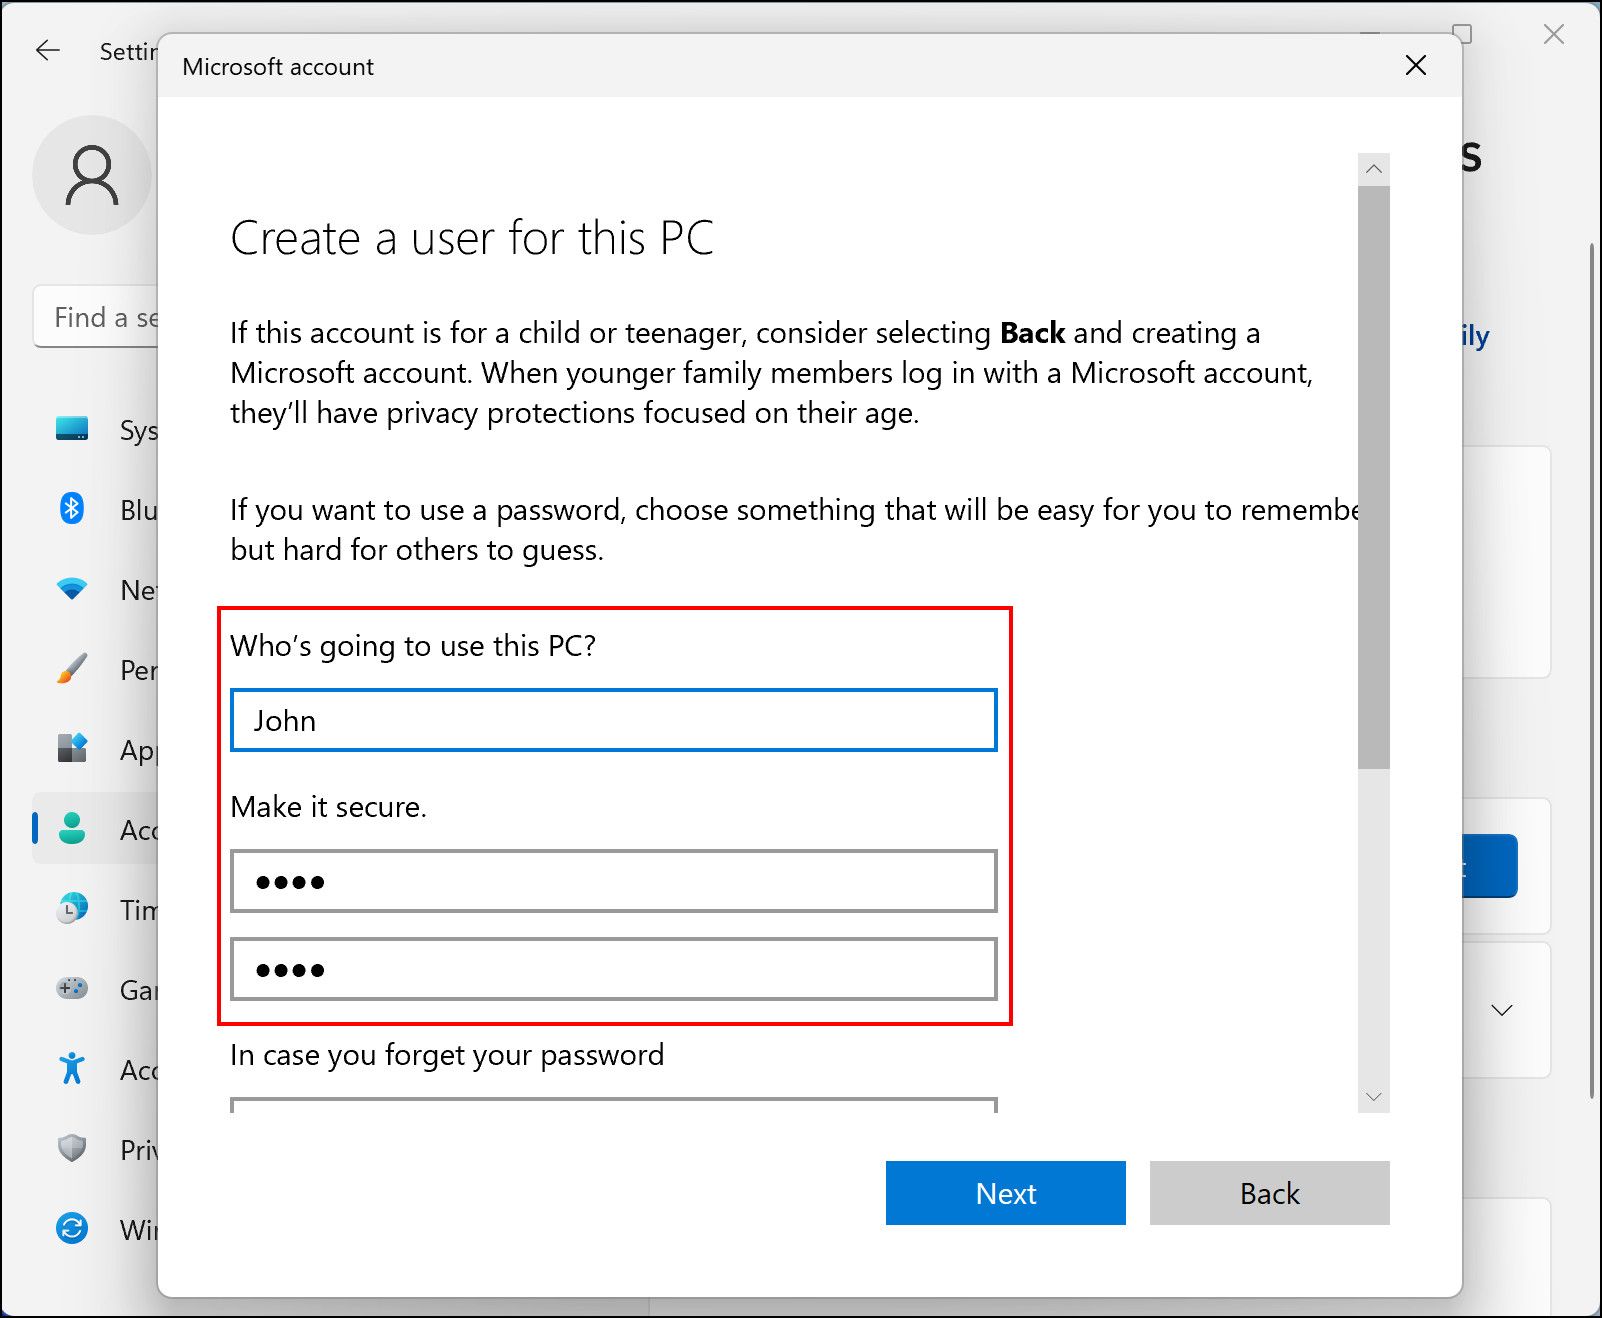
Add a name and password for the account. You cannot name the account as Guest, so choose any other name.
- Follow the on-screen instructions to proceed.


This should create a guest account on your Windows 11 operating system. However, at this point, this guest account is just a standard account that does not have many limitations. If you want to make the guest account more restrictive and limit what guest users can do, you can do so by making some changes to the Computer Management app.
Follow these steps if you wish to proceed:
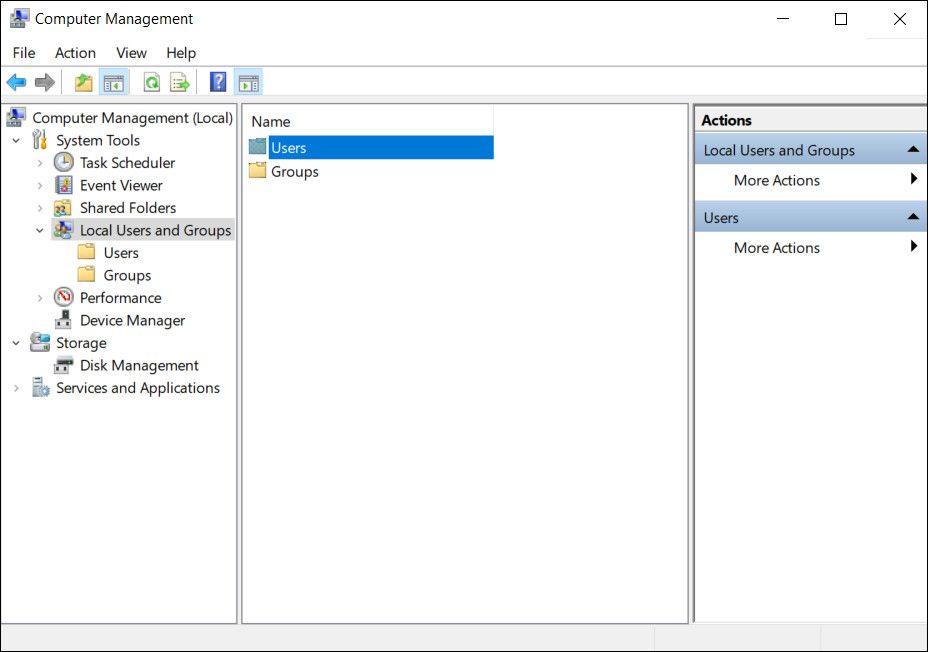
- Type Computer Management in the search area of the taskbar and click Open.
- Choose System Tools > Local Users and Groups from the left pane.
-
Next, click on Users on the right side of the window.
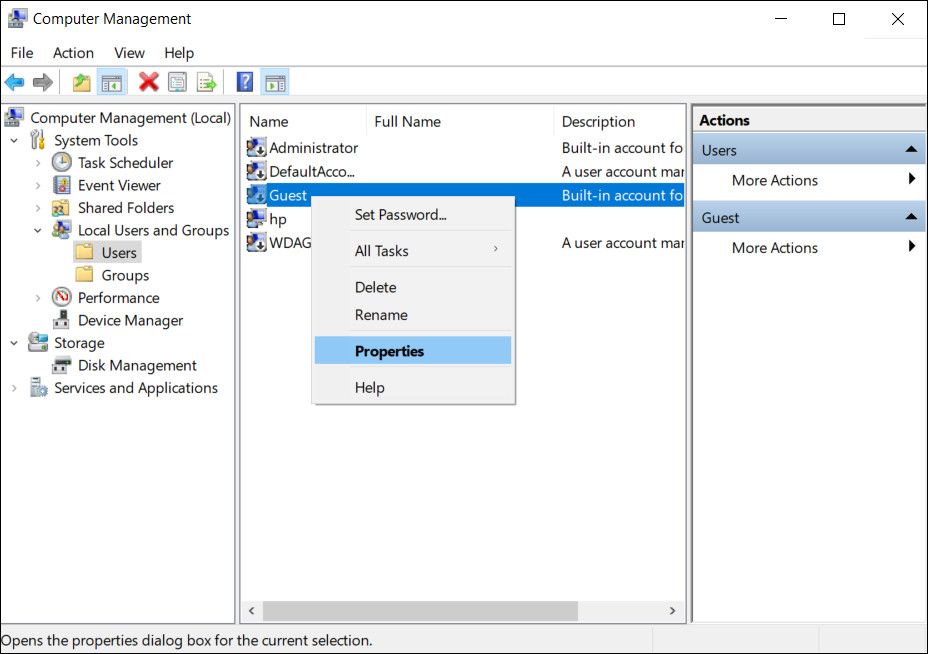
- On the right-hand side of the window, locate your guest account and right-click on it.
-
Choose Properties from the context menu.
-
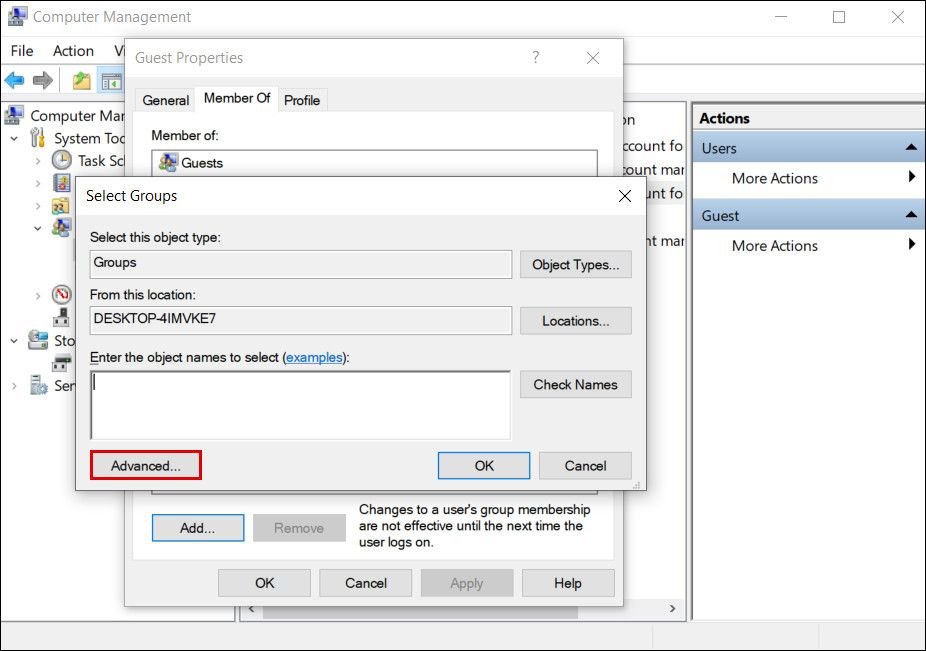
Click on the Member Of tab and hit the Add button.

-
Then, click on the Advanced button.
-
In the next window, hit the Find now button.
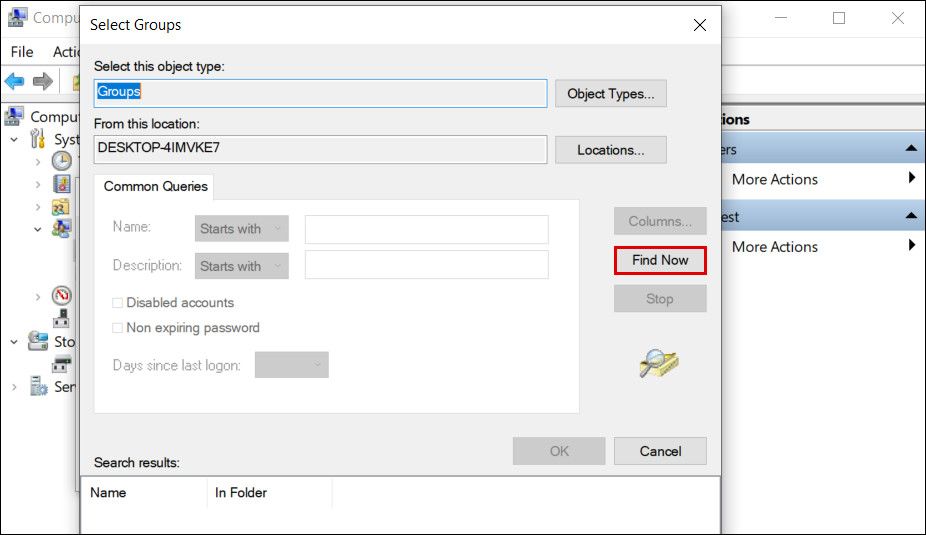
- Under Search results, choose Guests and click OK.
- Hit OK again.
-
Next, select Users and click on the Remove button.

- Finally, click Apply and then OK.


You will see that the account becomes more restrictive once you are done.
2. How to Create a Windows 11 Guest Account via Settings
If you longer need the guest account, here is how to remove it using Windows Settings:
- Launch Windows Settings and head over to Accounts.
- Choose Family & other users from the right side of the window.
-
Now, locate the guest account under Other users and click on the Remove button associated with it.
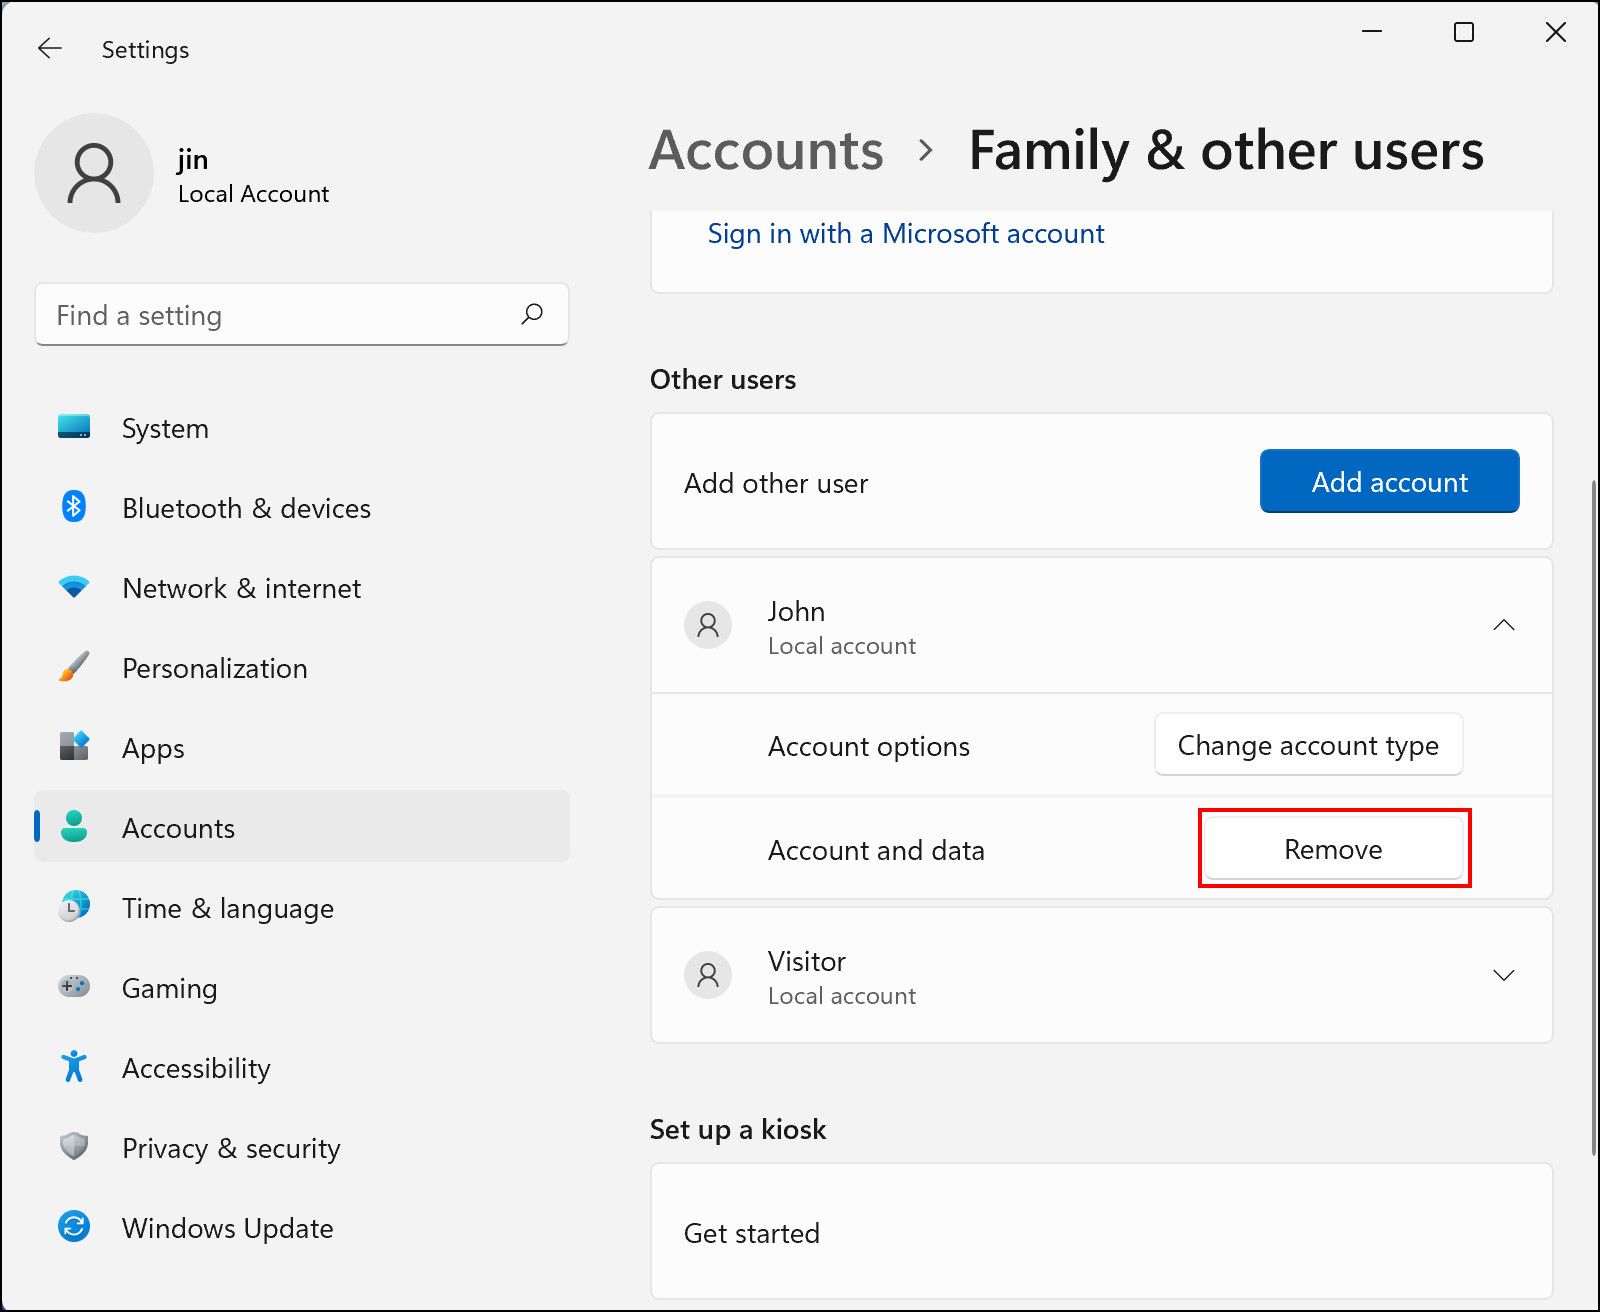

Your account and the data within it shall now be removed.
Make Your Windows 11 PC Secure With a Guest Account
It is cheaper to share a computer, but one of the most common concerns that discourage users from doing so is privacy. Now that you know how to create a separate guest account that offers limited access to the resources, you can let others use your computer without worrying about it.