
Windows developers, good news! Microsoft has released a Windows 11 Enterprise virtual machine, allowing you to start building Windows apps quickly. While other Windows 11 versions are available to download and install on different virtual boxes, this specific virtual machine is targeted to developers. This will provide you with a way to run the OS without changing your current system and test apps if need be.
Here’s what you need to know about the Windows 11 evaluation virtual machine, how you can install it in your VirtualBox, and common problems you may face when launching the machine.
What Is in the Windows 11 Enterprise Virtual Machine?
Apart from Windows 11 Enterprise, this ISO also includes various tools that developers can take advantage of. Here’s what’s included in the virtual machine:
- Window 11 Enterprise (evaluation version).
- Windows 10 SDK, version 2004 (10.0.19041.0).
- Visual Studio 2019 (latest as of 10/09/21) with the UWP, .NET desktop, and Azure workflows enabled and also includes the Windows Template Studio extension.
- Visual Studio Code (latest as of 10/09/21).
- Windows Subsystem for Linux enabled with Ubuntu installed.
- Developer mode enabled.
- A Windows Terminal installed.
The Windows 11 Enterprise VM can support a variety of virtual machines, specifically VMWare, Hyper-V, VirtualBox, and Parallels. It is a 20GB download and will expire on January 9, 2022.
How to Download and Install the Windows 11 Enterprise Virtual Machine in VirtualBox
Before installing this virtual machine, you need to ensure that you have enough physical hardware resources to devote to it. Microsoft didn't mention any requirement for this machine, but we recommend at least 4 GB of memory and enough unused local storage to hold a full installation of Windows, apps, and other files (32GB or more).
You can also follow the minimum system requirements for installing Windows 11 to ensure that it runs smoothly. Finally, if your computer can handle the virtual machine, follow the steps below to install Windows 11 Enterprise VM:
1. Download and Install VirtualBox
First, download and install VirtualBox from the VirtualBox wiki. The software is free to download and available for non-commercial use. Once the file .exe file is downloaded, click on it and follow the on-screen instructions to install it properly on your system.
Optional step: Download and install the Virtualbox extension pack from the VirtualBox Downloads page. You can skip this step, but installing this can improve and add additional features to your Virtualbox machine. Through this pack, you can get features like Mouse Integration, Internet Connectivity, USB support, and other great features. You can install the package by clicking the downloaded file and following the instructions.
2. Download the Windows 11 Enterprise Virtual Machine
Next, download a copy of the Windows 11 installation files in OVA format. You can get these files from Microsoft's Virtual Machine download page. Make sure to download the Virtual Disk Image for VirtualBox.
3. Import the OVA FIles
Open and extract the downloaded files. Next, double-click the extracted file to open it. It will automatically open your VirtualBox and the Import Virtual Appliance dialogue box. Here you can change the settings and the location of the Machine Base Folder. Make sure that you check the box that says Import hard drives as VDI. If you’re happy with the settings, click Import.
Wait for the virtual machine to upload in your VirtualBox. Once done, you can now open and use the Windows 11 Enterprise Virtual Machine.
Common Problems Encountered When Opening Windows 11 Enterprise Virtual Machine in VirtualBox
You’ve finally installed the Windows 11 development environment in your VirtualBox. But, unfortunately, you can’t open the virtual machine and run the OS. This can be frustrating, especially after correctly following the steps mentioned above.
But don’t worry, we have listed below the common problems faced when opening the Windows 11 Enterprise virtual machine in VirtualBox and how to fix them.
Failed to Open a Session for the Virtual Machine Error
If you’re experiencing an error that says "Cannot enable nested VT-x/AMD-V without nested-paging and unrestricted guest execution!," it is highly likely that your Hyper-V, a virtual machine native in your Windows 10 system, is enabled. In some cases, disabling this will do the trick. Here’s how to fix this problem:
- Press Win + S to open the Windows search bar, type cmd, then right-click the Command Prompt search result and select Run as Administrator.
- In the Command prompt, type bcdedit /set hypervisorlaunchtype off and press Enter. Close this window.
-
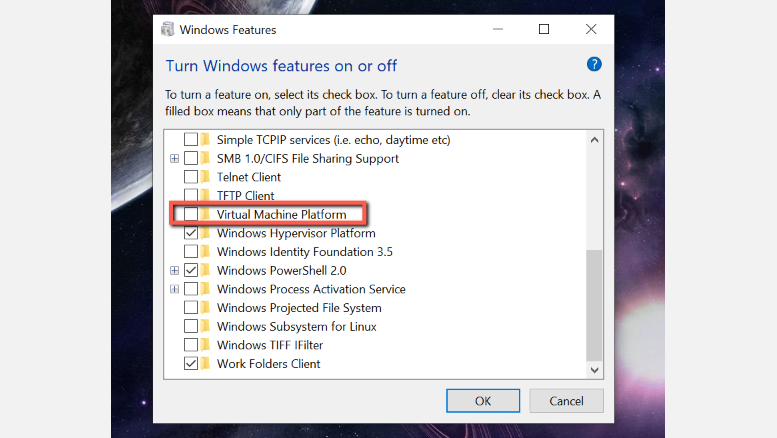
Next, Turn off the Windows feature "Virtual Machine Platform." To do this, press Win + S to open Windows Search. Type Windows Feature and press Enter. Now, look for the Virtual Machine Platform option, and make sure that there’s no check beside it. Reboot your computer.
- After rebooting your computer, open VirtualBox and the Windows 11 Enterprise virtual machine. Your machine should normally run now.

The UEFI Interactive Shell Opens Instead of Booting Windows 11
Another problem that you may encounter when opening this virtual machine is getting the UEFI interactive shell window instead of booting the system. Don’t worry; there’s nothing wrong with the machine you’ve installed. You might have accidentally enabled the EFI setting in your machine. To fix this issue, follow the steps below:
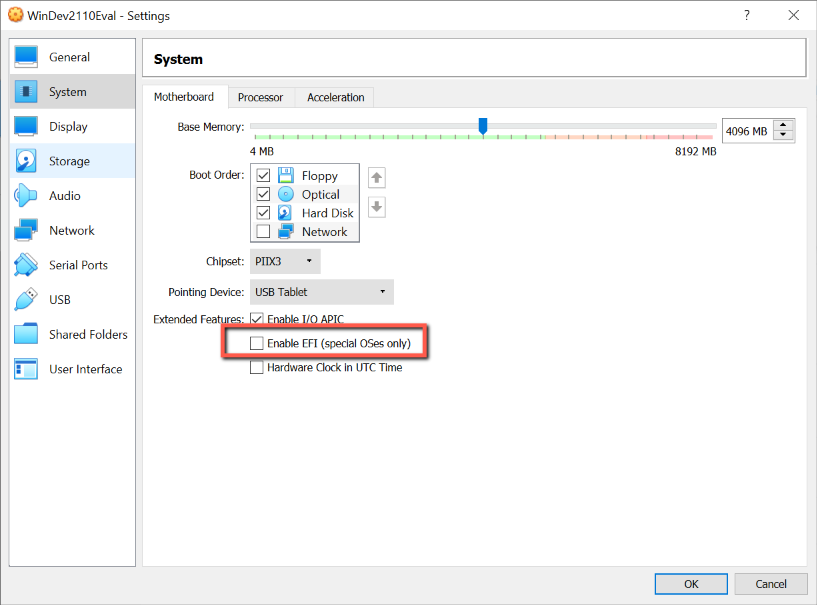
- Select the Windows 11 virtual machine and click the Settings icon.
- Go to the System settings found on the left-side panel and uncheck the box beside Enable EFI (special OSes only). Click OK.
-
Start your virtual machine again. This will boot your Windows 11 Enterprise system.

Windows 11 Enterprise Virtual Machine for Developers
This virtual machine is specifically made for developers so they can start creating apps for Windows 11. Non-developers can also download and install this virtual machine so they can see and experience the latest Microsoft operating system. However, this virtual machine will expire on January 9, 2022. This means that you won’t be able to use this VM image and may need to set up a new one again.
If you wish to continue using Windows 11 safely without changing your main system, you can still do so by downloading and installing the Windows 11 ISO from the Microsoft download page in your VirtualBox. However, you need to have a product key ready to continue enjoying this operating system, even as a virtual machine.