Hyper-V is Microsoft's in-house virtualization solution for Windows 11. It lets you create virtual machines and run them on virtual hardware. That said, if you want to use Hyper-V on your computer, you will need to enable it first.
In this article, we show you the how to enable Hyper-V in Windows 11 and create virtual machines without third-party tools.
What Are the Use Cases for Hyper-V?
Hyper-V is a native virtualization tool that allows you to run multiple operating systems on your system virtually without affecting your host OS.
With Hyper-V, you don’t have to rely on third-party hypervisor solutions such as VirtualBox and VMware Workstation. Hyper-V has plenty of use cases for individuals, and even more for organizations.
Some Hyper-V virtual machine use cases include:
- Run and test software for an older version of Windows or non-Windows OS
- Test software on multiple operating systems using multiple virtual machines on a single host system.
- Offers disaster recovery features including live migration and failover clustering for increased uptime.
- Create and run virtual machines in isolation for improved security.
Prerequisites to Enable Hyper-V on Windows 11

Hyper-V is available as an optional feature on Windows 11 Pro, Enterprise, and Education. To check your edition of Windows, go to Settings > System > About. Then, check the Windows specifications section to find your Windows edition.
If you have the Home edition, here’s how to install Hyper-V on Windows 11 Home. All you have to do is run a bat script to install Hyper-V on non-compatible systems.
Depending on how many virtual machines and types of applications you intend to run, you may need more resources to run the virtual machines smoothly.
In addition, you need to enable Hardware Virtualization in BIOS. It is an essential feature to run virtual machines on your Windows system but often disabled by default.
How to Enable Hardware Virtualization in BIOS
On compatible systems, you can enable Hardware Virtualization in BIOS. The below steps are for an HP computer. If you are using a custom-made PC or laptop from another manufacturer, refer to the user manual for detailed instruction. If not, refer to our general guide to enter the BIOS on Windows.
To enable Hardware Virtualization in BIOS:
- Shut down your PC if it is powered on.
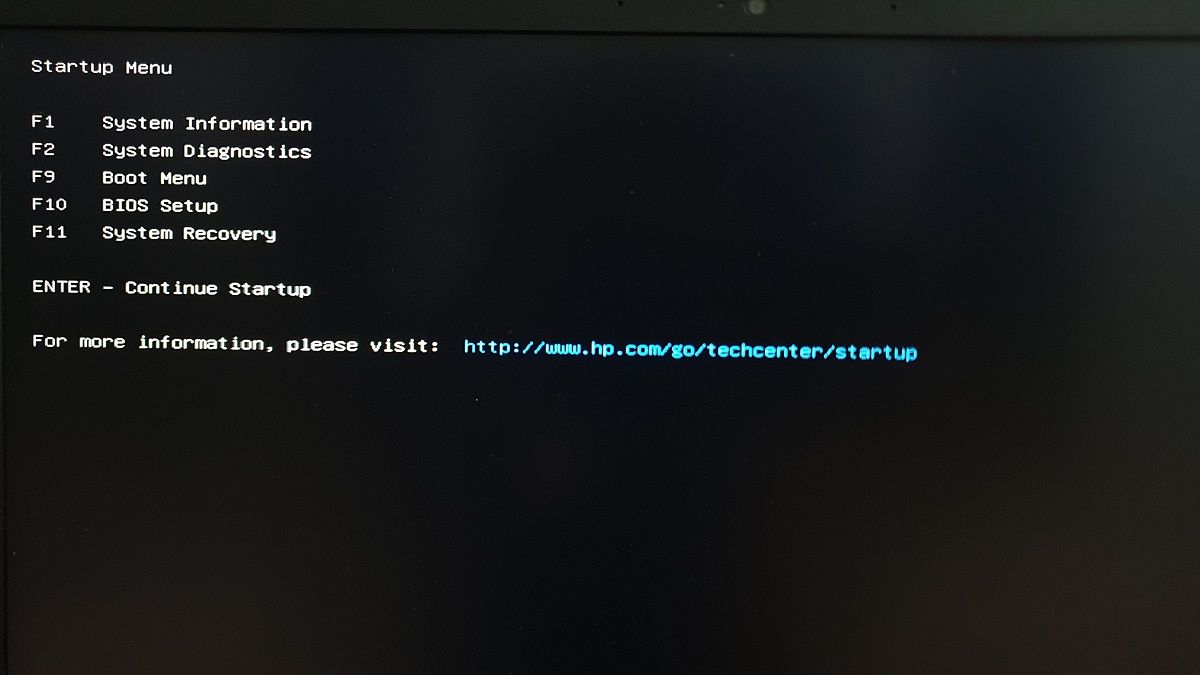
- Press the Power button to power on the system and start pressing the Esc key to view the Startup Menu.
-
In the Startup Menu, press F10 to enter the BIOS setup.
- In the BIOS Setup Utility, use the arrow key and open the Configuration tab.
-
Next, use the down arrow key to highlight the Virtualization Technology option.
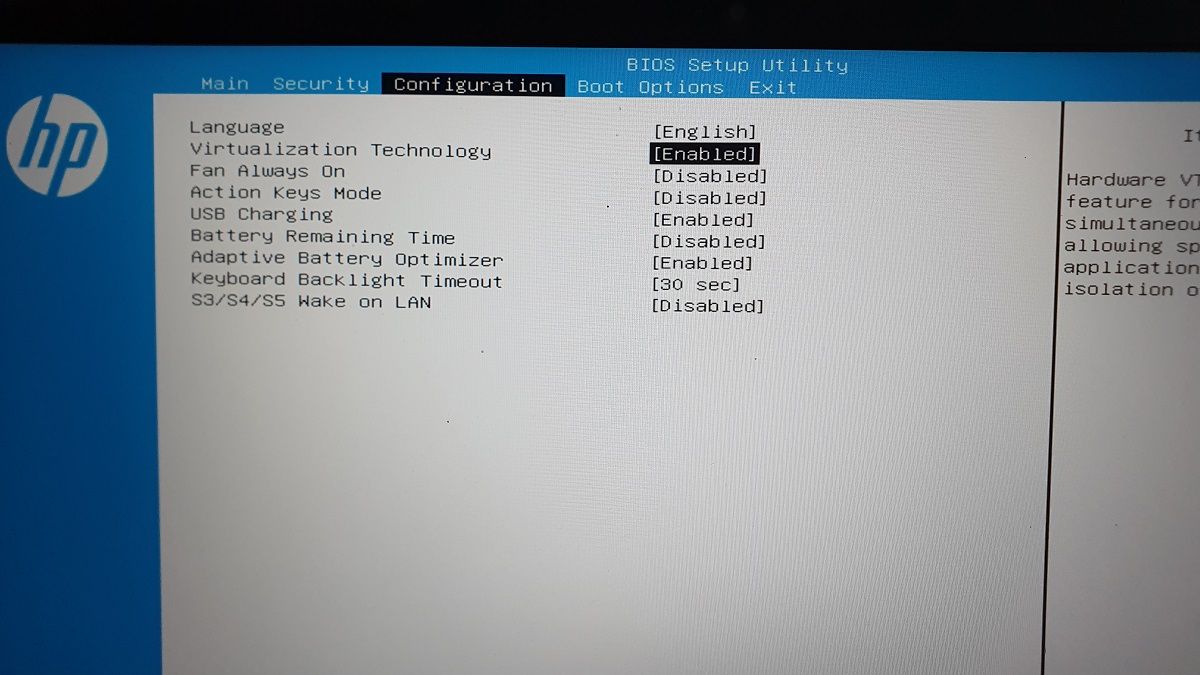
- Hit Enter and then select Enabled from the options.
- Press F10 to save the changes and exit BIOS.
- Your PC will restart and apply the changes. This may take a while, so wait till your system is fully restarted.


After restart, you can enable Hyper-V on Windows 11. Here’s how to do it.
1. Turn On Hyper-V in Windows 11 Via Control Panel

You can enable Hyper-V using the Windows Features dialog. You can access Windows Features to add or remove optional features in Windows 11 from the Control Panel. Here’s how to do it.
- Press Win + R to open Run.
- Type control and click OK to open the Control Panel.
- In the Control Panel, go to Programs > Programs and Features.
- In the left pane, click on Turn Windows features on or off.
- In the Windows Features dialog, select Hyper-V. If you expand Hyper-V, you will see Hyper-V Management Tools and Hyper-V Platforms.
- Make sure both the options are selected and click OK. Since these are optional features, Windows will begin to install and enable them on your PC. This process may take some time to complete.
- Once completed, click on Restart Now to restart, and apply the changes.
After the restart, search for Hyper-V and click on Hyper-V Manager to create virtual machines in Windows 11.
2. Add Hyper-V to Windows 11 Using Command Prompt

Command Prompt offers a fast and efficient way to perform repetitive tasks. You can use the DISM (Deployment Image Servicing and Management) command-line tool to access and install optional Windows features via Command Prompt.
Follow these steps to enable Hyper-V on Windows 11 using Command Prompt:
- Press the Win key, and type cmd. Then, right-click on Command Prompt and select Run as Administrator.
-
In the Command Prompt window, type the following command and hit Enter to execute:
DISM /Online /Enable-Feature /All /FeatureName:Microsoft-Hyper-V - The Deployment Image Servicing and Management tool will start enabling the Hyper-V feature and show the progress on the Command Prompt.
- Once the operation is completed successfully, you will need to restart your PC. So, press Y on your keyboard to confirm the action.
After your PC restarts, you can open and use the Hyper-V Manager to create virtual machines.
3. Enable Hyper-V Using PowerShell

If you prefer Windows PowerShell over Command Prompt, you can also enable Hyper-V using the shell application.
However, unlike Command Prompt, PowerShell uses the enable-WindowsOptional features cmdlet to enable optional features in a Windows image.
To enable Hyper-V using PowerShell:
- Press the Win key, and type powershell. Then, right-click on PowerShell and select Run as Administrator.
-
In the PowerShell window, type the following shell command and hit Enter:
Enable-WindowsOptionalFeature -Online -FeatureName Microsoft-Hyper-V-All - PowerShell will run the cmdlet and initiate the Hyper-V enabling process. If successful, you will be asked to restart your PC.
- Type Y to confirm, and your PC will restart to apply the changes and enable a new feature.
How to Disable Hyper-V in Windows 11
While Hyper-V is safe to enable and use, you can disable it as easily using PowerShell. Useful if the virtualization tool causes conflict with your antivirus solution and other apps.
To disable Hyper-V using PowerShell:
- Open PowerShell as administrator.
-
In the PowerShell window, type the following command and press Enter:
Disable-WindowsOptionalFeature -Online -FeatureName Microsoft-Hyper-V-All - Wait for the success message to appear and close PowerShell.
- Restart your PC to apply the changes.
How to Configure Hyper-V Settings

Once Hyper-V is up and running, you can configure some settings to optimize your virtual machines for optimal performance. Here are a few settings you can configure before creating a virtual machine. You can access these settings from the right pane in Hyper-V Manager.
- Hyper-V Settings: You can configure your virtual hard disk and virtual machine location, configure NUMA spanning storage migration, and allow enhanced session mode. On the user side, it lets you configure the virtual machine's keyboard and the mouse release key.
- Virtual Switch Manager: It lets you create External, Internal, or Private switches. Virtual switches are bound to the physical network adapter to access the network.
- Integration services: You can choose from and enable/disable a host of integration services, including Heartbeat, Key-Value pair exchange, Time synchronization, and Volume shadow copy requestor (VSS) to enhance the performance and functionality of your virtual machine.

While the MMC-based Hyper-V manager is functional and built into the OS, consider using the relatively new Windows Admin Center. It is a browser-based management app that lets you manage your servers, virtual machines, local users and groups, and more.
Download Windows Admin Center from the official Microsoft page and run the installer to give it a go. Once installed, open the app, and it will launch in your default browser, giving you access to a host of management tools.
Many Ways to Enable Hyper-V in Windows 11
Hyper-V is a type 1 hypervisor, which means it runs directly on a computer’s hardware. It comes pre-installed, free to use without restriction, and offers linear performance on a consumer-grade system.
That said, dedicated virtual machines such as the VMWare WorkStation Pro is available on multiple platforms, can be used on older systems, and is more suitable for enterprise solutions. Check out our comparison comparing the three popular hypervisors to find the one that works for you.