The Virtualization-Based Security (VBS) feature came into the spotlight with Windows 11 and comes enabled by default on newer systems. This feature existed in Windows 10 too, but it hogged quite a lot of system resources.
If you experience a drop in gaming performance after upgrading to Windows 11, don't fret. If you've tried everything already and nothing seems to work, VBS may be the culprit behind your low frame rates. As such, let's explore how to disable VBS and squeeze the maximum amount of performance from your system.
Does VBS Really Reduce Performance?
PC Gamer and Tom's Hardware dove in deep to learn about the drop in performance after enabling VBS. Both findings revealed performance drops ranging from 5-25 percent. Popular titles like Horizon: Zero Dawn and Shadow of the Tomb Raider suffered massive FPS drops.
Surprisingly, the CPU and GPU frequency remained unchanged. But these components were drawing less power. There haven't been any detailed findings about what is actually causing it. But if you want to get maximum performance in games and applications, VBS is likely standing in your way.
What Are the Repercussions of Disabling VBS on Your System?
Virtualization-Based Security (VBS) works with Windows Hypervisor to create an isolated memory region. This isolated region securely stores login credentials, crucial Windows security code, and more. HVCI is a feature that uses VBS to conduct integrity checks on programs.
In simple words, attackers have a tough time when VBS is active. So, turning it off leaves you exposed to kernel-level attacks. If you are someone who uses their system for confidential official work, it is best to keep VBS enabled. If you are a gamer or use resource-intensive apps, disabling VBS will minimize the performance drop.
How to Check If VBS is Active on Your System
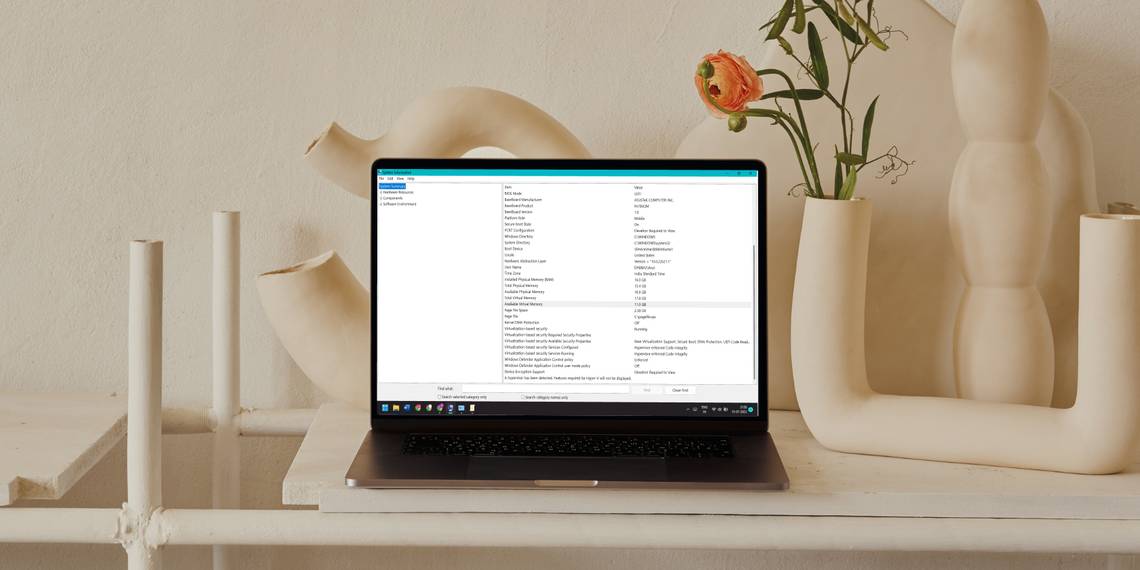
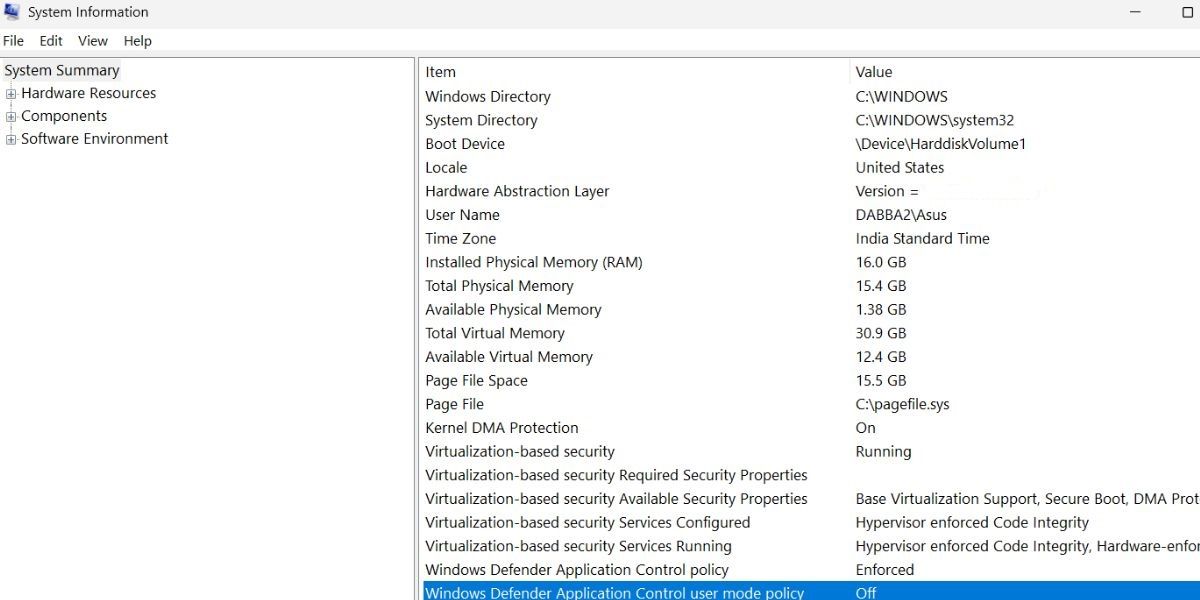
You can use the System Information app to check if VBS is active on your system. Here's how to do it:
- Press Win + R to launch the Run dialog box. Type msinfo32 in the text box and press the Enter key.
- System Information utility will launch.
- Navigate to the right pane. Scroll down and locate the Virtualization-based security entry in the list. Alternatively, you can use the Find What box present at the bottom and search for the feature.
-
If you see "Running" mentioned next to it, it means that VBS is up and running on your system.
- Close the System Information utility.

How to Disable VBS to Increase Performance in Windows 11
If you want to disable VBS, here are a few tricks you can try.
1. How to Disable VBS From the Windows Settings
Perform the following steps to disable VBS from the Settings app.
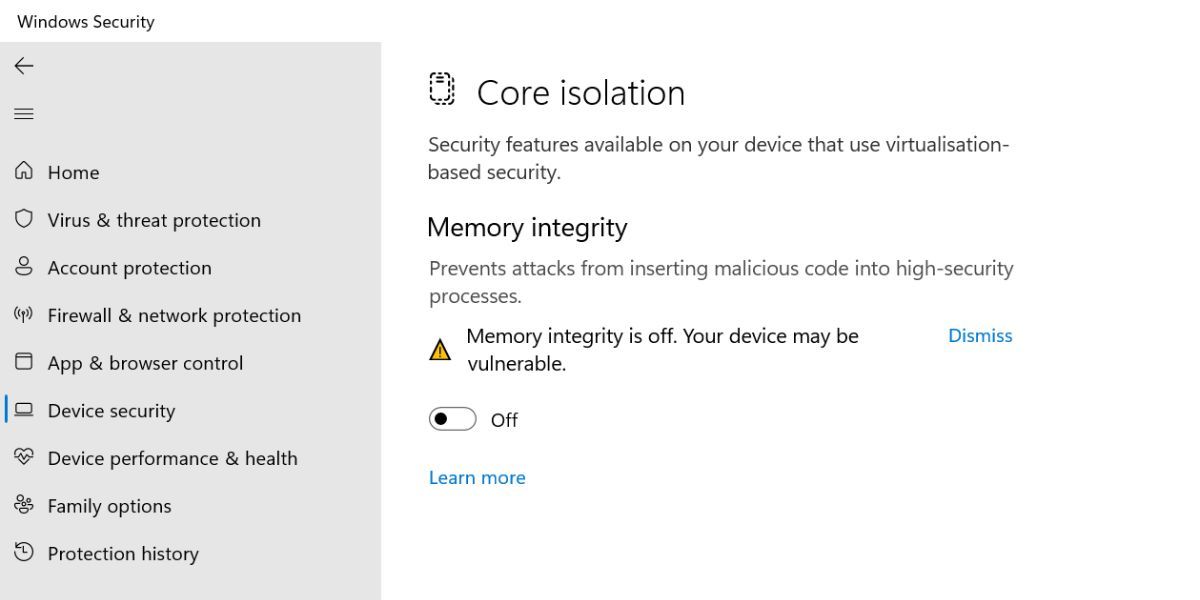
- Press Win + I to launch the Settings app. Navigate to the left-hand side menu and click on the Privacy and Security option.
- Click on Windows Security and then click the Open Windows Security button.
- Windows Security app will launch. Go to the left-hand side menu and select Device Security.
- Find the Core isolation section and click on the Core isolation details option.
-
Now, check whether the Memory Integrity toggle is active or not. If it is active, click on it to disable the feature.
- Restart your system. Test some apps and games to check their performance.

2. How to Disable VBS With the Command Prompt
You can also disable VBS using the command prompt. Keep in mind that you must grant administrator access before executing the commands.
To turn off VBS using the command prompt, repeat the following steps:
- Press Win + R to launch the Run command box. Now type cmd and press Ctrl + Shift + Enter to launch the command prompt with elevated permissions.
-
Type bcdedit /set hypervisorlaunchtype off in the text area.
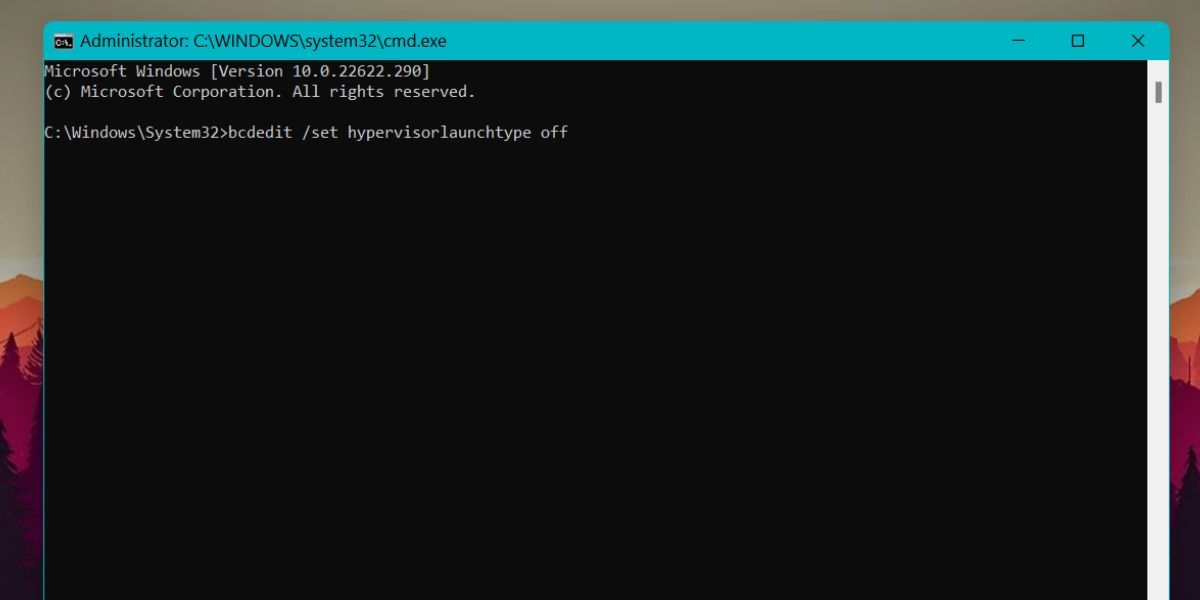
- Press the enter key to execute the command. Wait for the execution to complete.
- Restart your system. VBS won't bother you anymore.

3. How to Turn Off Windows' Virtualization Features
VBS can run on your system only if virtualization is active. If you shut off all the Virtualization features of Windows, VBS won't work. So, you have to uninstall a few Windows features.
To turn off Virtualization features in Windows 11, do as follows:
- Press the Win key, type Control Panel and open the first result.
- Find the Program and Features option and then click on Uninstall a Program option.
- Navigate to the top left-hand side and click on the Turn Windows Features on or off option.
-
Windows Features will launch. Find Microsoft Defender Application Guard, Virtual Machine Platform, and Windows Hypervisor Platform in the list.
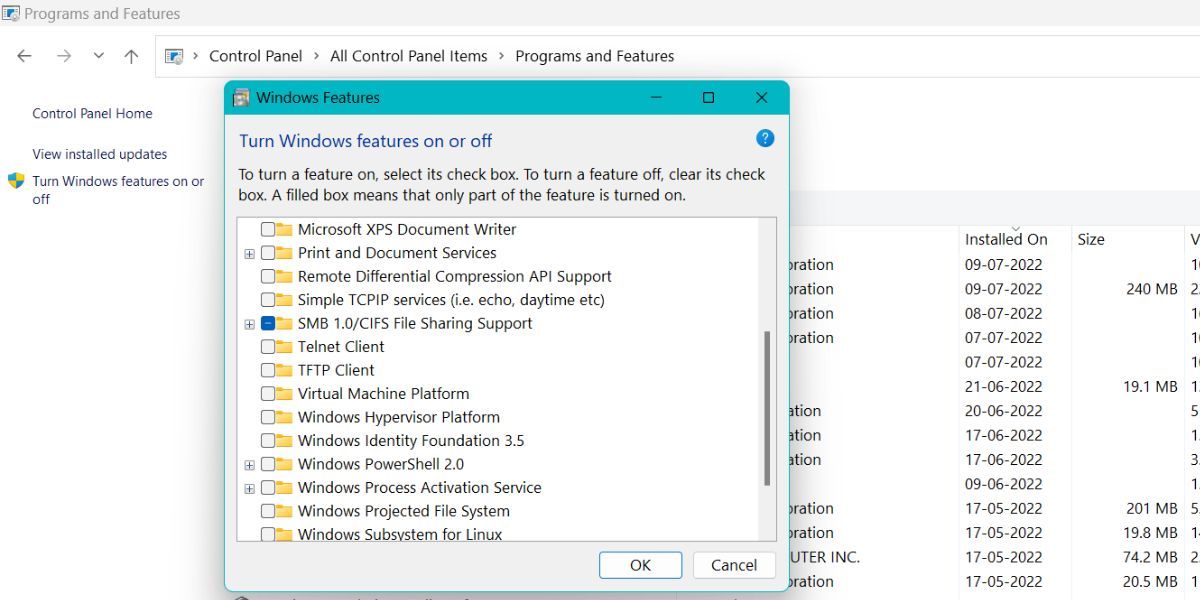
- Uncheck all these features and then click on the OK button. Wait for the setup to disable these features on your device. Click on the Restart Now button to apply changes.
- Revisit the Windows Features to check whether all Virtualization features are inactive or not.

4. How to Disable VBS From the Local Group Policy Editor
You can use the Group Policy Editor to turn off VBS permanently. Keep in mind that GPE is not available for Windows 11 Home users. You need to run a batch script to enable GPE. Check out our complete Group Policy Editor guide for more information on this.
To disable VBS using the Group Policy Editor, do as follows:
-
Press Win + R to launch the Run command box. Type gpedit.msc and hit the enter key to launch the Group Policy Editor.
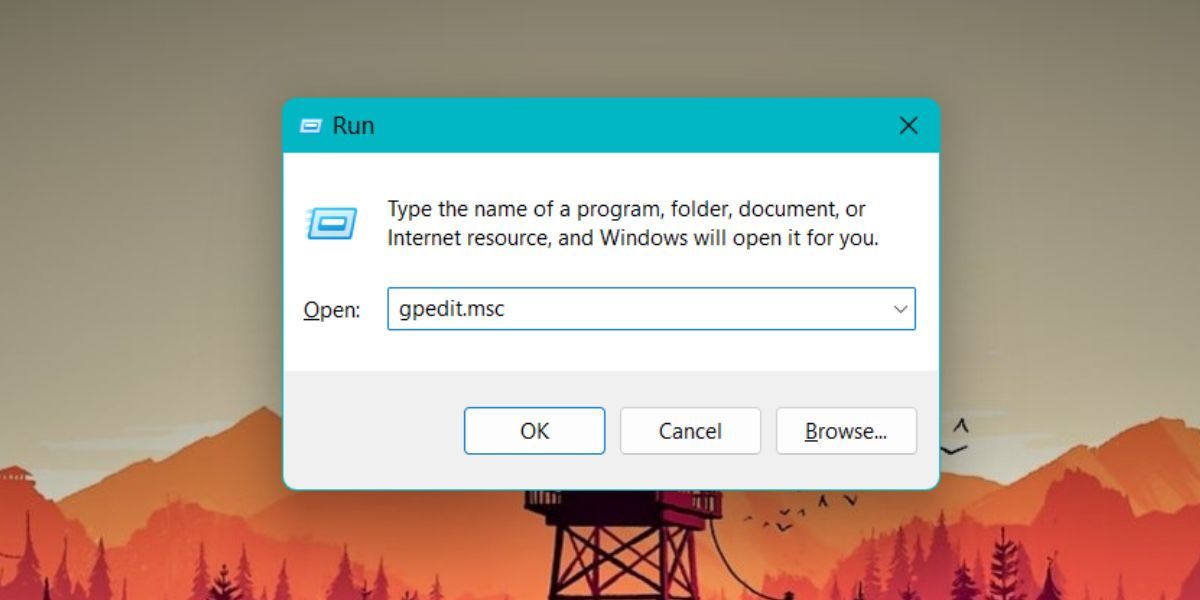
- Navigate to Local Computer Policy > Computer Configuration > Administrative Templates > System > Device Guard.
- Under Device Guard, find the Turn On Virtualization Based Security policy and double-click on it.
- Click on the Disabled radio button in the policy window. Then, click on the Apply button.
- Click on the OK button and exit the Group Policy Editor. Restart your system to apply changes.
- To re-enable VBS, click on the Enabled radio button in the Turn On Virtualization Based Security policy.

5. How to Disable Virtualization via the BIOS
The last option is to disable virtualization technology from the system BIOS. As mentioned before, VBS won't work if you disable virtualization features. So, by doing this, you can ensure that VBS doesn't turn on ever again.
To turn off virtualization technology from BIOS, repeat the following steps:
- Restart your system. Press the corresponding F-key to access the BIOS setup (usually it is the F2 or F12 key).
- Once you are inside the BIOS, go to the advanced settings page. Remember that each OEM has a different BIOS appearance and settings layout.
-
Find the Virtualization Technology option under advanced settings. Click on it to disable the feature on your system.

- Now, press the F10 key to save the changes. Exit the BIOS setup and continue the OS boot process.
- Check the Memory Integrity option in Windows Security. It will appear grayed out.

6. How to Disable VBS Using Registry Editor
If you don't have Group Policy Editor on your Windows 11 Home version, you can use the Registry Editor to change the status of VBS on your PC. Instead of manually navigating to the registry key, you can use Command Prompt to modify the EnableVirtualizationBasedSecurity DWORD value.
But before doing that, create a manual backup of the Windows Registry and save it to an external USB drive as a backup option. After doing that, repeat the following steps to disable VBS by tweaking the registry:
- Press Win + R to launch the Run dialog box. Type cmd and press the Ctrl + Shift + Enter keys simultaneously to open the Command Prompt with administrator privileges.
-
Now, type the following command and press the Enter key to execute it:
reg add "HKEY_LOCAL_MACHINE\System\CurrentControlSet\Control\DeviceGuard" /v EnableVirtualizationBasedSecurity/t REG_DWORD /d 00000000 /f -
If everything went fine, you will see a "The operation completed successfully." message.
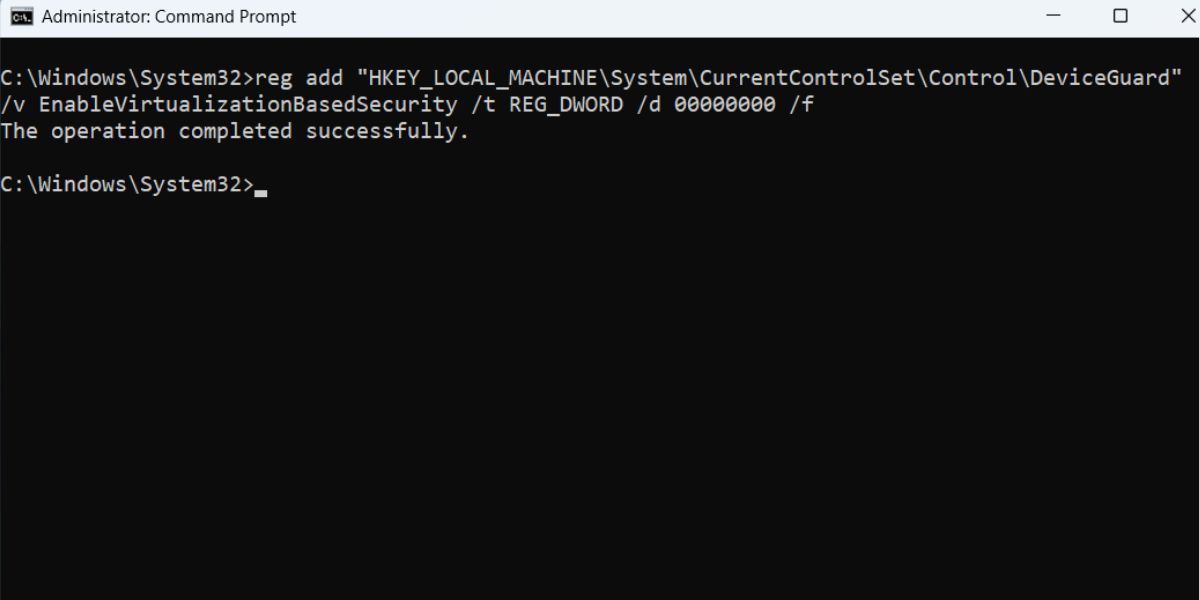
- Type exit and press Enter to close the Command Prompt window.
- Restart your PC to apply the changes.

VBS Won’t Throttle Your System Performance Anymore
VBS is a pretty cool feature that is available in both Windows 10 and 11. However, the drastic performance drops surely make it less enticing for gamers. Firstly, start by disabling the Memory Integrity feature in Windows Security. Then turn off VBS using the Group Policy Editor.
After that, move to other steps to disable virtualization features such as MDAG, and Virtual Machine Platform. Lastly, disable the virtualization technology from the BIOS. Features like VBS won't work without it.