
Call of Duty: Vanguard (or just "Vanguard" for short) is the latest installment in the franchise. However, much like the previous games in its series, it comes with some technical issues. For instance, players have said on some forums that Vanguard doesn't start for them.
When Vanguard doesn’t launch, you’re missing out on all its fun! This is how to fix Call of Duty: Vanguard not starting in Windows 11 and 10.
1. Repair Call of Duty: Vanguard’s Game Files
Many Call of Duty: Vanguard issues can arise if any of that game’s files are corrupted and need repairing. So, it might be a good idea to run a file scan for the game in Battlenet.
Here is how you can check the integrity of Vanguard’s game files with Battlenet’s Repair and Scan option.
- Bring up the Battle.net game client window.
- Click All Games to view your library.
- Select the Call of Duty: Vanguard game.
- Click the Options cog icon on the Play button.
-
Select Scan and Repair to fix Vanguard’s files.
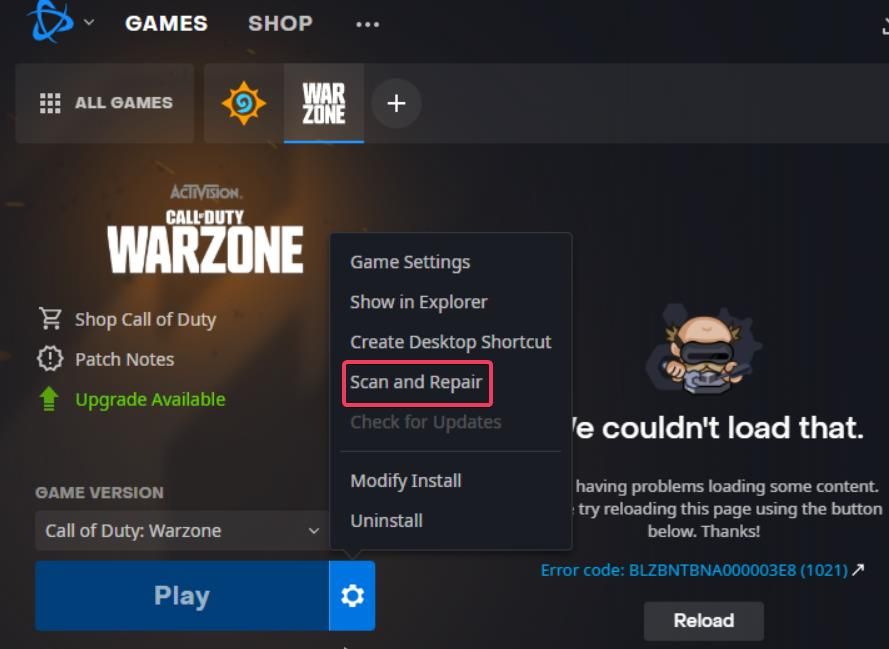
- Make sure you wait for the Vanguard scan to be fully complete.

2. Disable the Xbox Game Bar
The Game Bar has some nice gaming features. However, that bar can reputedly conflict with Vanguard on certain Windows 11 build versions. So, try disabling the Game Bar in Windows 11 as follows:
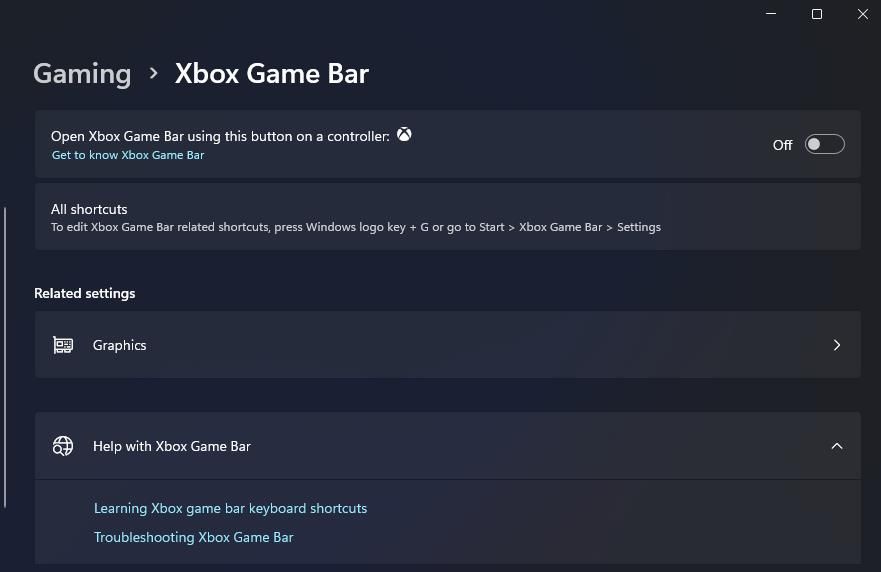
- First, launch Settings by selecting that pinned app’s Start menu shortcut.
- Click Gaming to view that tab’s navigation options.
- Select the Xbox Game Bar option.
-
Turn off the Open Xbox Game Bar setting.
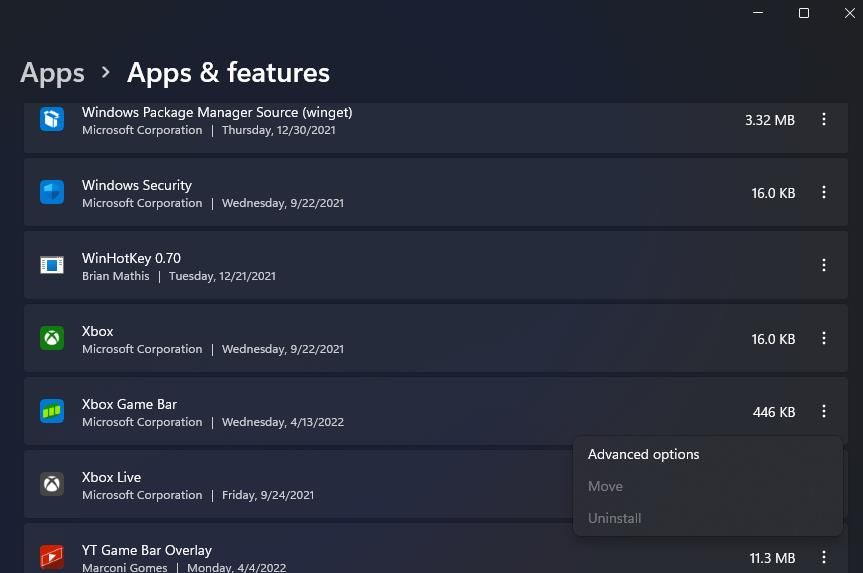
- Select Apps > Apps & features, and scroll down to Xbox Game Bar.
-
Click the three-dot button for the Xbox Game Bar app to select Advanced options.
-
Select Never on the Background apps permissions drop-down menu.
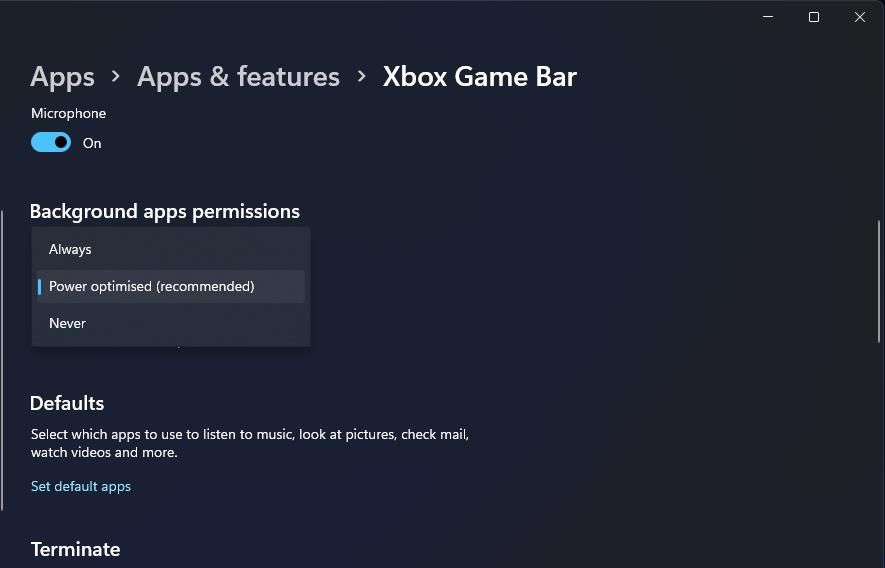
- Click the Terminate option.


3. Configure Vanguard to Start With DirectX 11
Did you select a DirectX 12 graphical setting for Call of Duty: Vanguard before it stopped starting? If so, try configuring Vanguard to start with DirectX 11 instead. You can do that in Battlenet in the following steps:
- Open the Battlenet gaming client software.
- Click Call of Duty: Vanguard to select it.
- Then click the cog icon on the right of Vanguards’ Play button to select Game Settings.
- Select the Additional command line arguments checkbox.
-
Input -d3d11 within the command line box.
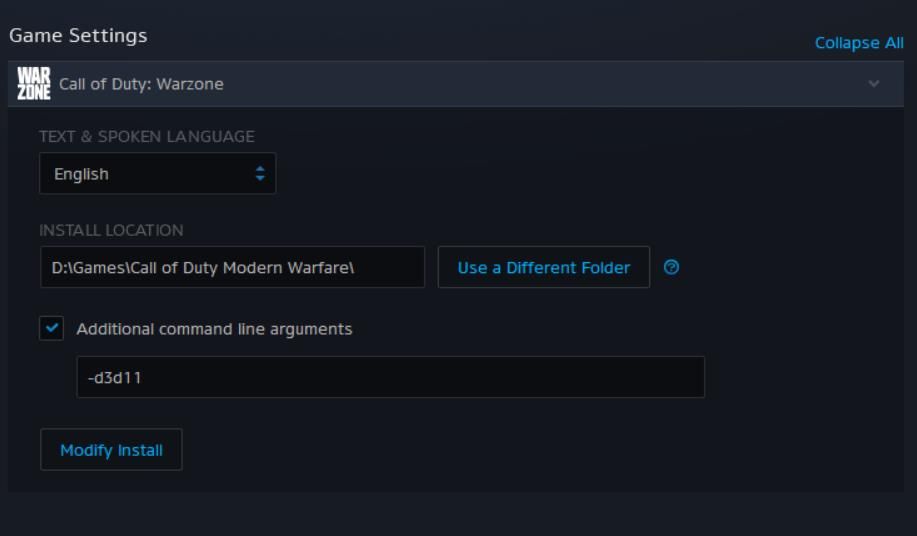
- Press the Done button.

4. Update Your PC’s GPU Driver
Call of Duty: Vanguard is a graphically intensive game. If your graphics card’s driver is many months old, you might need to update its driver to kick-start Vanguard. To ensure you install the very latest driver for your PC’s GPU (Graphical Processing Unit), it’s recommended to manually download a driver package from the NVIDIA or AMD websites.
Check out our guide on how to update your graphics drivers for further details about updating drivers for GPUs.
5. Check Windows Defender Firewall Settings
It’s not that unusual for firewalls to block games from launching. So, maybe you might need to check if Vanguard is allowed through Windows Defender Firewall. This is how you can check Windows Defender Firewall’s settings for Call of Duty: Vanguard:
- Start Run with any method mentioned in our how to open the Windows Run Command Dialog box guide.
- Type "control firewall.cpl" into Run and click OK.
-
Select the Allow an app or feature through Windows Defender Firewall navigation option.
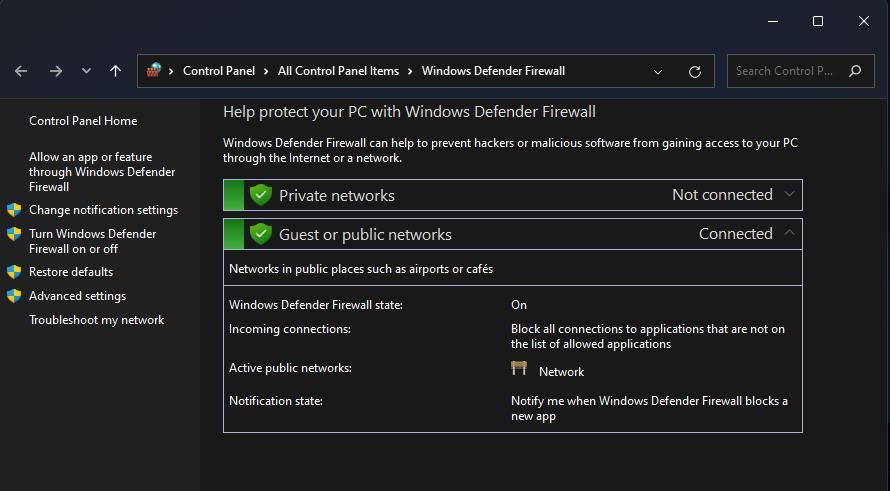
- Click the Change settings option.
-
Select all Private/Public checkboxes for Call of Duty: Vanguard.
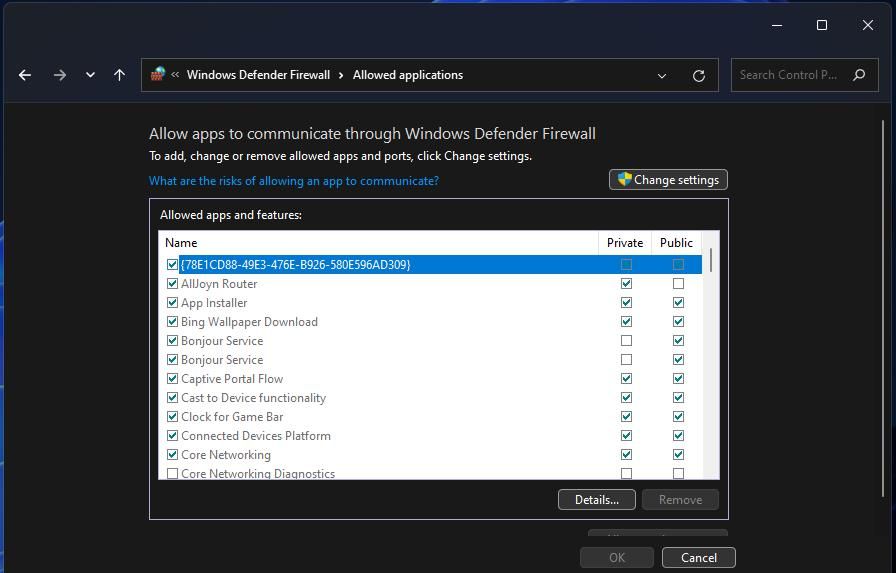
- Make sure all the checkboxes for Battle.net Launcher are selected there.
- Click OK to apply the new firewall settings.


If you can’t find Vanguard or Battlenet within Windows Defender Firewall’s allowed app settings, click the Allow another app button. Then click Browse to select Vanguard or Battle.net, and press the Open and Add buttons. After adding those apps, you can configure their firewall settings as outlined above.
Users with third-party antivirus software packages installed, some of which incorporate their own firewalls, might need to disable such utilities. To do so, right-click the system tray icon for your antivirus software to look for a disable shield setting. Select an option to at least temporarily disable the antivirus shield, and then try launching Vanguard.
6. Disable the NVIDIA In-Game Overlay
Conflict overlays can generate issues for Call of Duty and other Battle.net games. Do you have the NVIDIA in-game overlay enabled in GeForce Experience? If so, disabling that overlay might be the solution to fix Call of Duty: Vanguard for you. You can disable the NVIDIA in-game overlay like this:
- Open the GeForce Experience software.
-
Sign in with your NVIDIA account if required.
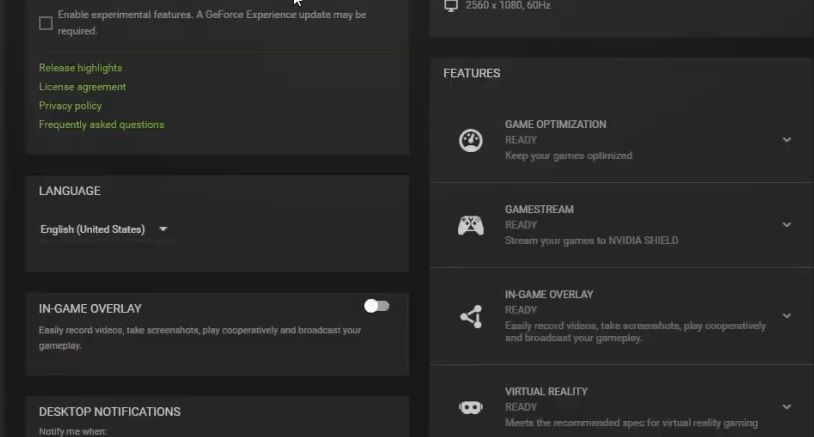
- Click the Settings (cog) button in GeForce Experience.
- Turn off the In-Game Overlay setting.

There are other software packages with overlays that can potentially conflict with Battle.net games. For example, Discord, MSI Afterburner, and AMD RadeonPro are three other programs that have overlay features. If you have any of those software packages installed, make sure their overlays are disabled as well.
7. Configure a Clean Boot
Configuring a clean boot with MSConfig’s settings will remove third-party programs and services from the Windows startup. Clean booting your PC will free up system resources for Vanguard and might disable a startup program or service that was conflicting with the game. This is how you can configure a clean boot in Windows 11:
- Bring up the System Configuration utility as covered in our ways to open MSConfig guide.
-
On MSConfig’s General tab, uncheck the selected checkbox for the Load startup items setting.

- Switch to the Services tab.
-
Select Hide all Microsoft services first, and then click Disable all.
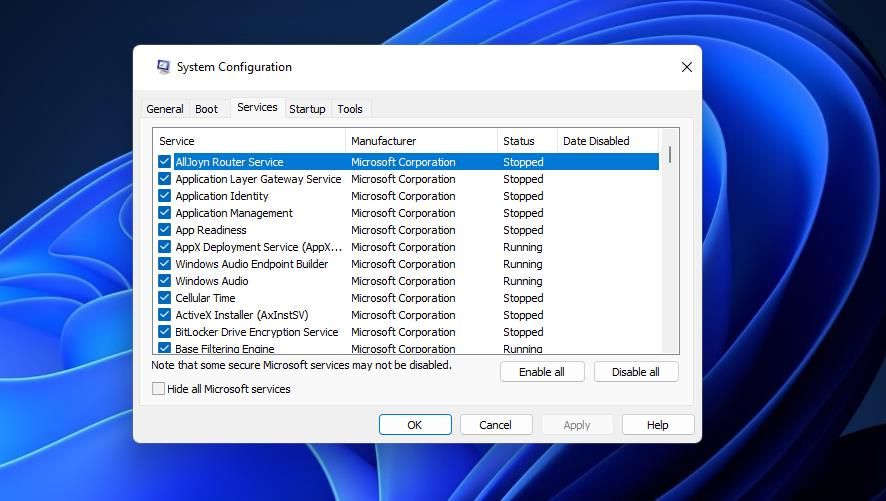
- Click Apply to save your new boot configuration options.
- Select OK to exit MSConfig, and then click Restart.


Try launching Call of Duty: Vanguard after restarting your desktop or laptop. If the game then works, you can simply leave the boot configuration as it is.
Alternatively, try to identify what startup app or service might have been conflicting with Vanguard before restoring the original boot settings in MSConfig. You can manually re-enable disabled startup programs and services from the Startup and Services tabs in Task Manager and MSConfig.
8. Reinstall the Intel Management Engine
An Intel Management Engine driver compatibility issue is another reputed cause for Vanguard not starting in Windows 11. Therefore, reinstalling the Intel Management Engine driver might fix Vanguard not starting for some players. You can reinstall that driver like this:
- Open Settings, and select its Apps tab.
- Click Apps and features to view installed software there.
- Next, click the three-dot button on the right of the Intel Management Engine Components package listed there.
- Select the Uninstall option for Intel Management Engine Components.
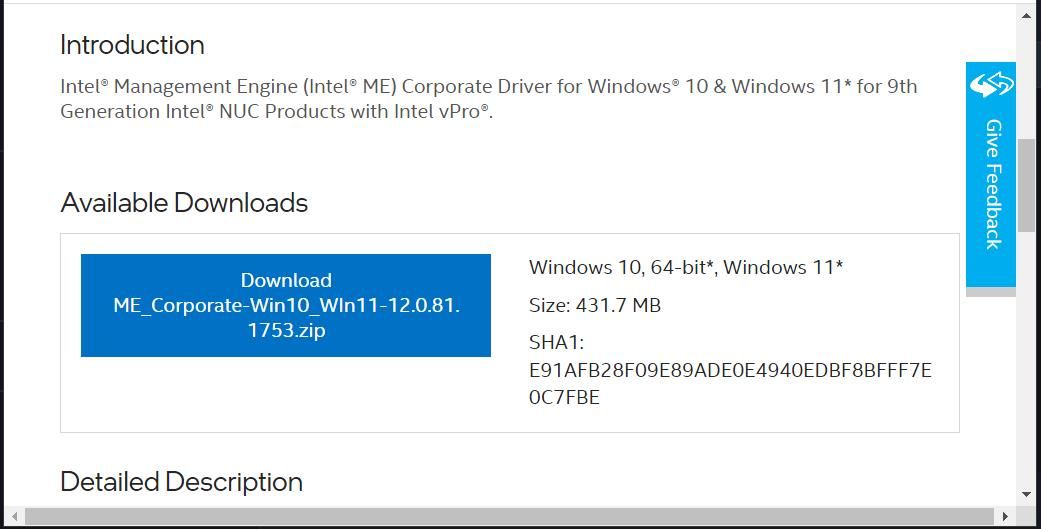
- Open this Intel driver download page.
- Input Intel Management Engine to search for that driver package.
-
Click the View details link for the Intel Management Engine driver package that’s compatible with your Windows PC.

-
Press the blue Download button for the driver package.
- Open File Explorer to navigate to the folder the Intel Management Engine driver package downloaded in.
- Double-click the Intel Management Engine driver package’s MEISetup.exe file.
- Then you can go through the setup wizard’s instructions to reinstall Intel Management Engine.
- Restart Windows after reinstalling the Intel Management driver.


9. Reinstall Call of Duty: Vanguard
If nothing else works, a fresh reinstallation of Call of Duty: Vanguard might be what’s needed. As Vanguard is a big game for downloading, this potential resolution is best left as a last resort. You can reinstall the game via Battle.net as follows:
- Bring up Battle.net.
- Select your Vanguard game within Battle.net.
- Click Options on the Play button.
-
Select Uninstall to remove the game.
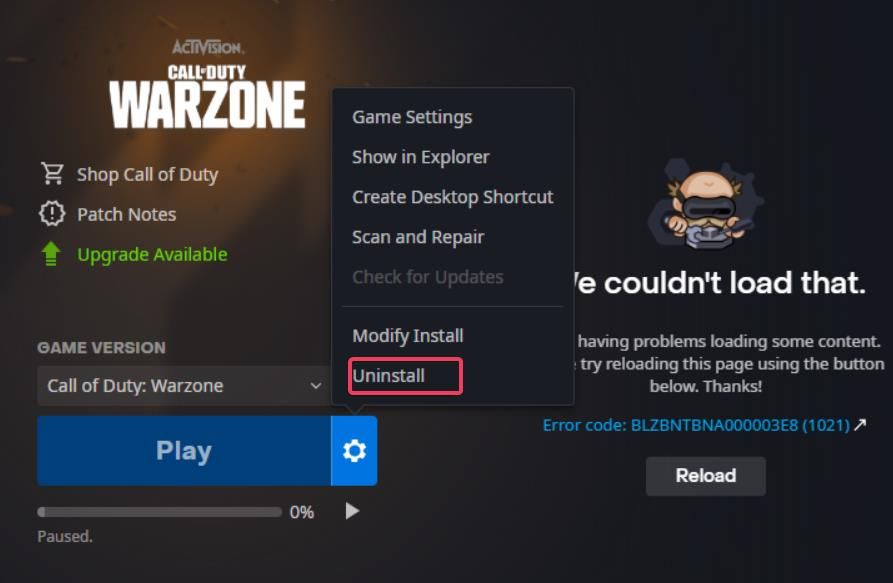
- Then click the Install button to reinstall Vanguard.

Have Fun in Call of Duty: Vanguard Once Again
Go through all the potential resolutions above (preferably in the order specified) to find one that fixes Vanguard not starting on your PC. We can’t say they’re guaranteed fixes for all, but there’s a good chance they’ll get the game started for most Windows 11 players. Then you can sit back and enjoy all the thrills of Call of Duty: Vanguard.