Closed captioning on Windows 10 is designed to enhance user experience and accessibility. Imagine you're in a noisy environment and can't hear the audio of your favorite show. Or you're trying to watch a movie on your PC without disturbing those around you. In these situations, closed captioning can be a lifesaver.
You'll soon discover how closed captioning can make your Windows 10 experience more accessible, customized, and enjoyable.
What Is Closed Captioning, and Why Is It Important?
Closed captioning is a powerful tool that lets you view text on your screen in real time while watching videos, attending live events, or giving presentations. The text displayed on the screen is synchronized with the audio, allowing you to understand the content even when you can't hear the audio.
One of the key benefits of closed captioning is that it enhances accessibility for people with hearing impairments. By displaying text on the screen, they can follow along with the content in real time without missing a beat.
Closed captioning is also useful when you're in a noisy place and can't hear the audio. This is especially important when you rely on closed captioning to access educational content, attend live events, or participate in video conferencing.
In addition to enhancing accessibility, closed captioning can be a valuable tool for improving your language skills. By allowing you to read along with the text as you listen to audio content, closed captioning helps you improve your listening skills and learn new words and phrases.
It’s also useful when you’re learning a new language, allowing you to see the text in real time. With that, you reinforce your understanding of the spoken language and associate new words and phrases with their written counterparts.
Lots of online services and software offer closed captioning these days. For example, you can enable closed captioning on YouTube videos, which detects and automatically generates subtitles for what is being said.
How to Customize Closed Captioning Settings in Windows 10
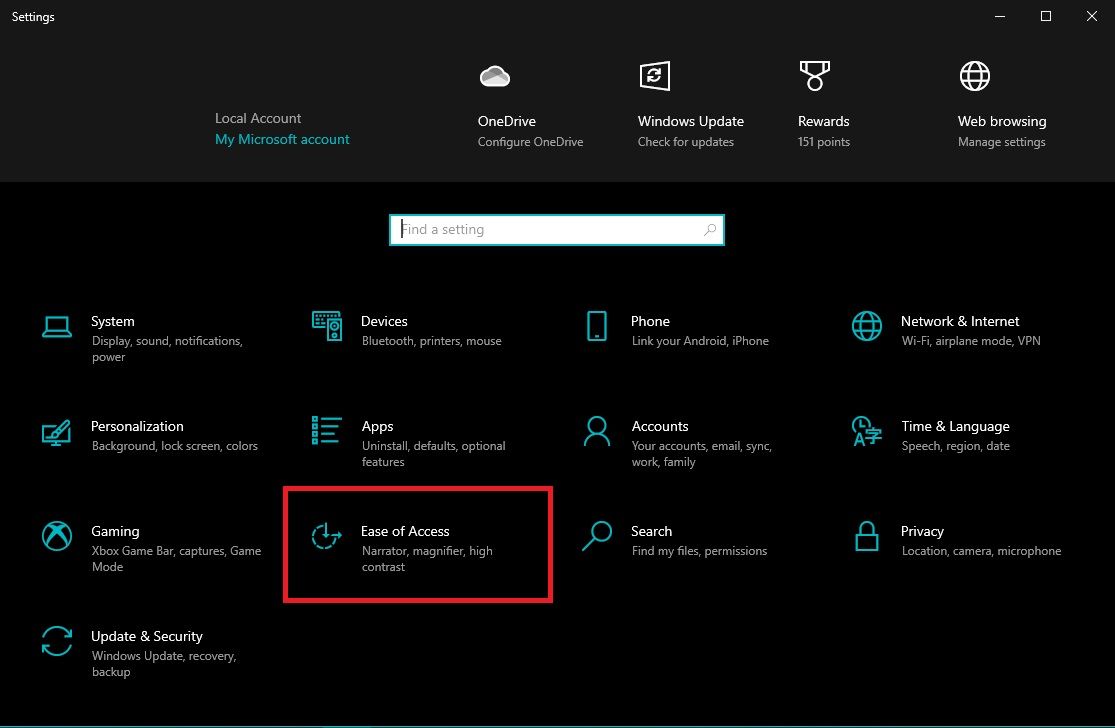
Windows 10 allows you to customize the appearance, language, and behavior of closed captions to suit your needs and preferences. To get started, click the Start menu button in the lower-left corner of your screen and select the Settings app.
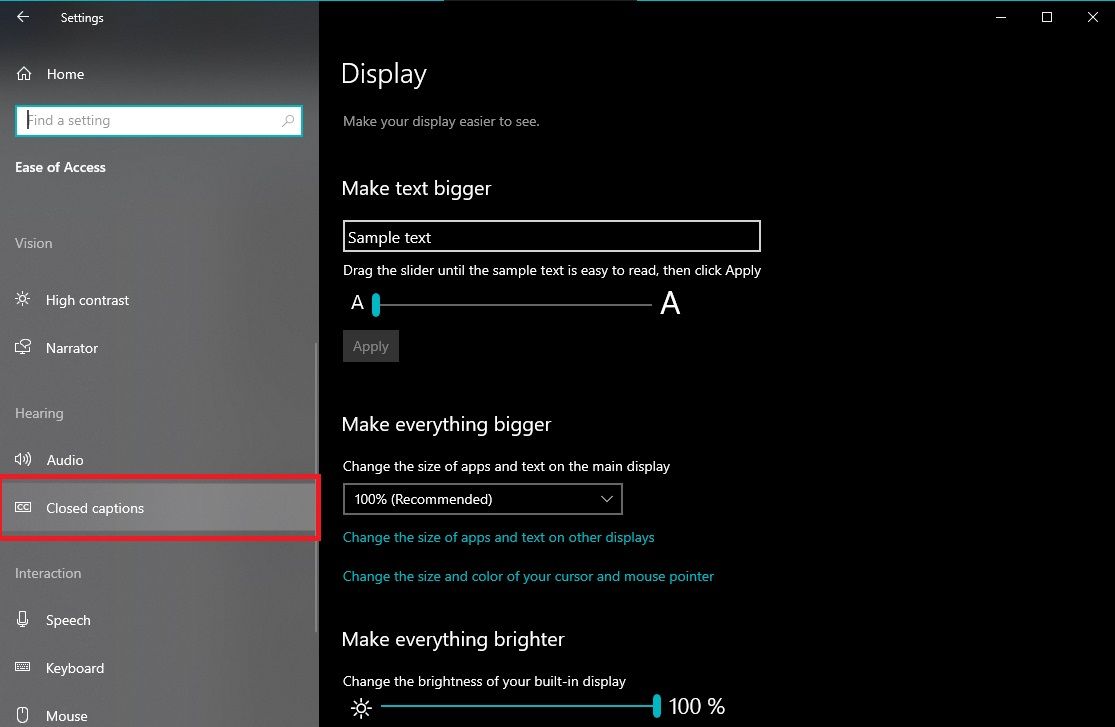
In the Settings menu, select Ease of Access, then click on the Closed captions option in the left-hand sidebar.
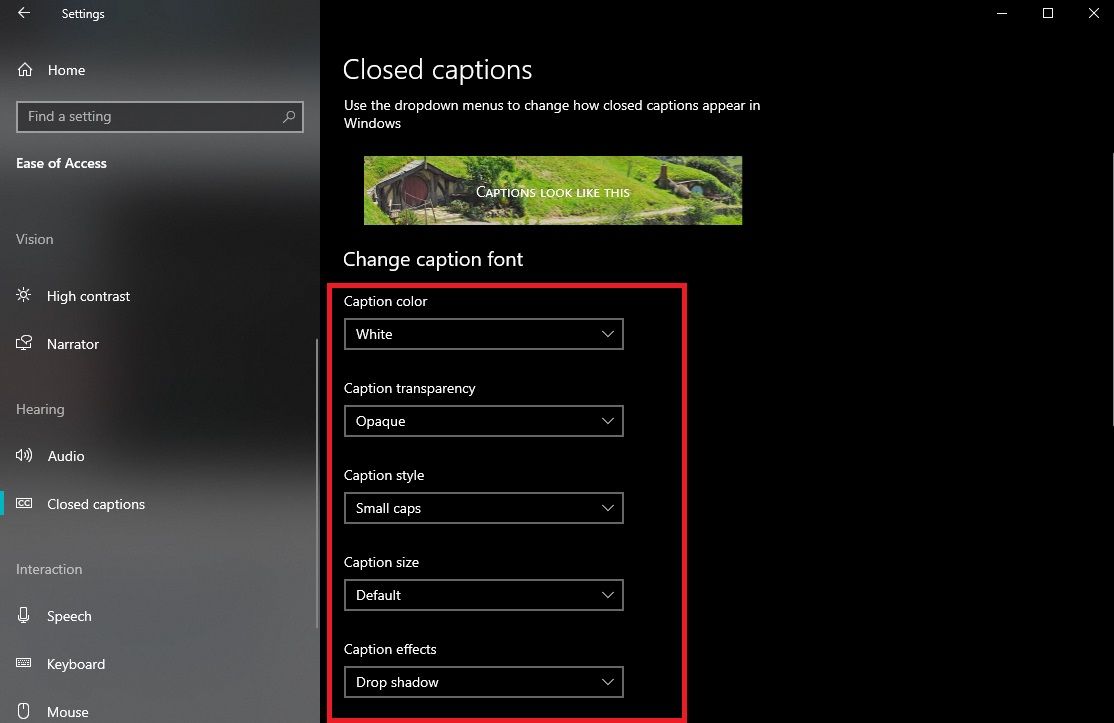
On the Closed Captions menu, you'll see several options for customizing your closed captioning settings. The first option is the Change Caption Font section, where you can adjust the font size, color, and opacity of closed captions.
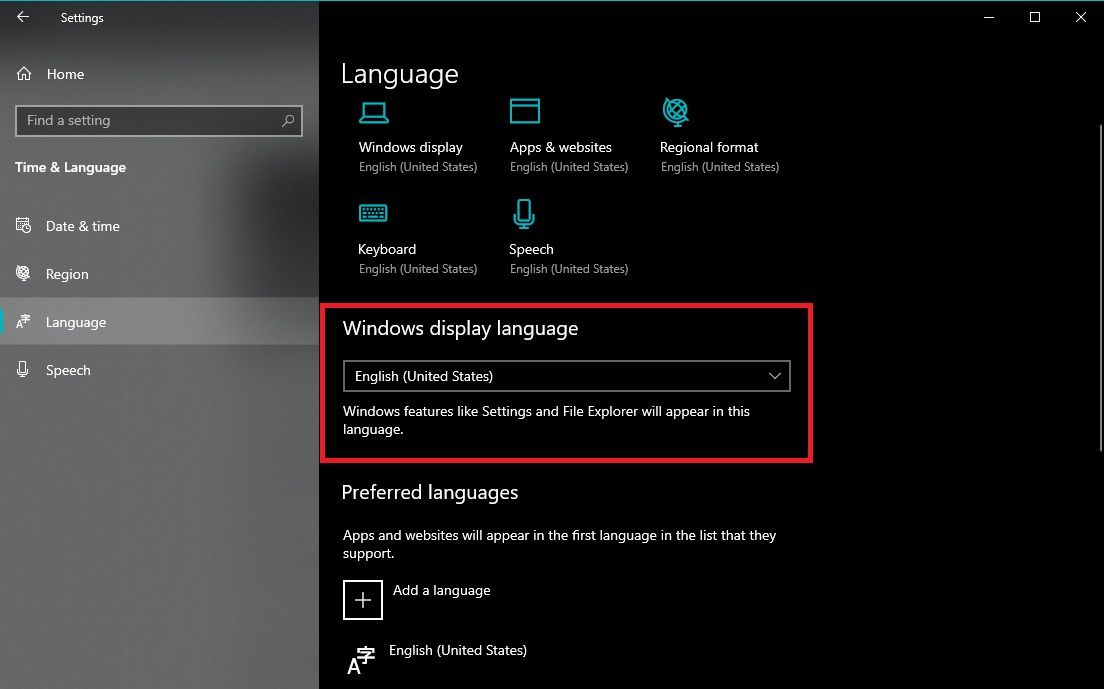
You can also change your closed captioning language by changing your Windows system language. On the Settings menu, select Time & Language and click Language. Choose the language you want from the list and restart your computer.
When you change the display language, Windows automatically updates the language used for closed captions in videos and other media. You can also install language packs on Windows if you can’t find your preferred language in the drop-down menu.
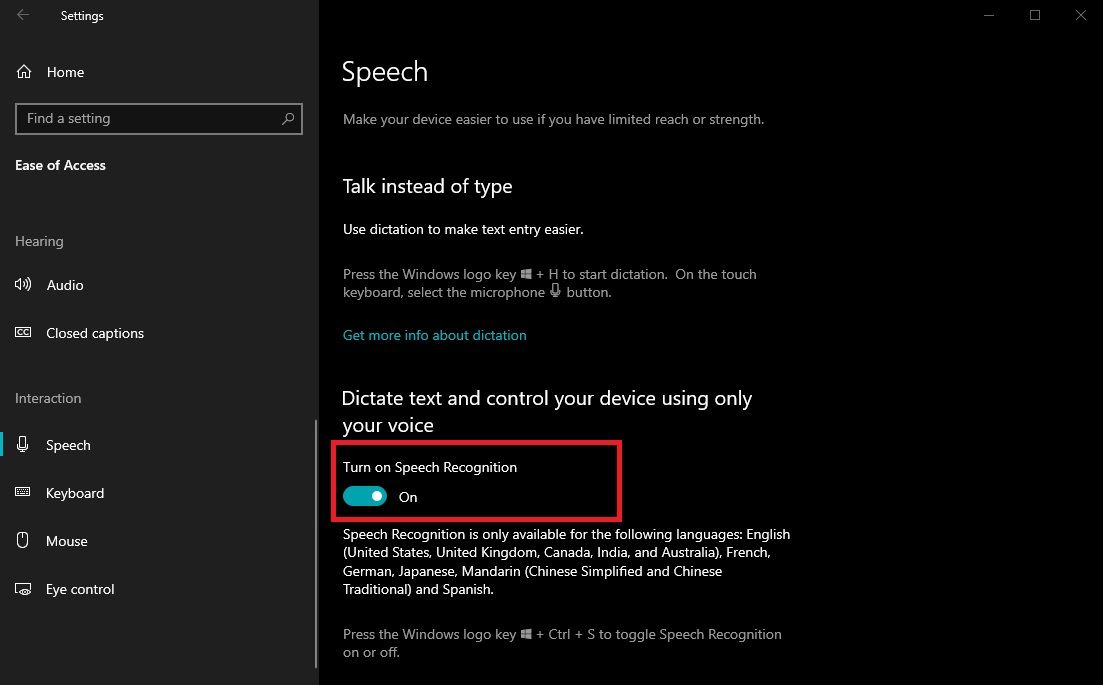
Another interesting customization feature for closed captioning in Windows 10 is the ability to use speech recognition to generate captions automatically.
To customize this feature, ensure that the feature is enabled by navigating to the Ease of Access menu and clicking Speech. Then, turn on Speech recognition.
Now that you know how to customize the closed captioning feature, here are some ways to make the most out of it.
How to Use Closed Captioning in Windows 10 Videos and Movies
Closed captioning in Windows 10 videos and movies can help you better understand the dialogue, improving your viewing experience.
To enable closed captioning for your videos and movies, open the video or movie you want to watch on the Windows Media Player and click the CC button. You can choose your preferred language for the captions and adjust the font size, color, style, and timing to suit your preferences. You can also use speech recognition to generate captions automatically.
To turn off closed captioning, simply click on the CC button again, and the captions will disappear from the screen. If you want to change the language or other customization options, click the settings icon and adjust them accordingly.
Closed captioning is a great feature for people with hearing impairments, those who prefer to read text instead of listen to audio, or those who watch movies in noisy environments.
How to Use Closed Captioning in Windows 10 Presentations
There are a few key things to keep in mind when it comes to using closed captioning in Windows 10 presentations.
First, you must ensure that your presentation software supports closed captioning. Many popular presentation programs, such as Microsoft PowerPoint and Google Slides, offer this feature.
Once you have created your presentation and added the necessary text or audio content, you can enable closed captioning by selecting the appropriate option in the software's settings or preferences menu.
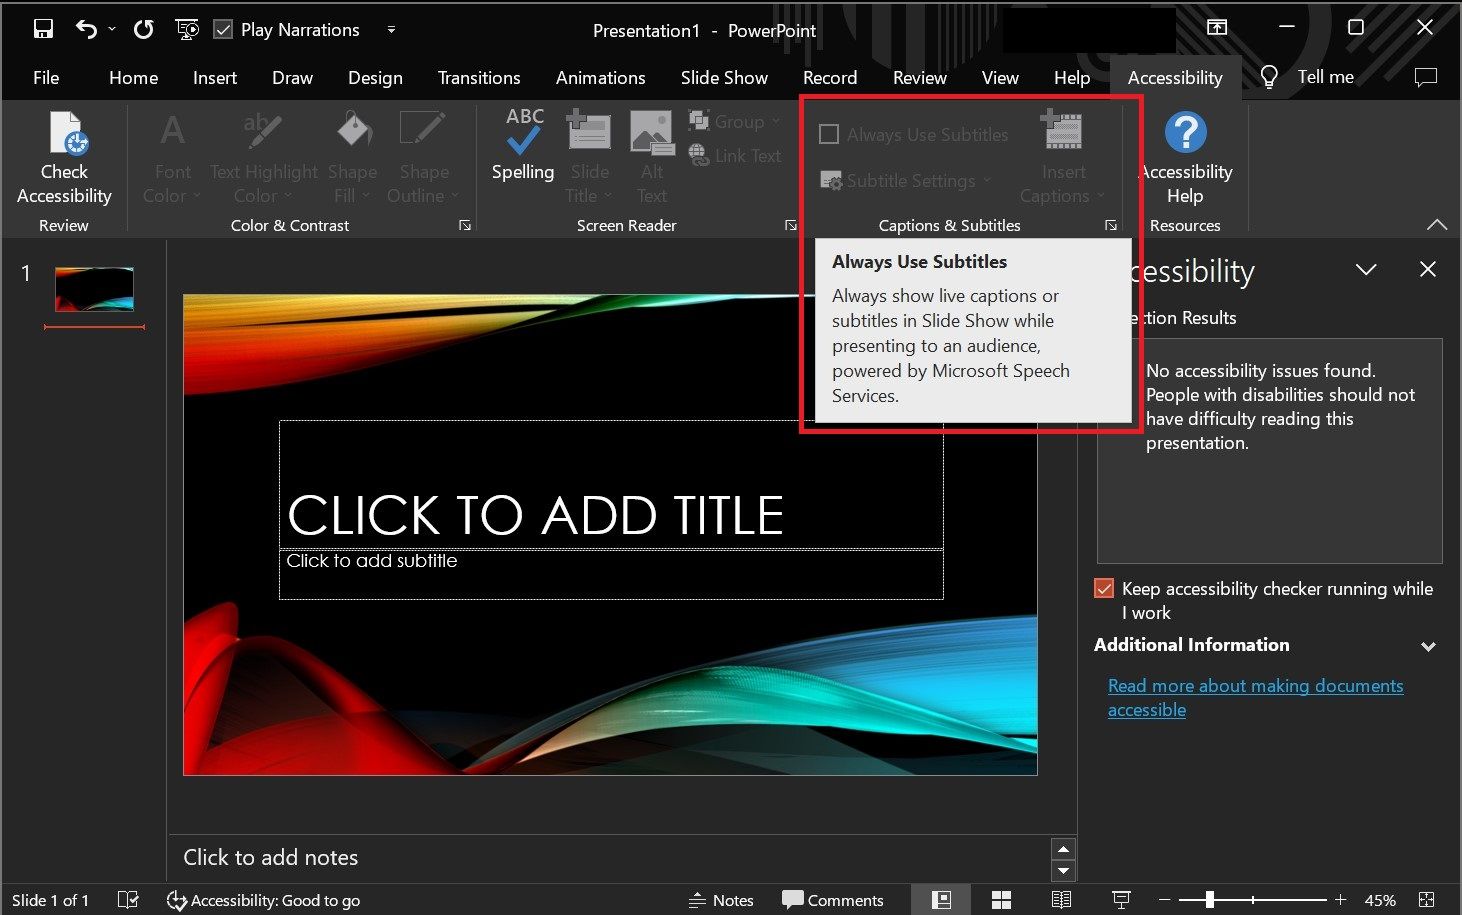
In PowerPoint, for example, you can enable closed captioning by going to the Accessibility tab and selecting Always use Subtitles in the Closed Captioning section.
From there, you can choose your preferred language for the captions, adjust the font size and style, and customize the caption timing. You can also choose different styles or formats for your captions, or position the caption in different parts of the screen.
By using closed captioning in your presentations, you can make your content more accessible to a wider audience, including those with auditory disabilities or those who prefer to read along with the presentation.
Use Closed Captioning in Windows 10 Live Events
One way to improve accessibility and make your presentations inclusive and engaging for all viewers is by using closed captioning in your live events.
To use closed captioning in Windows 10 live events, you can enable the feature through the settings in the event platform. This will provide real-time transcription of the spoken dialogue, making it accessible to all viewers.
Closed captioning is also helpful for viewers who may be unable to hear the audio due to technical issues or background noise. To ensure that your closed captioning is accurate, it is important to use clear and concise language in your presentation.
Avoid using complex sentence structures or technical jargon, as this can be difficult for viewers to follow. It's also a good idea to rehearse your presentation ahead of time to ensure that the timing of the captions matches the spoken dialogue.
Improving Accessibility in Windows 10 Presentations: Utilizing Built-in Features
In addition to closed captioning, there are other accessibility features you can use in your Windows 10 presentations. For example, PowerPoint’s Accessibility Checker identifies and resolves any potential issues with your presentation, such as unreadable text or insufficient color contrast.
What’s more, Windows 10 offers a range of built-in accessibility features, such as the Magnifier and Narrator, which help visually impaired users to navigate your presentation. By utilizing these tools, you can ensure everyone can access and benefit from your content.


