
When you open Windows 10's Power Menu, you usually see the Shut down, Restart, and Sleep options. However, if you have recently performed an upgrade or set up a new PC, you may notice the Sleep option is missing from the Power menu.
For most laptop users, a missing sleep option is highly annoying, as it means they cannot put their laptop to sleep and save on battery. Fortunately, you can restore the sleep option in Windows 10 with a few tweaks.
Why Is the Sleep Option Missing From the Power Menu in Windows 10 or 11?
Usually, the sleep option disappears from the Power menu after performing an upgrade or installing Windows feature updates. However, if the problem cropped up after performing a clean install, this could be a driver-related issue. Irrespective of the reason, we'll go over some quick and complex tweaks to fix this issue.
1. Enable the Sleep Option via Control Panel
On some PCs, Windows 10 may have disabled the sleep option by default depending on the driver availability or system configuration. The first thing you should do to fix the missing sleep option is to check your Power options configuration in the Control Panel.
To enable sleep mode on Windows 10:
- Press Win + R to open the Run dialog box. Type control and click OK to open the Control Panel.
- In the Control Panel, go to System and Security > Power Options.
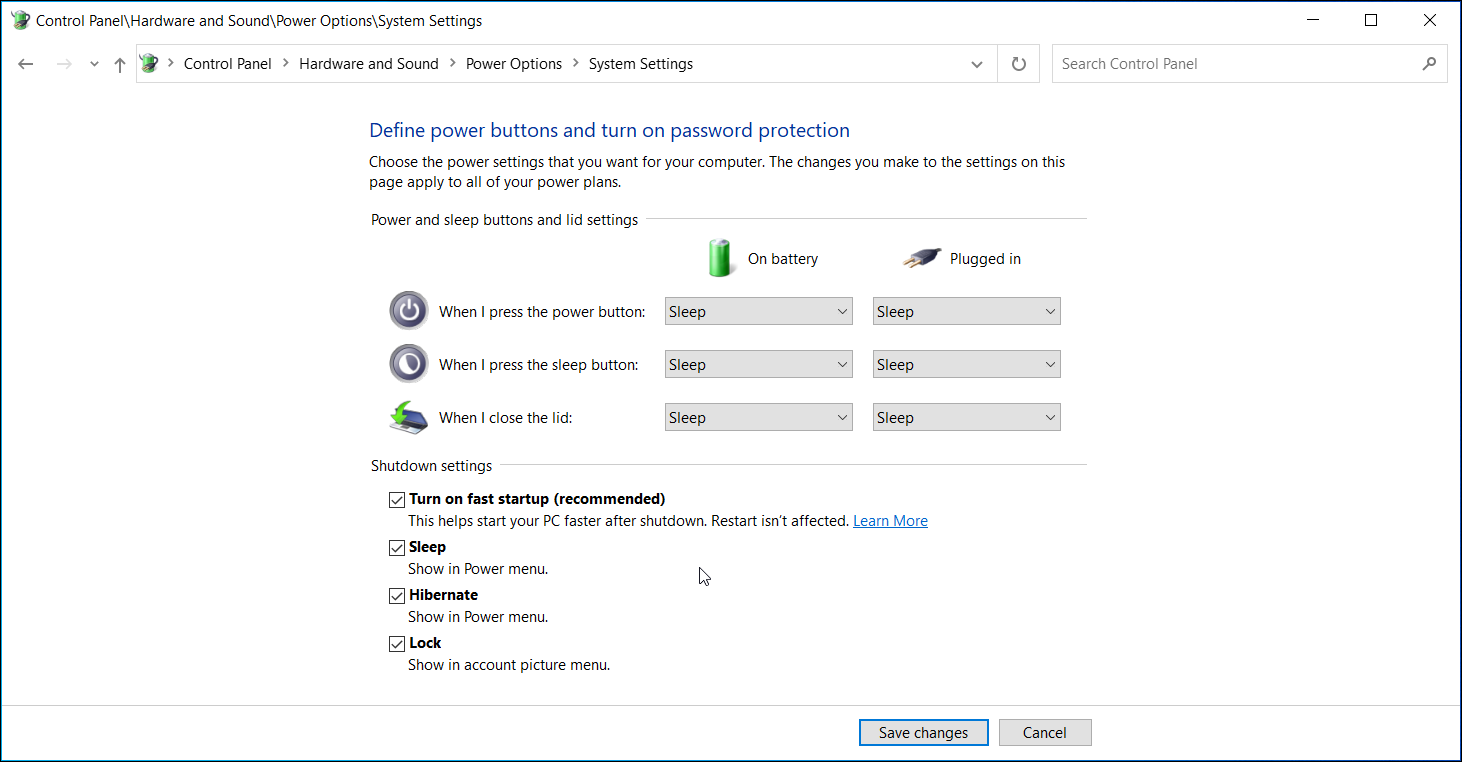
- Click on Choose what the power buttons do in the right pane.
- Next, click on Change settings that are currently unavailable.
- Under Shutdown settings, locate and check the Sleep option. Click Save changes to add the sleep option to Power Menu.
- Close the Control Panel and open the Power menu. You should now see the Sleep option with other power modes.
If you can’t find the Sleep option under Power Option in the Control Panel, you will have to enable it by other methods listed. If the sleep option is greyed out, you will need to update your display driver.
2. Restore Power Option to Default in Command Prompt
Windows 10 allows you to customize power plans to best meet your needs. However, an incorrectly configured power scheme can cause power options to malfunction. You can restore the default power schemes using a command through the Command Prompt.

To restore the default power schemes:
- Click on the Start button and type cmd. Windows 10 will automatically open up the search bar and look for your term. Right-click on Command Prompt when it appears and select Run as administrator.
-
In the Command Prompt window, type the following command and hit Enter to execute:
powercfg -restoredefaultschemes - On successful execution, you will not see any success message.
- Close the Command Prompt. Next, open the Power menu to see if the Sleep mode is accessible.
3. Enable the Sleep Mode via Local Group Policy Editor
Group policy allows you to configure your computer and user settings for a local computer using the Group Policy Editor. For example, you can edit the Show sleep in power options menu policy in the editor to enable Sleep mode on your system.
Group Policy Editor is only available on Windows 10 Pro and above versions. If you are not using the Pro version, follow our guide to enable Group Policy Editor on Windows 10 Home. Once you have Group Policy Editor enabled, you're good to go.
To enable sleep option in the Power menu:
- Press Win + R to open Run. Type gpedit.msc and click OK to open the Group Policy Editor.
-
Next, in the Group Policy Editor, navigate to the following location:
Computer Configuration > Administrative Templates > Windows Components > File Explorer -
In the pane on the right, locate and right-click on the Show sleep in the power options menu policy and choose Edit.
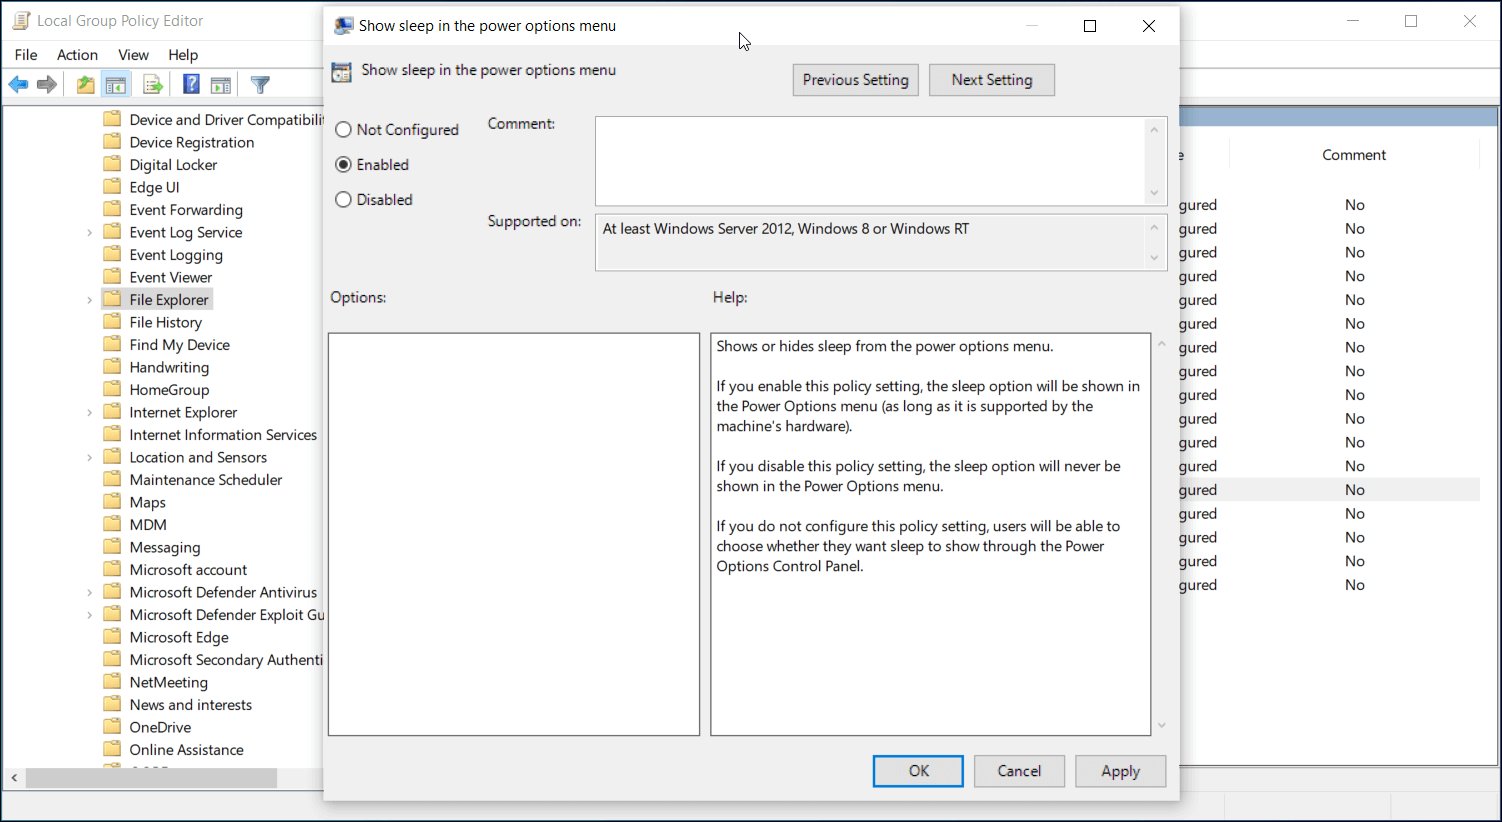
- Select Enabled and click Apply and OK to save the changes.

That should restore the sleep option to the Power menu in Windows 10. If you don’t see the changes right away, restart your computer and check again.
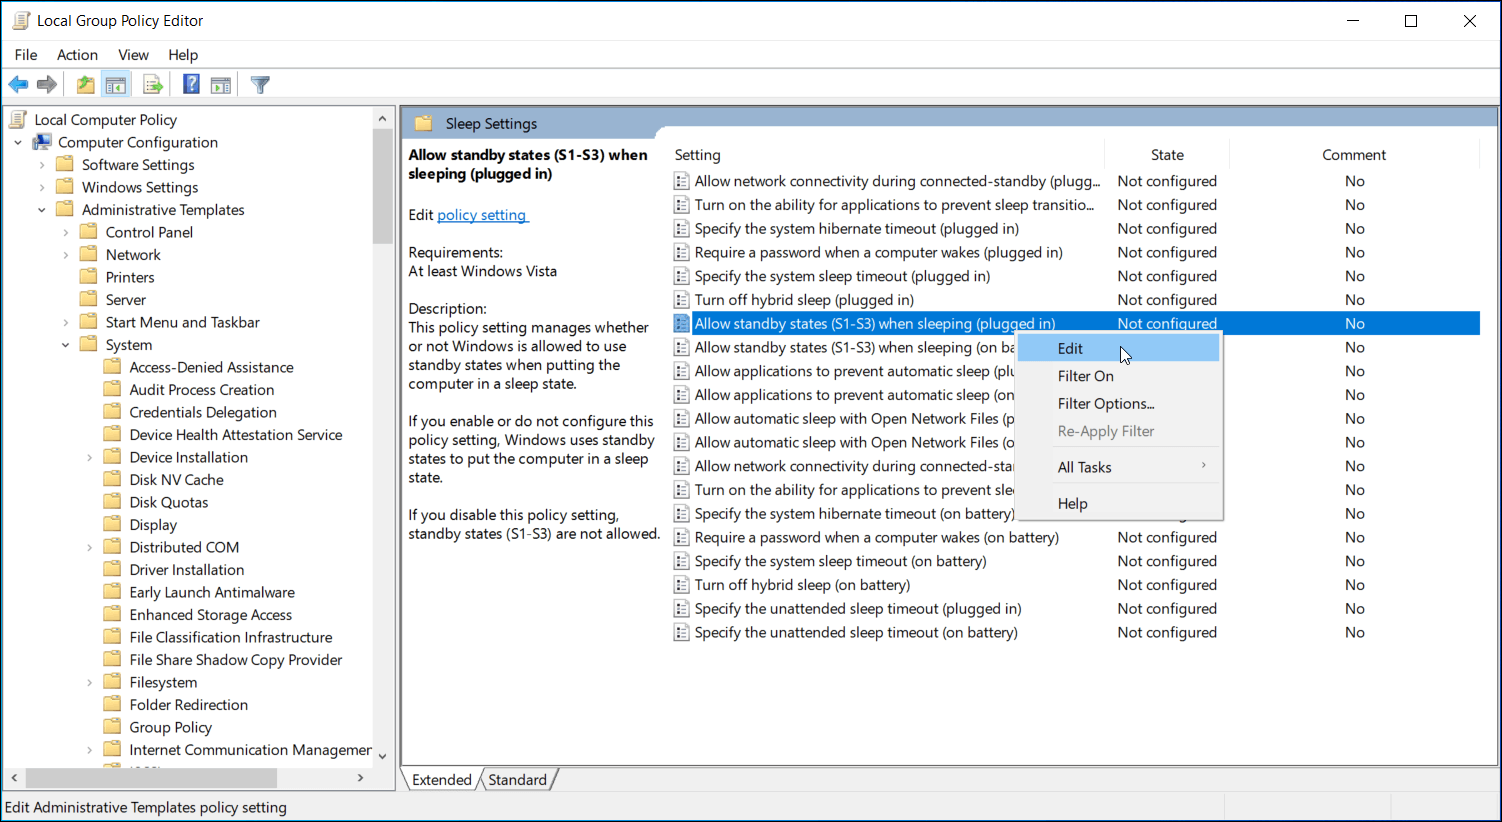
If that didn’t work, try to tweak the Sleep Settings policy in the Group Policy Editor. To do this, open the Group Policy Editor and navigate to Computer Configuration > Administrative Template > System > Power Management > Sleep Settings.

In the right pane, locate and right-click on Allow standby states (S1-S3) when sleeping (plugged-in) and select Edit. Set it to Enabled/Not Configured and click Save changes.
Open the Power menu again and check to see if your sleep button is back.
4. Run the Power Troubleshooter

Windows 10 has built-in troubleshooters that can help you find and fix problems for system-related hardware and settings. The Power troubleshooter is one such tool and can help you fix issues with your computer’s power settings. Here’s how to use it.
- Press Win + I to open Settings.
- Next, go to Update and Security and click on Troubleshoot in the left pane.
- If you don’t see troubleshoot options, click on Additional troubleshooters.
- Scroll down to Find and fix other problems and click on Power.
- Next, click Run the troubleshooter. It will scan the system for power schemes related issues and fix them automatically.
- Close the troubleshooter and open the Power option to see if the sleep option is now available.
You can also run the Power troubleshooter from the Run dialog box. To do this, press the Windows key + R, type msdt.exe /id PowerDiagnostic and hit Enter. Then, in the Power troubleshooter window that appears, click Next to run it.
Run Power Troubleshooter in Windows 11

If you are using Windows 11, follow these steps to run the Power troubleshooter instead:
- Press Win + I to open Settings.
- Open the System tab in the left pane.
- In the right pane, scroll down and click on Troubleshoot.
- Next, click on Other troubleshooters.
- Scroll down to the Other section and locate the Power option.
- Click the Run button for Power to initiate the troubleshooter. The troubleshooter will scan for potential issues and recommend fixes that you can apply.
5. How to Enable a Grayed Out Sleep Option in Control Panel
Sometimes you can physically see the sleep option on your computer, but you can't actually click on it because it's grayed out. Fortunately, if this happens to you, there is an easy way to fix it.

If you just bought a Windows 10 laptop with the sleep option grayed out, the system is likely using older drivers installed on the production line. As such, the best thing you can do after setting up your new PC is to install all pending driver and Windows updates.
To do this, go to Settings > Update & Security > Windows Updates and check for available Windows updates.
You can also install the latest display drivers manually from the laptop/GPU vendors' website, Windows device manager, or use the proprietary tool such as GeForce Experience or AMD Radeon Software if you have a discrete graphics unit.
We have a detailed guide on how to update graphics drivers in Windows 10 that you can follow for more details.
6. Enable InstantGo on Compatible Systems Using Registry Editor

Some laptop manufacturers equip their computers with the InstantGo feature to optimize power usage on Windows computers. It is a hardware feature different from the regular Standby (S3) sleep option available on most computers.
If you have InstantGo available but disabled, you may not see the Sleep option. To fix this, you can enable InstantGo using Registry Editor.
Additionally, you can check if your system is InstantGo compatible using a Command Prompt command. Here’s how to do it.
- Press Win + R to open Run.
- Type cmd, press and hold Ctrl + Shift, and click OK to open the Command Prompt as administrator.
-
In the Command Prompt window, type the following command and hit Enter:
powercfg /a
- Check the output text to see if it mentions Standby (Connected). If yes, then your system InstantGo compatible, and you can enable it from the registry editor.
To enable InstantGo using Registry Editor:
- Press Win + R to open Run.
-
Type regedit and click OK to open Registry Editor.
-
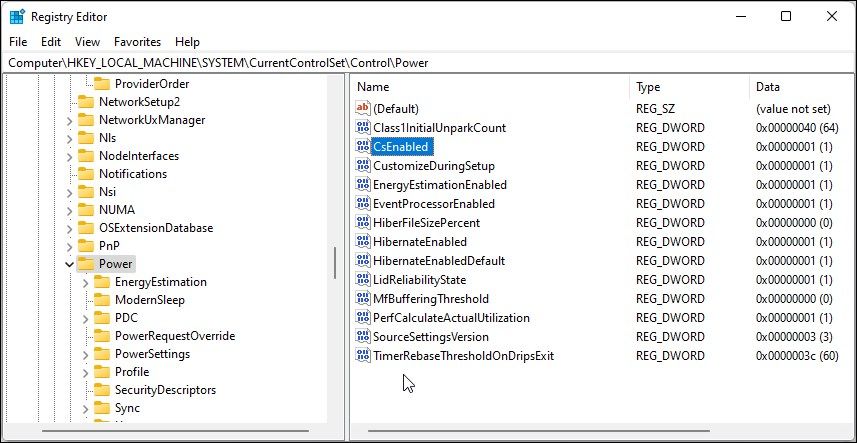
In Registry Editor, navigate to the following location. You can copy and paste the following path for quick navigation:
HKEY_LOCAL_MACHINE\SYSTEM\CurrentControlSet\Control\Power
- On the right-pane, locate the CsEnabled value.
-
Right-click on CsEnabled, and select Modify.
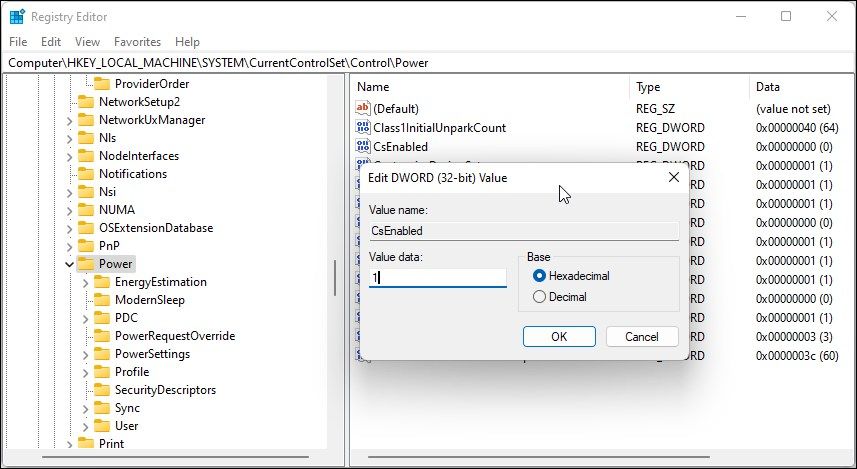
- Type 1 in the Value data field and click OK to save the changes.
- If you don’t see the CsEnabled value, your system does not support InstantGo.
- Once done, close the Registry Editor and reboot your PC.


You Should See the Sleep Option in the Power Menu Now
The additional power modes such as Sleep and Hibernate allow you to conserve power without completely shutting down your system. If you don’t find the sleep option after performing an upgrade, install all the pending updates for your system. Since Windows installs a generic Microsoft display driver by default, it can be inefficient when you want to access advanced system settings.
In addition, custom Windows power plans can help you extend battery life and conserve power when the system is idle. If you don’t have a custom power plan configured yet, it is the right time to do it.