Data loss can happen to anyone, regardless of how careful they are with their computer. There are several reasons why important files may be lost, and this is why it is crucial to have a reliable backup system.
One of the easiest and most convenient options available for Windows 10 users is File History. To this end, we will explore how to use Windows 10 File History to protect and recover your important files in case of data loss or corruption.
An Overview of Windows 10 File History and Its Benefits
Windows 10 File History is a simple yet powerful tool that allows you to create automatic backups of your important files. By default, it’s set to back up your documents, photos, music, videos, and other files in your libraries.
One of the main benefits of using this system is that it provides an easy way to recover files you may have accidentally deleted or lost due to a system failure. For example, you can restore a file or an entire folder to a previous state.
In addition to basic backup and restore functionality, File History offers advanced features such as excluding specific file types from backups and manual file versioning. These features give you more control over your backups.
Another benefit of enabling File History on your PC is that it allows you to access previous versions of files. This is particularly useful for tracking changes and collaborating with others on a document. You can also use File History to restore files to a new computer or recover files after a hard drive failure.
File History runs in the background and uses minimal system resources, so you can continue to use your computer without any noticeable impact on performance.
With that out of the way, here are some nifty methods to leverage File History to protect your important files.
1. Customizing File History Settings for Optimal Protection
When it comes to protecting your important files with Windows 10 File History, customizing its settings can help to optimize your protection level.
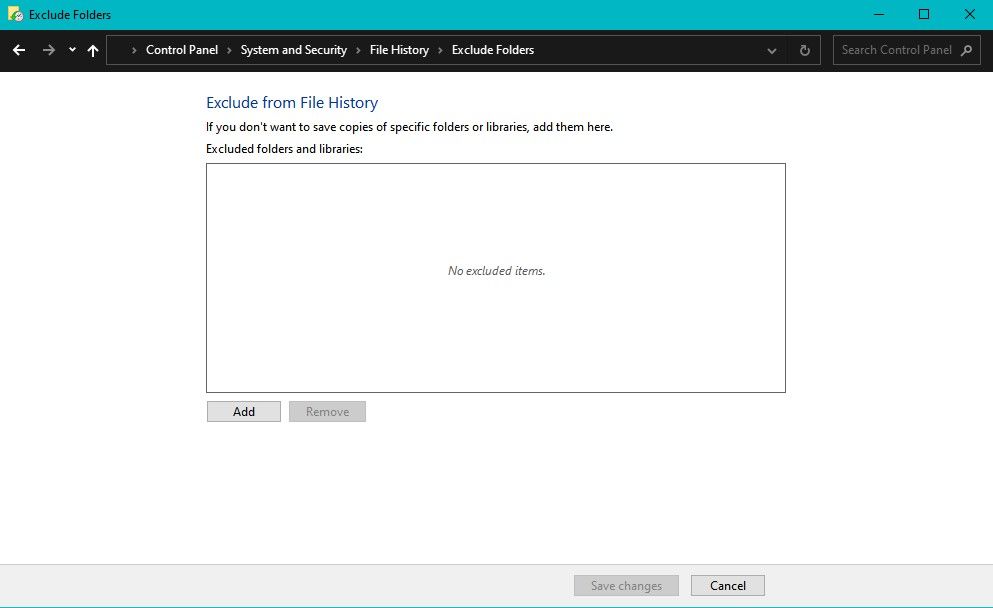
First, you can select which files and folders you don’t want to back up using the Exclude Folders button. This allows you to back up only the files you intend to save and exclude any unnecessary files or folders outside your libraries' default personal files.
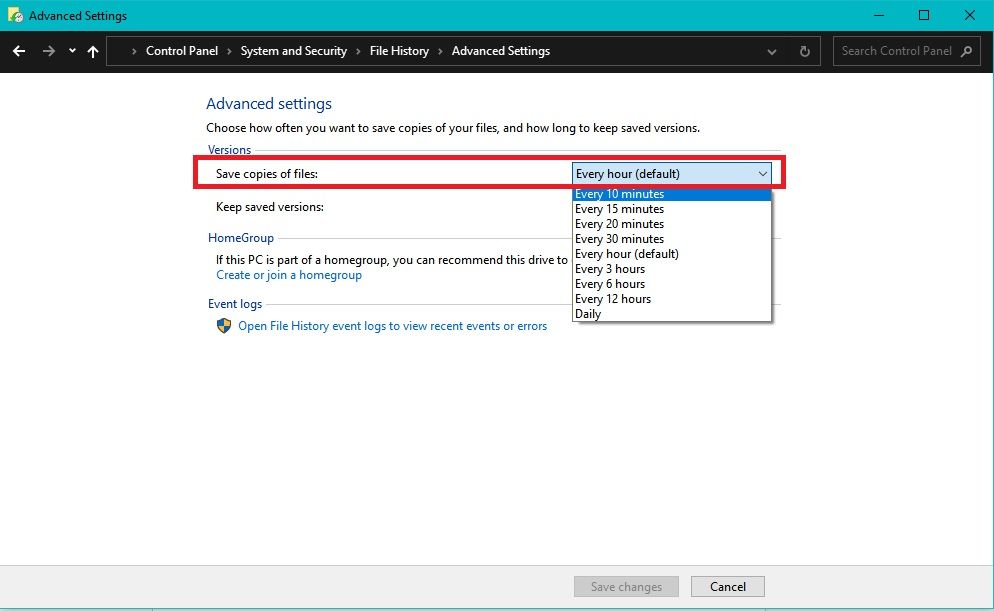
You can also change the backup frequency to suit your preferences. File History is originally set to back up your files every hour, but you can adjust this frequency in the Advanced Settings Page to every 10 minutes or once daily.
It’s worth noting that more frequent backups will create larger backup files and possibly affect your system performance.
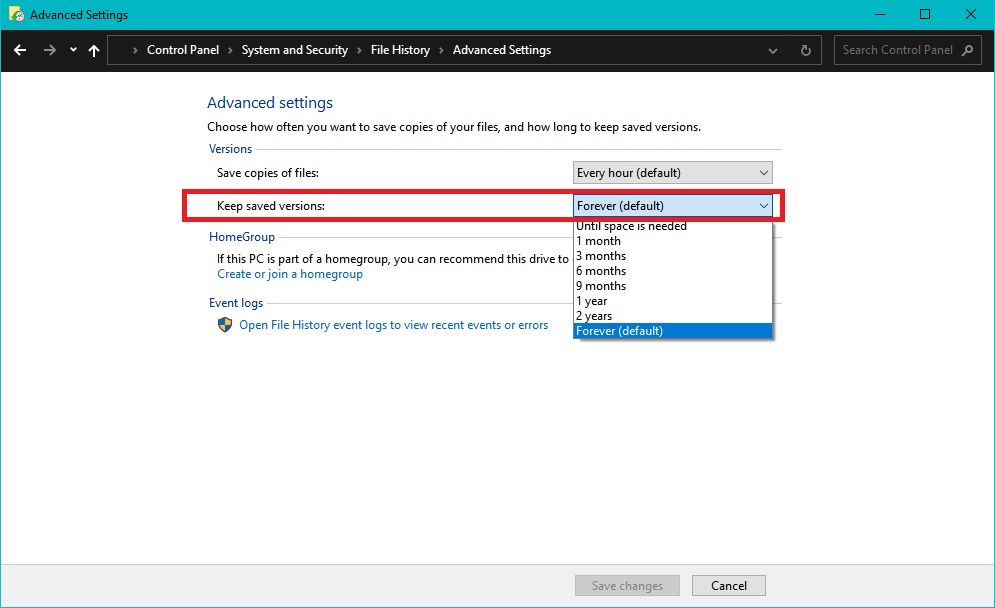
Additionally, you can adjust the retention settings to keep backups for specific days, weeks, or months. Doing this can conserve disk space and ensure that you only keep the latest file backups.
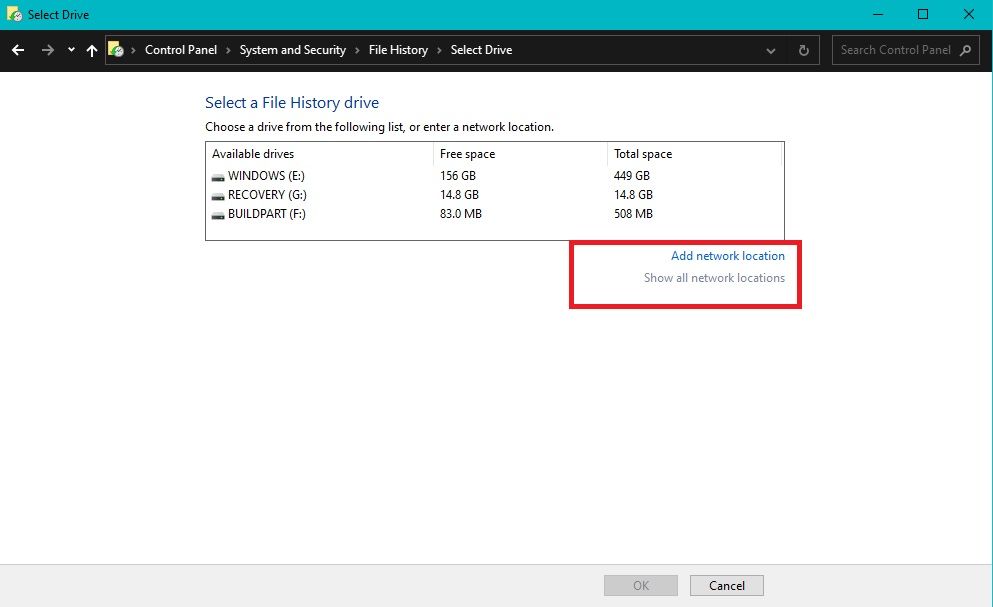
Instead of backing up your files to an external hard drive by default, you can also choose an alternative location to back up your files. For example, you can back up your files to a remote network location.
Finally, File History allows you to create a system image backup of your entire Windows system. This is useful in a catastrophic system failure, as you can use the system image to restore your computer to its previous state.
2. Selecting Files to Back Up With File History
To select the files you want to back up using File History, connect an external hard drive or a USB drive to your computer.
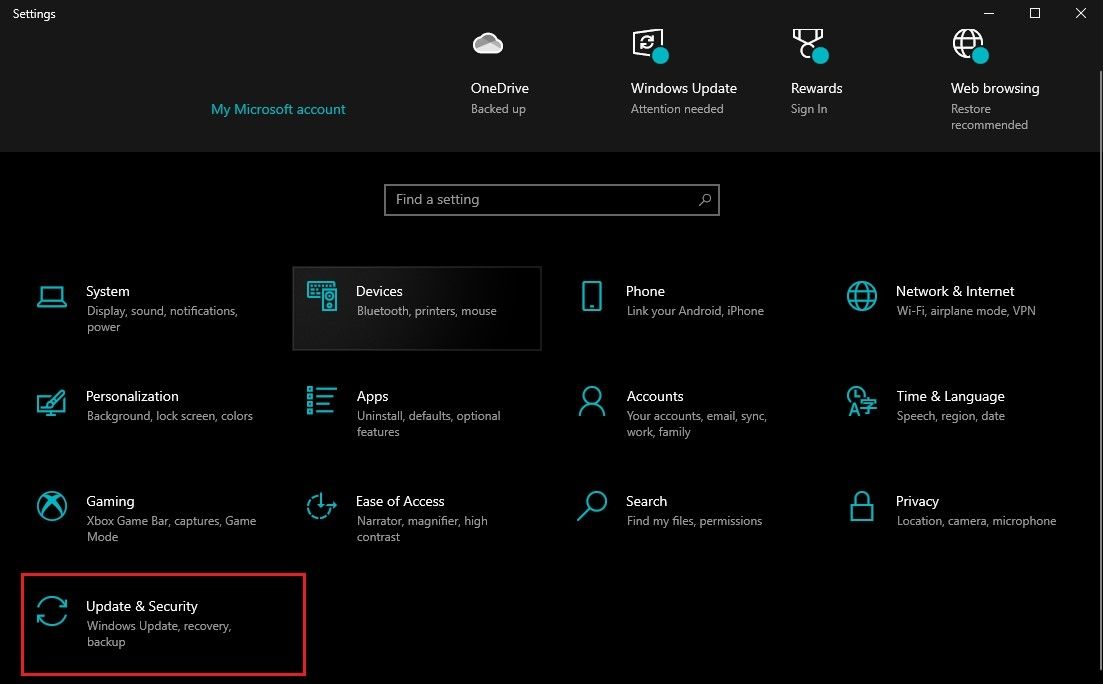
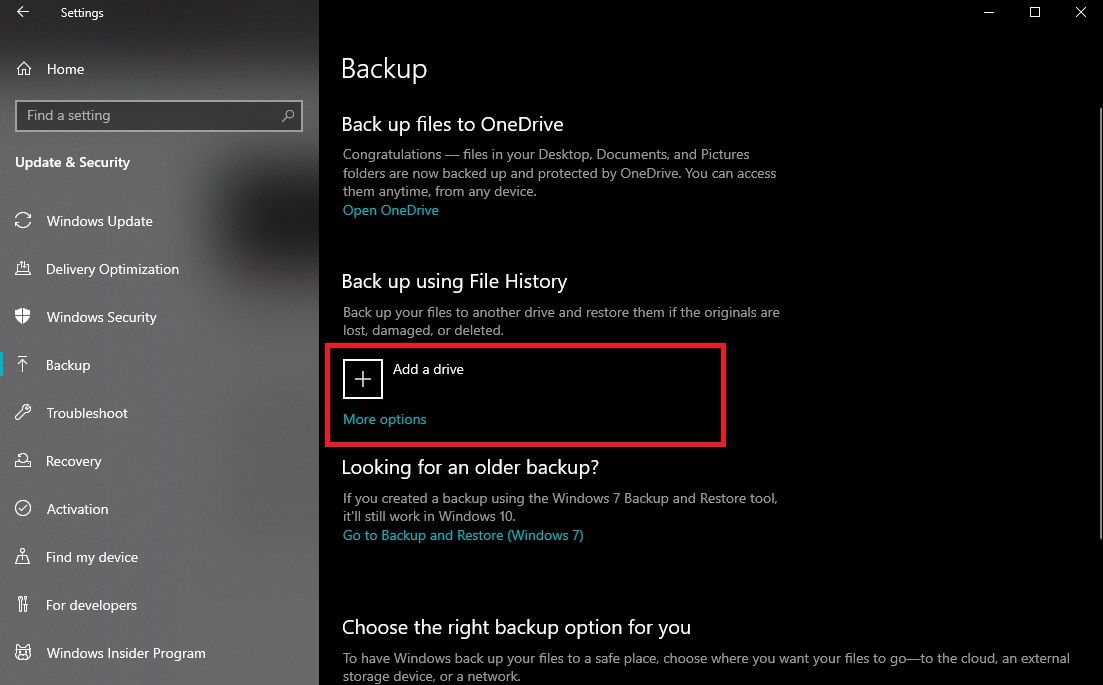
After that, click on the Start menu or press Win + I to open the Settings app. Then, click Update & Security and select Backup on the left side of the screen.
Under the Backup using File History section, click the Add a drive button to select the external hard drive or USB drive you want to use for the backup. Once you select the backup drive, click More Options.
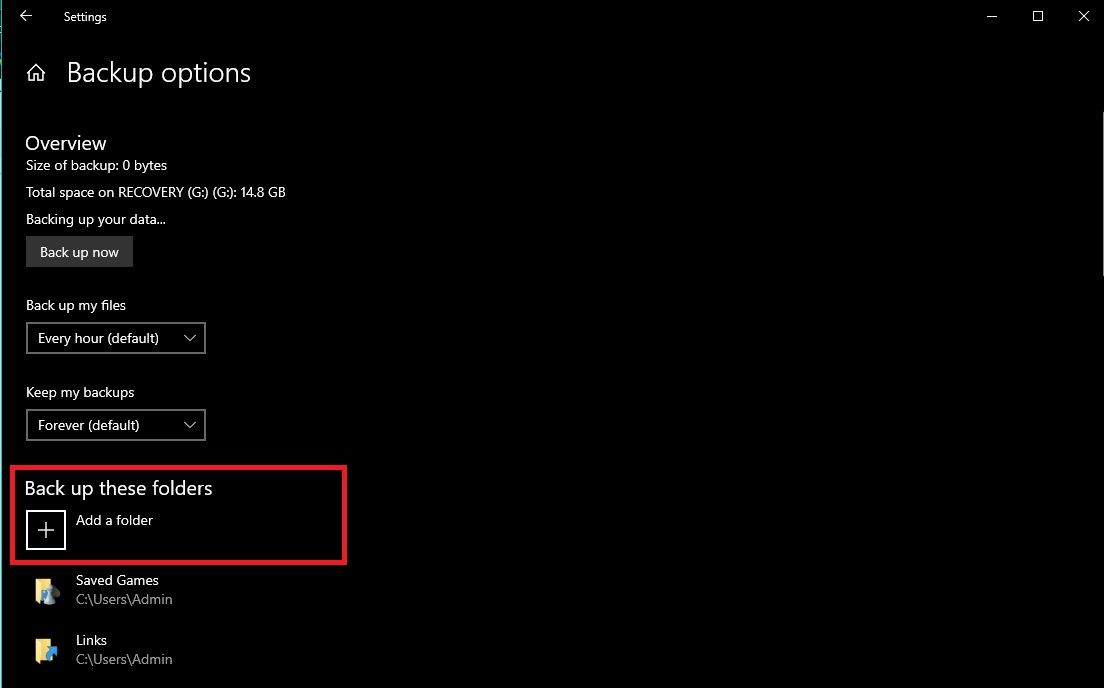
Under the Back up These folders section, you can choose which folders you want to back up. File History backs up your Desktop, Documents, Pictures, Music, and Videos folders by default, but you can add folders by clicking the Add a Folder button.
Once you have selected the folders you want to back up and customized the backup frequency, click the Back up now button to start the backup process.
3. Backing Up to an External Drive Versus a Network Location
You can set File History to back up to an external drive or a network location. However, there are some important considerations to keep in mind when selecting your backup location.
Backing up your files to an external drive is a convenient option, as you can easily disconnect the drive and store it in a secure location. It also allows you to create separate backups.
On the other hand, backing up to a network location provides more flexibility and accessibility. With a network backup, you can access your files from any computer on your network as long as you have the appropriate permissions.
This is useful if you have multiple devices that you want to back up or if you want to access your files from a different location.
However, backing up to a network location may have some drawbacks. It requires a stable network connection, and if the network location is not properly secured, it can be vulnerable to hacking or data theft.
Also note that network backups may be slower than backing up to an external hard drive, as they rely on the speed of your network connection.
4. Restoring Files With Windows 10 File History
Restoring files with Windows 10 File History is essential to data recovery in case of loss or damage. Luckily, the process of restoring files is simple.
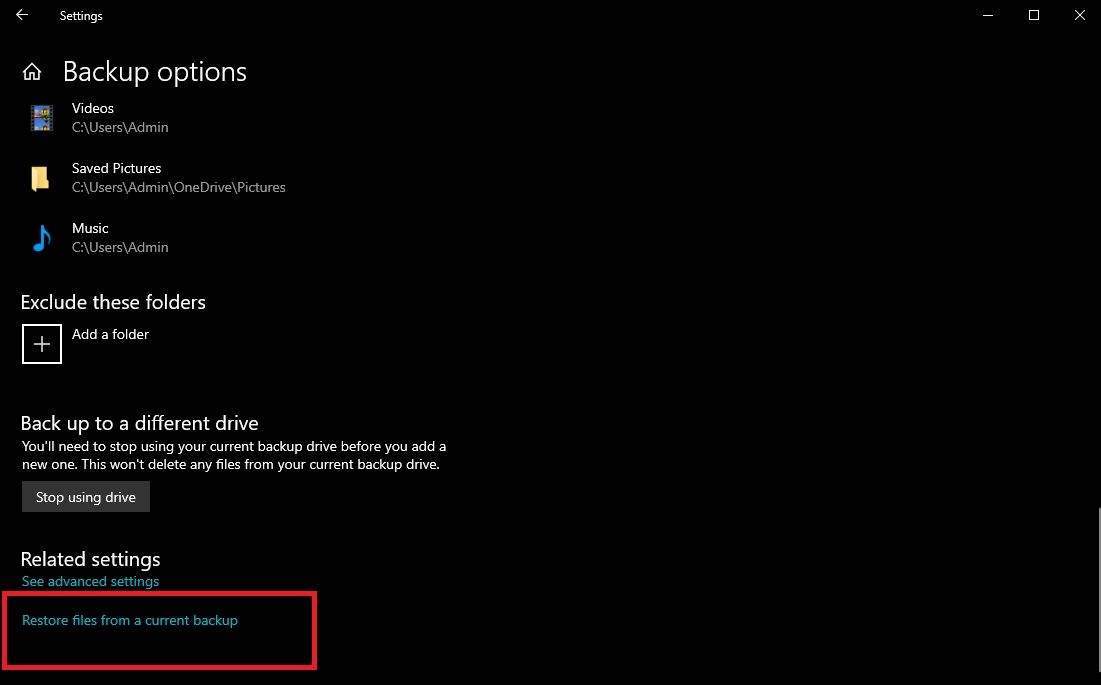
Open the File History settings by going to the Back Up Page and clicking on more options. After that, click Restore files from a current backup. This will take you to the Restore Files interface.
You can select the file or folder you want to restore by browsing through the backup files or searching for the file by name. Once you have found the file, select it and click the Restore button to begin restoration.
During restoration, you will be prompted to choose a location to restore the file. Depending on your needs, you can restore the file to its original location or a different location on your computer.
If you're restoring a deleted or modified file, you may need to restore a previous version. You can do this by selecting the file and clicking on the Previous button to view previous versions of the file. From there, select the version you want to restore.
Best Practices for File History Backup and Recovery
File History is an excellent solution for many users. However, it is important to note that it's not a replacement for a comprehensive backup strategy. So, having multiple backup solutions, including cloud-based and regular offline backups is always a good idea.
Consequently, you should explore other backup solutions and strategies to help you further protect your data. By combining multiple backup solutions and following best practices for data security, you can ensure that your important files are always safe and accessible, no matter what happens.


