Installing custom ROMs on Android phones used to be relatively simple. You unlocked the bootloader, installed a custom recovery, and you were pretty much ready to go.
Things have changed since, and if you're unable to flash a custom ROM through TWRP or Fastboot, you're probably flashing it at the wrong level. Most modern phones now have another level called FastbootD, where you can make changes to the system partition.
So, let's look at what FastbootD is, and how to boot into FastbootD mode and use it to install a custom ROM or GSI (Generic System Image).
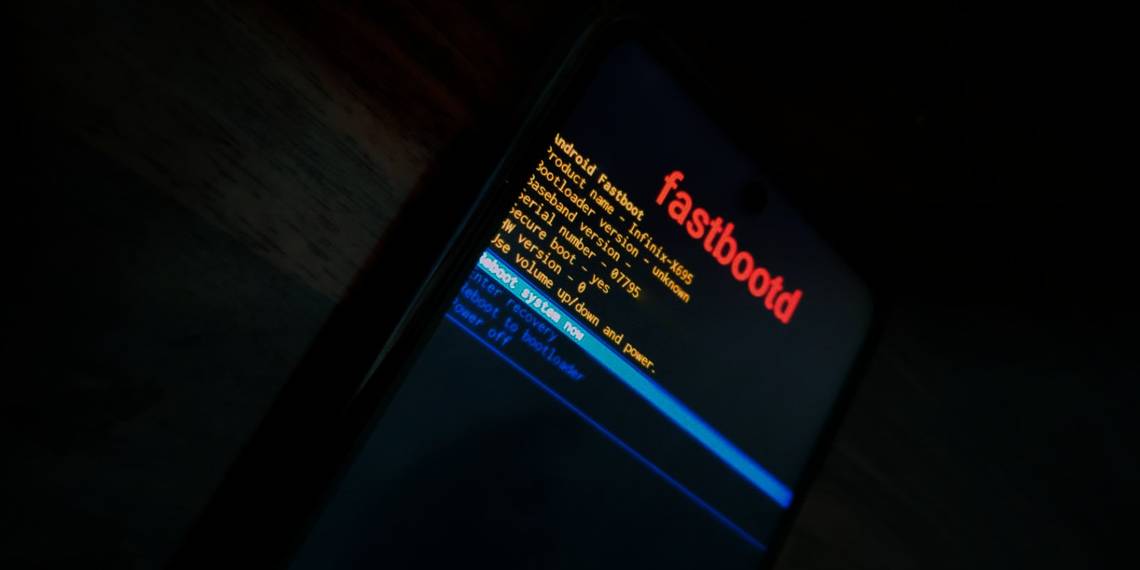
What Is FastbootD?
FastbootD helps in flashing firmware images on Android phones and deals with them in the Device Disabled Verification Failed or DDVF state. This state appears when the device's bootloader cannot identify the signature of the updated firmware, usually because the firmware is unsigned or tampered with.
FastbootD helps restore the device to a usable state. However, most advanced users and developers use it to install custom ROMs and GSIs.
Fastboot and FastbootD are both low-level tools for Android debugging and maintenance. Fastboot allows interaction with your device's bootloader and can be used to flash partitions, usually other than the system partition. On the other hand, FastbootD is for troubleshooting and repairing your Android phone and allows you to flash the system partition.
If you're not sure whether to use Fastboot or FastbootD, you'll have to check whether your Android phone supports Project Treble (more on this below).
If the phone doesn't support Project Treble, it likely doesn't have a FastbootD mode, so you can use the Fastboot mode instead. However, as we'll discuss shortly, if your phone has a FastbootD mode, you'll most likely have to use it for flashing the system image.
How to Boot Into FastbootD Mode
Every step you take from here is potentially dangerous for your phone. Reading your phone model's forum on XDA is recommended, as it will give you a better understanding of the whole process and avoid any mishaps. You should also devise a full backup plan in case things don't go according to plan.
To boot into FastbootD mode, you need to set up an ADB connection between your Android device and PC. If you don't know how to do this, refer to our detailed guide on how to use ADB and Fastboot on Android. This should get the ADB connection up and running.
You also need to unlock the bootloader of your Android phone to utilize FastbootD. The instructions for this vary for each device, so it's best to head over to the XDA forums or the manufacturer's website for guidance. Unlocking the bootloader deletes all your user data, so back up everything before proceeding.
Step 1: Install and Set Up ADB
Once ADB is set up and the bootloader is unlocked, connect your phone to your PC using a USB cable. Open Command Prompt or Terminal in the default ADB folder on your PC. First, check the ADB connection by typing the following command. It should return a long serial number:
adb devices

Make sure OEM Unlocking is enabled in the Developer Options on your phone, as mentioned in our guide, and reboot into the bootloader with this command:
adb reboot bootloader
Step 2: Unlock Flashing
Next, you need to unlock flashing on your phone to allow making changes to the partitions, including the system partition. Enter each of these commands and use the Volume Up button to confirm:
fastboot flashing unlock
fastboot flashing unlock_critical

Step 3: Disable Verification
Now, disable verification to avoid getting flagged for tampering with the critical files. For this, you need the VBMeta (Verified Boot Metadata) files from your stock or custom ROM (if it has them). These are files that store checksums and signatures of other partitions on your phone.
You can usually find the stock ROM or VBMeta files on your device's XDA forum or your manufacturer's website. Just type your model and write "Stock ROM" or "Flash File" next to it in Google Search, and you'll find the ROM. You can also try SamMobile for Samsung phones or Google for Pixel phones.
Once you have it, extract it and save the vbmeta.img and vbmeta_system.img in the ADB folder and run these commands:
fastboot --disable-verity --disable-verification flash vbmeta vbmeta.img
fastboot --disable-verity --disable-verification flash vbmeta_system vbmeta_system.img

Step 4: Boot Into FastbootD Mode
Now, reboot into FastbootD mode by entering this command:
fastboot reboot fastboot
This step boots your device into FasbootD mode, so you're at the level where you can flash your custom ROM or GSI.
Once you've unlocked the bootloader and disabled verification, do not relock the bootloader without enabling everything that you had disabled—especially the verification. Doing so may hard brick your phone, making it unrecoverable.
Some commands might be unnecessary if your phone doesn't have dynamic partitions or has only A instead of AB partitions.
You can check if your phone has dynamic partitions and if you can flash a GSI on it by using one of these free apps: Treble Check or Treble Info.
Project Treble allows you to install the same system images on devices with different hardware specifications. If your device supports Project Treble as per the app, you can install GSIs on it.
How to Flash a Custom ROM or GSI Using FastbootD Mode
To proceed further, ensure you have followed every step mentioned above. Download the custom ROM made for your phone mode, or a GSI from XDA or this useful GitHub ROM list. Place the image file in your ADB folder, and rename it to system.img. If you're going for a GSI, you can read more details about flashing a GSI and Dynamic System Updates.
The best place to find custom ROMs is and has always been XDA. You can search for your phone model, and if there is any development for it, you'll find it in its forum. Custom ROMs in these forums are made specifically for a single phone model, unlike GSIs, which are compatible with every model that supports Project Treble.
If you're confused about choosing between a custom ROM and a GSI, we recommend that you go for a custom ROM made for your device because it will have better hardware compatibility than a GSI. GSIs are ideal for relatively unknown phone models that have no individual development.
So, assuming you're in FastbootD, let's proceed with installing a new ROM.
Step 1: Erase the System
First, you need to check the Fastboot binary and should only proceed if the command returns is-userspace: yes. Don't worry. It says yes in most cases, but we just want to be sure. Enter this command to check:
fastboot getvar is-userspace

Now, erase your current system. Make sure you know how to recover your stock firmware if something goes wrong, take backups, and read the device-specific forums:
fastboot erase system
Step 2: Delete the Partitions
The next step is to delete the logical partitions so that you can replace them with new ones.
For Android phones with dynamic (AB) partitions, enter these commands:
fastboot delete-logical-partition product_a
fastboot delete-logical-partition product_b
For devices with A-only partitions, use this command:
fastboot delete-logical-partition product

Step 3: Flash the System Image
Finally, flash the system file that you saved in the ADB folder:
fastboot flash system system.img

Once the file is flashed, reboot your device into recovery by choosing the Enter recovery option on your phone. Use the volume buttons to navigate to the option and press the Power button to select it.
In recovery, select Wipe data/factory reset and confirm by selecting Factory data reset. Once done, select Reboot system now, and your device should restart and run the new ROM.
Explore FastbootD After Proper Device-Specific Research
FastbootD eliminates the need to use custom recoveries like TWRP. However, you can access FastbootD through TWRP as well. It's in the recovery's Advanced Settings, and the commands remain pretty much the same as we've outlined.
Again, we can't emphasize enough how important it is to read and do research about your phone model before making any of these modifications. The time you spend in the beginning will save you the time, effort, and stress you might otherwise have.