VMware Workstation offers a snapshot feature that captures the current state of a VM at a specific point in time. This snapshot captures the virtual machine's configuration, in addition to a virtual disk log that preserves the present state of the virtual machine, so you can resume tasks as if the VM was never turned off.
Once a snapshot is taken, you can use it to revert the VM to the state it was in when the snapshot was taken. Taking a snapshot of your VM is an important function from which all users will greatly benefit—but how does it work?
Why Take a VMware Snapshot?
So how exactly can people benefit from taking snapshots of their VMs? Well, there are several reasons why:
- Temporary Backups: Snapshots can be used as a form of backup for your virtual machines (VMs). Taking a snapshot allows you to revert a VM to its previous state. This, however, should only be a temporary form of backup as snapshots are still dependent on its host memory drive.
- Development: A snapshot can also be used for development purposes. VMware snapshots can act like a virtual sandbox, so your main body of work is safe when something goes wrong. And since you can basically make multiple snapshots in a single VM, you can keep taking snapshots whenever you feel necessary.
- Archiving: Taking a snapshot allows you to archive the state of your VM for future reference.
- Testing: Snapshots can be used to test various software in versions without permanently altering the virtual machine. You can take a snapshot before making changes, test the changes, and then revert to the snapshot if the changes don't work out.
How to Make Snapshot on VMware Workstation
Taking a snapshot in VMware Workstation is very simple.
In the screenshot above, we used basic bash commands to create a directory named "MUO." Now, we want to take a snapshot of this state so that we can revert to it later.
To take a snapshot using VMware:
Navigate through your toolbars and click on VM > Snapshot > Take Snapshot.
Or you can click on the snapshot icon (clock with a plus symbol) to take the snapshot.
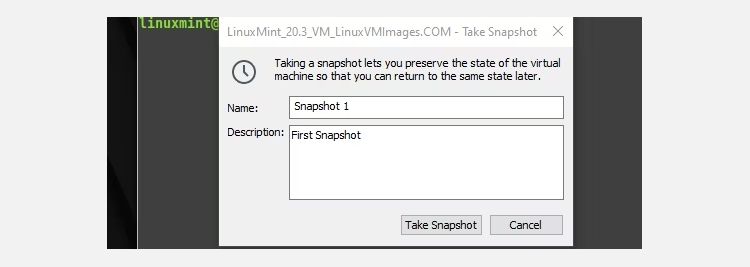
A prompt will pop up, and you provide the snapshot a name and optional description, then click Take Snapshot.
You have now successfully created a VMware snapshot!
How to Restore and Manage Snapshot
Reverting to a snapshot is also as easy as making them.
As you can see in the screenshot above, after taking the snapshot, we deleted the "Desktop" directory. This was a mistake, and now we want to revert to our previous snapshot.
To restore the snapshot, navigate to your toolbar and click on the restore icon (clock with a red backward arrow).
The machine has now successfully reverted to its old state, as shown in the screenshot below.
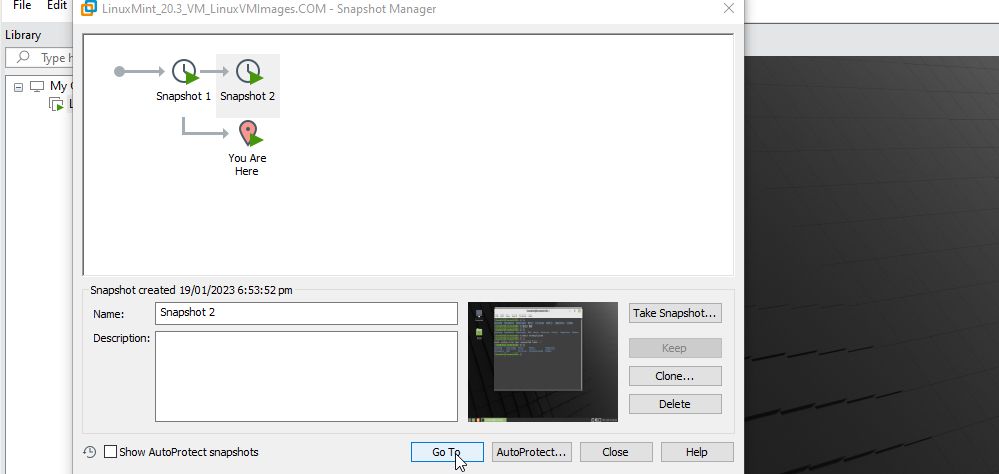
If you've taken multiple snapshots and want to select or delete a snapshot, click on the snapshot manager icon (clock with tool symbol, alongside the Take Snapshot and Revert Snapshot buttons). Note that although taking a snapshot initially uses a few megabytes of memory, the file size will grow the longer you use it. Make sure to free up some storage space and allot enough memory on the host device for your snapshots to grow.
To revert to a specific state, click on the snapshot you want to revert to and click Restore. You can also delete, clone, and protect certain snapshots in this menu.
Congratulations! You can now take, restore, and manage VM snapshots in VMware Workstation.
Best Practices When Taking VMware Snapshots
Now that you know how to use the snapshot feature in VMware Workstation, here are a few best practices you'll want to observe in VMware to ensure the best performance.
- Do not rely on snapshots as backups: Snapshot files differ from backups. A snapshot is meant to be a quick save feature that allows you to revert to an older state in case something goes wrong or when you need to take longer breaks without potentially losing all your progress. Snapshots are different from backups since snapshots only create placeholder disks in which your VM's current state is saved. It does not save all the files and data in your VM as a backup would. This means changes on the base disk could lead to problems that a snapshot cannot recover since it only contains data about the state of the VM and not the entire files themselves.
- Only have 2-3 snapshots per chain: A VM in VMware Workstation can have up to 32 snapshots per machine. However, it is recommended that you only keep two or three snapshots for better performance.
- Do not keep a snapshot for more than 72 hours: Although snapshots initially start out taking a few megabytes (MB) of space, the snapshot file size will continue growing the longer you keep them. Having such large files may take up all of your storage space and affect performance. Prevent maxing out your storage space by keeping a snapshot for no more than 72 hours.
- Avoid increasing VM storage space while keeping snapshots: Increasing your VM's storage space while the snapshots have been taken when the storage space was lower can corrupt the snapshots and make them unusable.
Other Ways of Saving Your Virtual Machine State
Although snapshots are the quickest way to save a VM's state, there are other ways to save a virtual machine in its current state. The first is through cloning, in which you create an exact copy of the VM with all its configuration and data files.
Cloning is best used when making multiple copies of a VM for testing and development.
If you need to share the VM with another machine, making a VM template creates a "Master copy," which can then be used for sharing.
You can also make a full-blown backup file of a VM just by using the backup feature in VMware Workstation. The files created by a backup are a much more robust and reliable form of a snapshot which keeps all files, including configuration files, data structures, and all data files, in one folder.
Lastly, you can do what is known as a cold migration which is a way of transferring the VM to another machine without shutting it down.
What About VMware Workstation Player?
VMware provides two flavors of its VMware Workstation: VMware Workstation Pro and VMware Workstation Player. Workstation Pro is a paid enterprise edition hypervisor, while Workstation Player is a free hypervisor made for students and tinkerers.
Unfortunately, VMware Workstation Player does not provide the snapshot feature (with or without a product key). However, there is a way to manually create a snapshot in Workstation Player. Unfortunately, this process includes backing up your VM, copying the backup files to another folder, and opening them as a separate VM—which is somewhat tedious for a snapshot.
Or you can switch to another hypervisor such as VirtualBox, which provides the snapshot feature for free.


