The Raspberry Pi Zero is so compact, you can literally take it with you anywhere. Forget media centers and retro game stations – save those for the larger Raspberry Pis. Your Pi Zero simply needs to get outdoors!
One project you can use it for outside is to create a time-lapse movie of what you’re doing right now. All it requires is a case, battery pack, and a Raspberry Pi camera module. With the right script, you can create a time-lapse movie that records your day, ready for you to upload to YouTube or share it elsewhere online.
What You’ll Need to Record a Wearable Time-Lapse of Your Day
Like the idea of recording everything that happens? You can record time-lapse footage everywhere you go with the following:
- Raspberry Pi Zero v1.3 or later
- Raspberry Pi Camera Module
- Camera ribbon for Pi Zero
- Elastic band to keep the cable tidy
- Portable battery (see below)
- Heavy duty packaging tape (to secure the USB power cable)
You should be able to collect these for under $50.
The Raspberry Pi Zero must be v1.3 or later as the older versions don't have the camera module port. Later Pi Zero models with Wi-Fi are good, but nearly three times the price of the 1.3.

Note that the camera ribbon cable for the Pi Zero is different to the default camera module ribbon for full sized Raspberry Pis. This ribbon cable is narrower at one end to suit the smaller connector on the Pi Zero.
Power Your Wearable Time-lapse Camera
As this is a portable project, a battery is required. Three options present themselves.
- A standard smartphone or tablet rechargeable battery.
- A custom-built battery pack for the Raspberry Pi.
- A compact, manufactured rechargeable battery back.
Which one you choose will depend on what sort of mobility you’re hoping to enjoy, and how long the camera should run for. Take option 1: this will last longer than the others but will make you less mobile. Meanwhile, Option 3 will be the most mobile option, but with the lowest battery life (around two hours). Option 2 will give you the best of both worlds but isn’t rechargeable.
Install Time Lapse Camera
You could set up the whole thing from scratch, but when there is a dedicated Raspberry Pi disk image called Time Lapse Camera, that seems somewhat pointless.
Download: Time Lapse Camera
This can be installed to your microSD card using BalenaEtcher or the Raspberry Pi Imager tool.
Time Lapse Camera has default settings to capture 1280x720 pixel JPEG images every 15 seconds. This can be changed in the timelapse.sh file (see below), allowing you to build a custom, configurable Raspberry Pi bodycam.
Configure the Camera
The default settings in the Time Lapse Camera build might not be wholly to your liking. To tweak them, open /boot/timelapse.sh in your text editor. This can be done while the microSD card is inserted in your computer, or after the Pi has booted, connected over SSH or using a mouse and keyboard:
sudo nano /boot/timelapse.sh
Here, you'll find a section labelled "Configurable stuff." Use this to tweak the setup to your preference:
- Interval: time between captures, measured in seconds
- Width: image width in pixels
- Height: image height
- Quality: each image is captured as a JPG, with a quality level of 1-100
- Dest: this is the destination directory
- Prefix: give the time-lapse images a prefix
- Halt: if using a stop button, specifies the GPIO pin (opposite to GND)
- LED: if using a status LED, specifies the GPIO pin
- prevtime: use this to specify a delay for the first capture
When you're done, save the text file before exiting. If editing timelapse.sh on your computer, safely eject the card and insert it in your Raspberry Pi Zero
Consider Your Case
To connect your Raspberry Pi Zero and camera together and carry them with relative safety, you’ll need a case. With so many solutions available, there’s only one option that offers the perfect solution: 3D printing.
In short, you need a case that features a clip, or provision for a lanyard-style attachment. It will also need to accommodate your Raspberry Pi Zero, the camera, and your chosen battery solution.
Two good 3D printed case options for a Raspberry Pi Zero and camera:
- One Piece Raspberry Pi Zero + Camera Case
- Raspberry Pi Zero Wearable Camera Case by Adafruit - comes with a built-in clip and a hole for attaching a cord and wearing as a lanyard.
Don't own a 3D printer? Look online for a local or mail order 3D printing business.
Perfect!
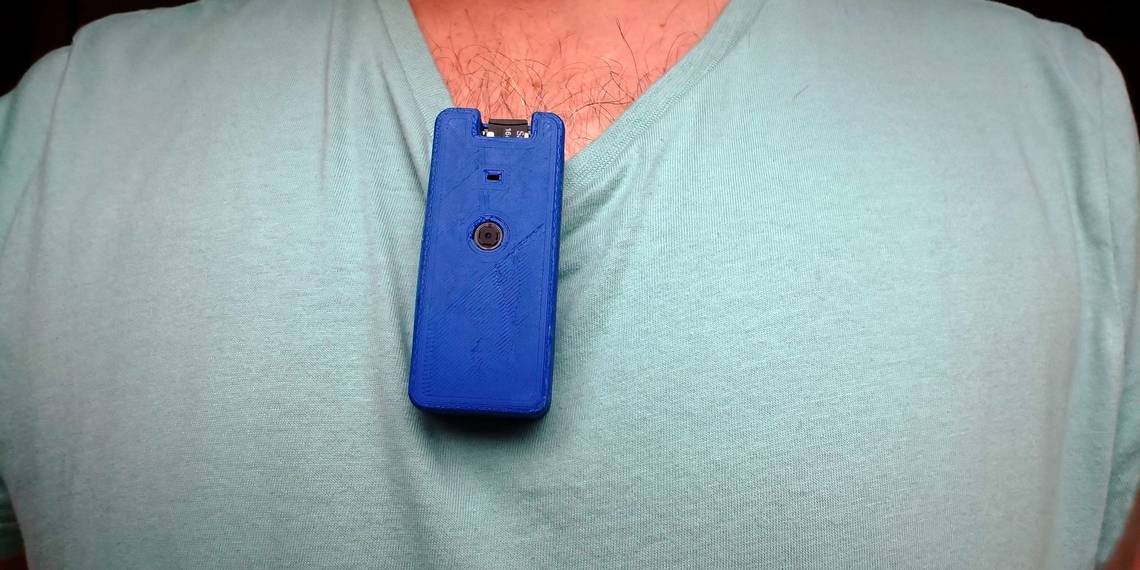
Build Your Raspberry Pi Zero Wearable Bodycam
So, you’ve got your Raspberry Pi Zero, a case of some sort, a power supply, and the script. You might have opted for stop/start button or be happy for the camera to start as soon as it powers up. If possible, you might use your local wireless network to connect via SSH to confirm the status of the camera.
It's now time to assemble the bodycam. At the very least you should have something that resembles this:

Convert the Images to a Movie
After creating your time-lapse you will need to compile the images into a video. First, review the image to ensure they're correctly orientated. If not, install imagemagick and rotate them as appropriate:
        sudo apt install imagemagick

for file in *.png; do convert $file -rotate 90 rotated-$file; done
This example command will rotate every image in the current directory 90 degrees clockwise. Of upi need to rotate, say, .JPG files anti-clockwise by 90 degrees:
for file in *.jpg; do convert $file -rotate -90 rotated-$file; done
At this stage you will have two versions of the images, so you might opt to delete the originals. This saves space on smaller microSD cards.
Next, create the video using avconv, part of the libav-tools suite.
        sudo apt-get install libav-tools

avconv -r 10 -i rotated-image%04d.jpg -r 10 -vcodec libx264 -crf 20 -g 15 -s 1280x720 timelapse.avi
Wait while your video is compiled, then view it on the Pi's video player.
Get Out and Start Your Time-Lapse Video!

All you need to do now is head out and start recording.
Once you’re done, safely shutdown the Pi Zero, remove the microSD card, and compile the images into a time-lapse video. Either retain your Raspberry Pi bodycam footage for posterity or share it online.