Having the option to save bookmarks within your browser is fantastic. Except when you go to find the link you need, and can't actually find it. It may have even been faster to try searching for the page again, but instead, you’re staring at a list of text and icons, determined to find it.
In this article, we’ll take you through three ways to visually organize your bookmarks. This will help you locate your links faster because you'll know exactly where everything is.
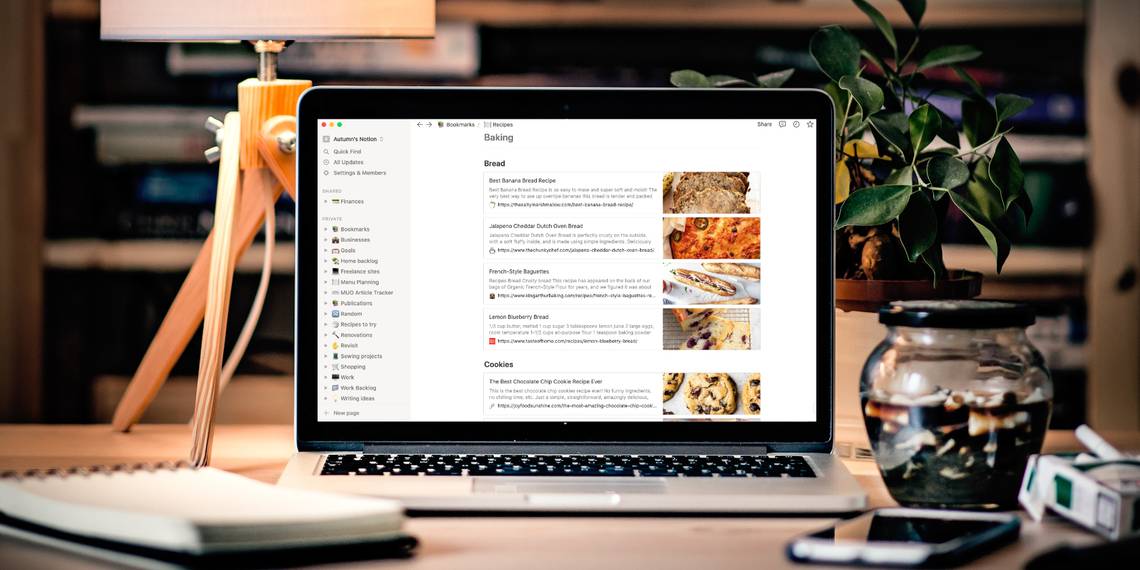
How to Visually Organize Your Bookmarks in Notion
Simply put, Notion is a note-taking and project management software. However, you can do just about anything with it. It’s highly versatile, easy to use, and just a really neat place to be all around.
To create visual bookmarks in Notion, start by creating a new page. To do this, select the New page option in the bottom-left corner.
Next, create a sub-page to act as a folder for similar links, for example, recipes. Within the subpage, press the forward slash on your keyboard to bring up the commands menu.

Locate the Web bookmark option, or start typing the words, and it will come up. Select it and a field will appear where you can paste your link.
Notion does the work for you of pulling the title, description, and photo. It may take a moment to appear, but if you find it’s not showing up, try refreshing your page.
If you have many similar links and want to find them quickly, you can create subcategories within your page by adding headings. You can even get creative with color-coding to help certain titles stand out—just give your text a right-click and select the color option.
Each time you have a link you want to save going forward, add it to the proper list. What's more, you can even use Notion's free Web Clipper extension to automatically saved pages to the right place in Notion.

Notion offers a personal account that’s free for you to use as an individual, with no limitations on pages and blocks (the information you fill your pages with). You can also share your boards with up to five friends.
How to Visually Organize Your Bookmarks in Milanote
Milanote is a tool you can use to organize your ideas visually. It’s excellent for planning creative projects, creating mood boards, and rounding up design assets. You can also use it to make a bookmarks board that’s both organized and pleasing to look at.

Start your bookmark collection by dragging and dropping a new board onto your homepage and name it accordingly. Once you're inside that board, create another one and give it a name that works with the types of links you’ll be saving—we’ll use the recipe example again.
Next, go into your new board and drag and drop a link card onto the surface. Paste your link inside the field and Milanote will pull up the page's title, description, and image for you.
If you want to create categories within a board to find your links quicker, you can add columns to round up similar items.

Now, whenever you have a link you want to add, simply put it on the appropriate board or create another if it’s unrelated. You can adjust your boards as you go by rearranging the cards. You can also add notes and comments, and get as creative as you want by adding images and other elements.
Additionally, you can share your board with a friend, so they can view your links or collaborate on your board. Milanote allows up to 100 cards for free.
How to Visually Organize Your Bookmarks on Pinterest
Pinterest is a social media site intended for saving and discovering the information you find on the internet. While it may seem the obvious choice, it’s easy to forget that you can pin stuff outside of what you find on Pinterest.
You can create some really interesting boards here, and Pinterest does most of the work for you.

Get started by creating a board and giving it a name that encapsulates the links you’d like to collect inside. You can set it to be public and share it with anyone you’d like, or private if you don’t want anyone else's eyes on your links. There are three ways to get links onto your boards.
The first is to do it manually. Go over to Pinterest and within your board, select the add button, choose Create a Pin, and fill in the link, description, and image field accordingly.
The second is to add the Pinterest Save Button extension to your browser, which you can do in your browser’s extension settings.
On Brave, Safari, and Chrome, selecting the extension settings will bring you to a web store or show you how to get there. This extension is available at no cost.

Once you add the extension, pin it to your browser, and anytime you have a link you want to save, give the icon a click. A window will pop up and walk you through the rest. If you don’t yet have a board or section that fits, you can create it using the extension.
The third way to add a pin is when the creator or developer has kindly added a pin option to their content. Select it, and a window will pop up that walks you through the rest.
Pinterest gives you the options of adding private notes for yourself, comments for others, and the ability to get super organized by adding sections within your boards. You can also rearrange everything as you go if you decide you want to alphabetize, put your favorites first, or whatever suits your style.
Get Your Bookmarks Organized
Now that you have some ideas on organizing your bookmarks, why not get started to avoid losing another interesting or useful link? All three options will help you create organized and aesthetic bookmarks folders. It’s somewhat like making a digital scrapbook.
While there are plenty of options for saving bookmarks, these three are certainly worth checking out.