SSH is widely used for accessing Linux servers securely. Most users use SSH connections with default settings to connect to a remote server. However, the unsecured default configurations also pose various security risks.
The root account of a server with open SSH access may be at risk. And especially if you are using a public IP address, it is much easier to hack the root password. Therefore, it's necessary to know about SSH security.
Here's how you can secure your SSH server connections on Linux.
1. Disable Root User Logins
For this, first, disable the root user's SSH access and create a new user with root privileges. Turning off server access for the root user is a defense strategy that prevents attackers from achieving their goal of intruding into the system. For example, you can create a user named exampleroot as follows:
        useradd -m exampleroot
passwd exampleroot
usermod -aG sudo exampleroot
Here's a brief explanation of the aforementioned commands:
- useradd creates a new user and the -m parameter creates a folder under the home directory for the user you created.
- The passwd command is for assigning a password to the new user. Remember that the passwords you assign to the users should be complex and difficult to guess.
- usermod -aG sudo adds the newly-created user to the admin group.
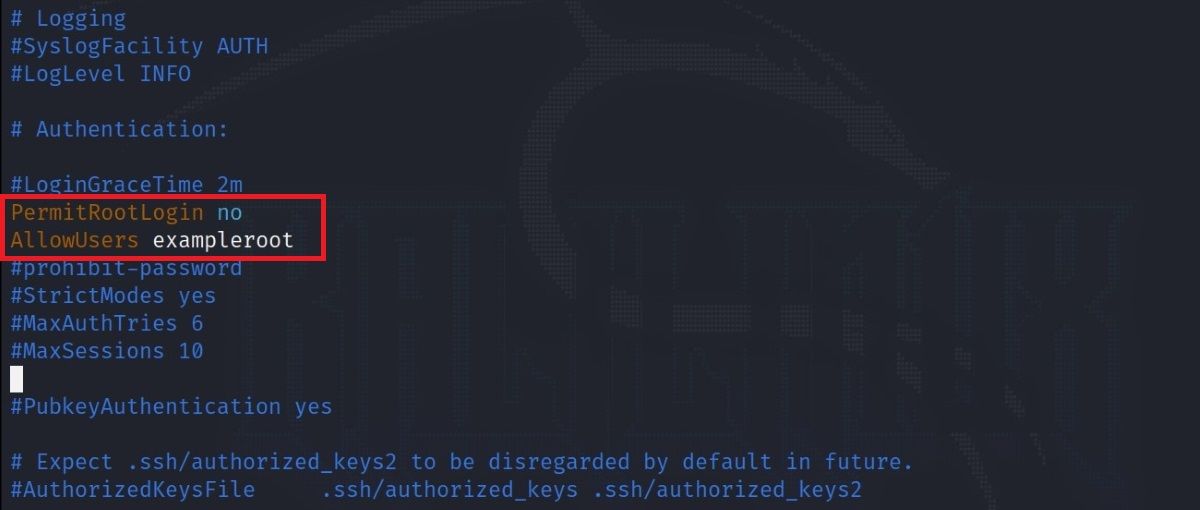
After the user creation process, it is necessary to make some changes to the sshd_config file. You can find this file at /etc/ssh/sshd_config. Open the file with any text editor and make the following changes:
        # Authentication:

#LoginGraceTime 2m
PermitRootLogin no
AllowUsers exampleroot
The PermitRootLogin line will prevent the root user from gaining remote access using SSH. Including exampleroot in the AllowUsers list grants necessary permissions to the user.
Finally, restart the SSH service using the following command:
sudo systemctl restart ssh
If that fails and you receive an error message, try the command below. This may differ based on the Linux distro you use.
sudo systemctl restart sshd
2. Changing the Default SSH Port
The default SSH connection port is 22. Of course, all attackers know this and therefore, it is necessary to change the default port number to ensure SSH security. Although an attacker can easily find the new port number with a Nmap scan, the goal here is to make the attacker's job more difficult.
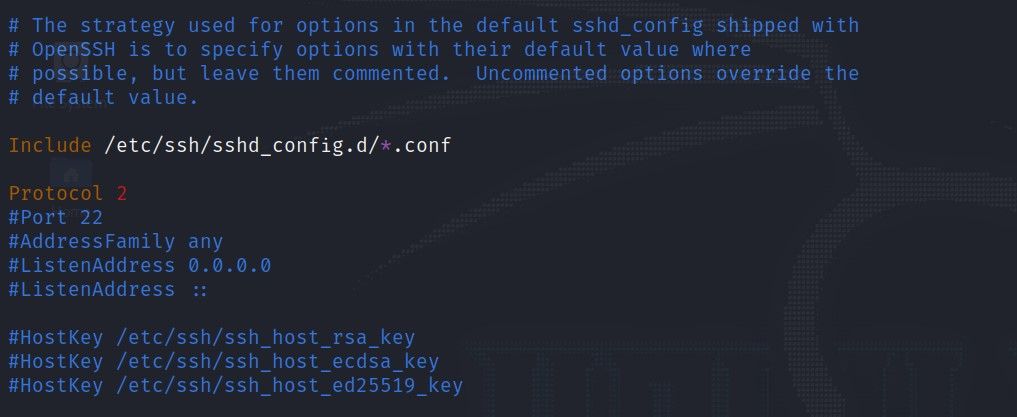
To change the port number, open /etc/ssh/sshd_config and make the following changes to the file:
        Include /etc/ssh/sshd_config.d/*.conf

Port 5922
After this step, restart the SSH service again with sudo systemctl restart ssh. Now you can access your server using the port you just defined.
If you are using a firewall, you must make the necessary rule changes there as well. On running the netstat -tlpn command, you can see that your port number for SSH has changed.
3. Block Access for Users With Blank Passwords
There may be users without passwords on your system that you might've created accidentally. To prevent such users from accessing the servers, you can set the PermitEmptyPasswords line value in the sshd_config file to no.
PermitEmptyPasswords no
4. Limit Login/Access Attempts
By default, you can access the server by making as many password attempts as you want. However, attackers can use this vulnerability to brute-force the server.
You can automatically terminate the SSH connection after a certain number of attempts by specifying the number of permitted password attempts.
For this, change the MaxAuthTries value in the sshd_config file.
MaxAuthTries 3
5. Using SSH Version 2
The second version of SSH was released because of the many vulnerabilities in the first version. By default, you can enable the server to use the second version by adding the Protocol parameter to your sshd_config file.
This way, all your future connections will use the second version of SSH.
        Include /etc/ssh/sshd_config.d/*.conf

Protocol 2
6. Turning Off TCP Port Forwarding and X11 Forwarding
Attackers can try to gain access to your other systems by port forwarding through SSH connections. To prevent this, you can turn off the AllowTcpForwarding and X11Forwarding features in the sshd_config file.
        X11Forwarding no
AllowTcpForwarding no
7. Connecting With an SSH Key
One of the most secure ways to connect to your server is to use an SSH Key. When you use an SSH Key, you can access the server without a password. In addition, you can completely turn off password access to the server by changing the password-related parameters in the sshd_config file.
When you create an SSH Key, there are two keys: Public and Private. The public key is uploaded to the server you want to connect to and the private key is stored on the computer using which you will establish the connection.
Create an SSH key with the ssh-keygen command on your computer. Do not leave the Passphrase field blank and remember the password you entered here.
If you leave it blank, you will only be able to access it with the SSH key file. However, if you set a password, you can prevent an attacker with the key file from accessing it.
As an example, you can create an SSH key with the following command:
ssh-keygen
8. IP Restrictions for SSH Connections
Most of the time, the firewall blocks access using frameworks of its standards and aims to protect the server. However, this is not always enough and you need to increase this security potential.
To do this, open the /etc/hosts.allow file. With the additions you make to this file, you can restrict the SSH permission, allow a specific IP block, or enter a single IP and block all remaining IP addresses with the deny command.
Below you will see some sample settings. After doing these, restart the SSH service as usual to save the changes.
9. Selectively Allow Acess to Users and Groups
You can configure the sshd config file to selectively allow or disallow users and groups from SSH-ing into your server. By default, all users and groups are allowed access. This is a security risk when you're managing a production server that shouldn't be accessed by anyone else except those with proper clearance.
Here are the lines you need to add to allow/disallow SSH access to users and groups:
        AllowUsers: username sshuser@ip:port
AllowGroups: groupname
DenyUsers: username1 username2 sshuser@ip:port
DenyGroups: groupname
10. Set Idle Timeout Interval
If a trusted user leaves their desktop unattended with them logged into your server, an adversary with access to their computer can take advantage of it and perform malicious actions on your server.
The simplest way to counter this is to set an idle timeout interval period. After a defined period of inactivity, the server will terminate the SSH connection to the user to prevent unsolicited access in the absence or inactivity of the trusted user.
Here are the lines you need to add to your sshd config to turn this setting on:
ClientAliveInterval 120
As per the command issued in the config file, after 120 seconds of inactivity, the connection will be terminated. You can change the number to match your liking.
11. Add a Warning Banner
While this is not an active security measure, adding a warning banner can be a useful psychological tactic to ward off unwelcome guests and send the adversary on the back foot when they try to connect to your server with malicious intent.
To add a custom warning banner, first, carefully prepare the text for the banner or grab one of the generic ones from the internet and save it to a text file. Then, add this line to your config file:
Banner /path/to/banner/banner.txt
12. Enforce Strong MAC Algorithms
MAC, in the context of SSH, stands for Message Authentication Code. MAC is a cryptographic algorithm used to verify and validate data transmissions between client and server.
It's important that you set strong MAC algorithms to ensure the integrity and confidentiality of your data, which are two key pillars of cybersecurity. Here's the line you need to add to your config:
MACs hmac-sha1,hmac-sha2-256,hmac-sha2-512
13. Set LogLevel to Monitor SSH Activity
You can monitor SSH activity in varying levels of verbosity. By default, this feature may be turned off. It's recommended you turn on this feature and set it to the basic logging level—INFO which will only record errors, messages, key authentication, login, and logout activity of users.
You can certainly change it to a more verbose level like VERBOSE or DEBUG if you prefer so. Here's the line you need to add to your sshd config file:
LogLevel INFO
Now, your SSH server will generate the basic logging data which you can read by navigating to and reading the /var/log/auth.log* file on Debian/Ubuntu-based machines and /var/log/secure file on RHEL/CentOS/Fedora.
You can either view the entire logfile and navigate to parts with sshd or, use the grep command to filter out the contents and only read through the sshd logs.
The Importance of Linux Server Security
Data and data security issues are quite detailed and should be considered by all server administrators. Server security is a very sensitive issue as the main focus of attacks is web servers, and they contain almost all information about a system.
Since most servers run on the Linux infrastructure, it is very important to be familiar with the Linux system and server administration.
SSH security is just one of the ways to protect servers. It is possible to minimize the damage you take by stopping, blocking, or slowing an attack. Apart from providing SSH security, there are many different methods you can implement to secure your Linux servers.


