There are many reasons for Microsoft Word documents to print out strangely. Some involve errors with the program; others could hint at more far-reaching issues.
If your Microsoft Word documents are printing out incorrectly on Windows, try these troubleshooting options to get perfect prints every time.
Finding Out What the Problem Is
Before we begin, you should know that a few of these troubleshooting techniques to find out why Microsoft Word isn’t printing correctly involve some test printing. If you want to conserve printer toner or ink, here’s how to change settings to make Microsoft Word print in black and white.
Print a Test Page
Before you try any other potential fix, it’s best to rule out an error with your printer. This will give you an idea of where the issue lies. Follow these steps to print a test page on your printer.
- Click on the Start menu and type ‘control panel.’
- Click on the Control Panel app.
- In Category view, look under Hardware and Sound for the View devices and printers option. In Icon view, it is called Devices and Printers.
- Right-click on your printer and select Printer properties. (Make sure your printer is connected to your computer and switched on. The printer will be grayed out if it is not.)
- Under the General tab, click on the Print Test Page button.

The test page should tell you whether your printer has been installed correctly. If there is an issue with your printer, this guide on what to do when your printer is not working should help you resolve the issue.
If the test page prints out correctly, the issue is probably not with your printer. It could be Microsoft Word or even Windows that is causing the print error.
Fixes You Can Try to Fix Printing Issues in Microsoft Word
1. Print Other Microsoft Word Documents
Is the problem with a specific document? A particular file may have corrupted contents, or the file itself may be corrupted. This could cause printing errors with Microsoft Word. Try the following fix:
- Open a new Microsoft Word file.
- Copy and paste your text and other data into the new Word document.
- Print the newly created document.
If your document prints out as desired, it may be an error with the original file. This probably means that the print error was an isolated issue, and this should resolve it.
If the page doesn’t print out correctly, it could be an issue with Microsoft Word or some of its settings.
2. Print Documents in Other Formats
To know whether the printing issue you are having is Microsoft Word-specific, try printing another document on your computer, maybe a PDF file or even a website. Pressing Ctrl + P on most web pages should pull up the print options.
If PDF documents print out correctly, here’s a temporary fix: When you’ve finalized the contents in your Microsoft Word document, covert it to PDF and print that instead.
Here’s how to convert a Microsoft Word document into a PDF document. In Microsoft Word on Windows, simply go to File > Save As, then choose PDF at the Save as type dropdown.

Here’s a helpful article on how to convert Word files to PDF on a Mac computer.
3. Check Printer Drivers
If other documents are printing out correctly, a potential fix may be to uninstall and reinstall either your printer drivers or your printer, or both. As Microsoft themselves put it, “Word is a very printer-intensive program. Therefore, a minor problem in the printer driver tends to affect Word before it affects other programs.”
Here’s a guide on fixing printer driver issues and getting your printer functioning normally again on Windows.
4. Check for Problems With Windows
The problem might be add-ons that you’ve installed with Microsoft Word or even misbehaving device drivers. Follow this guide to get in and out of Safe Mode in Windows 10 to test why Microsoft Word won’t print documents correctly.
If you are able to print properly in Safe Mode, you may want to perform a clean boot to isolate and identify the cause of your problem.
5. Scaled Printing Issue
A less common issue is when pages print at a fraction of the actual size, taking up only a small portion of the printed paper. This is possibly a problem with scaling factors. Here’s how to check and remove the scaling on Microsoft Word documents when printing.
- Press Ctrl + P or go to File > Print when working in the Word document.
- Click on Printer Properties under your printer.
- Under the Page Setup tab, in the Page Layout section, make sure the Scaled option isn’t selected. If it is, switch it to Normal-size.

This should make the pages print at full size, with text and any graphics filling the entire page.
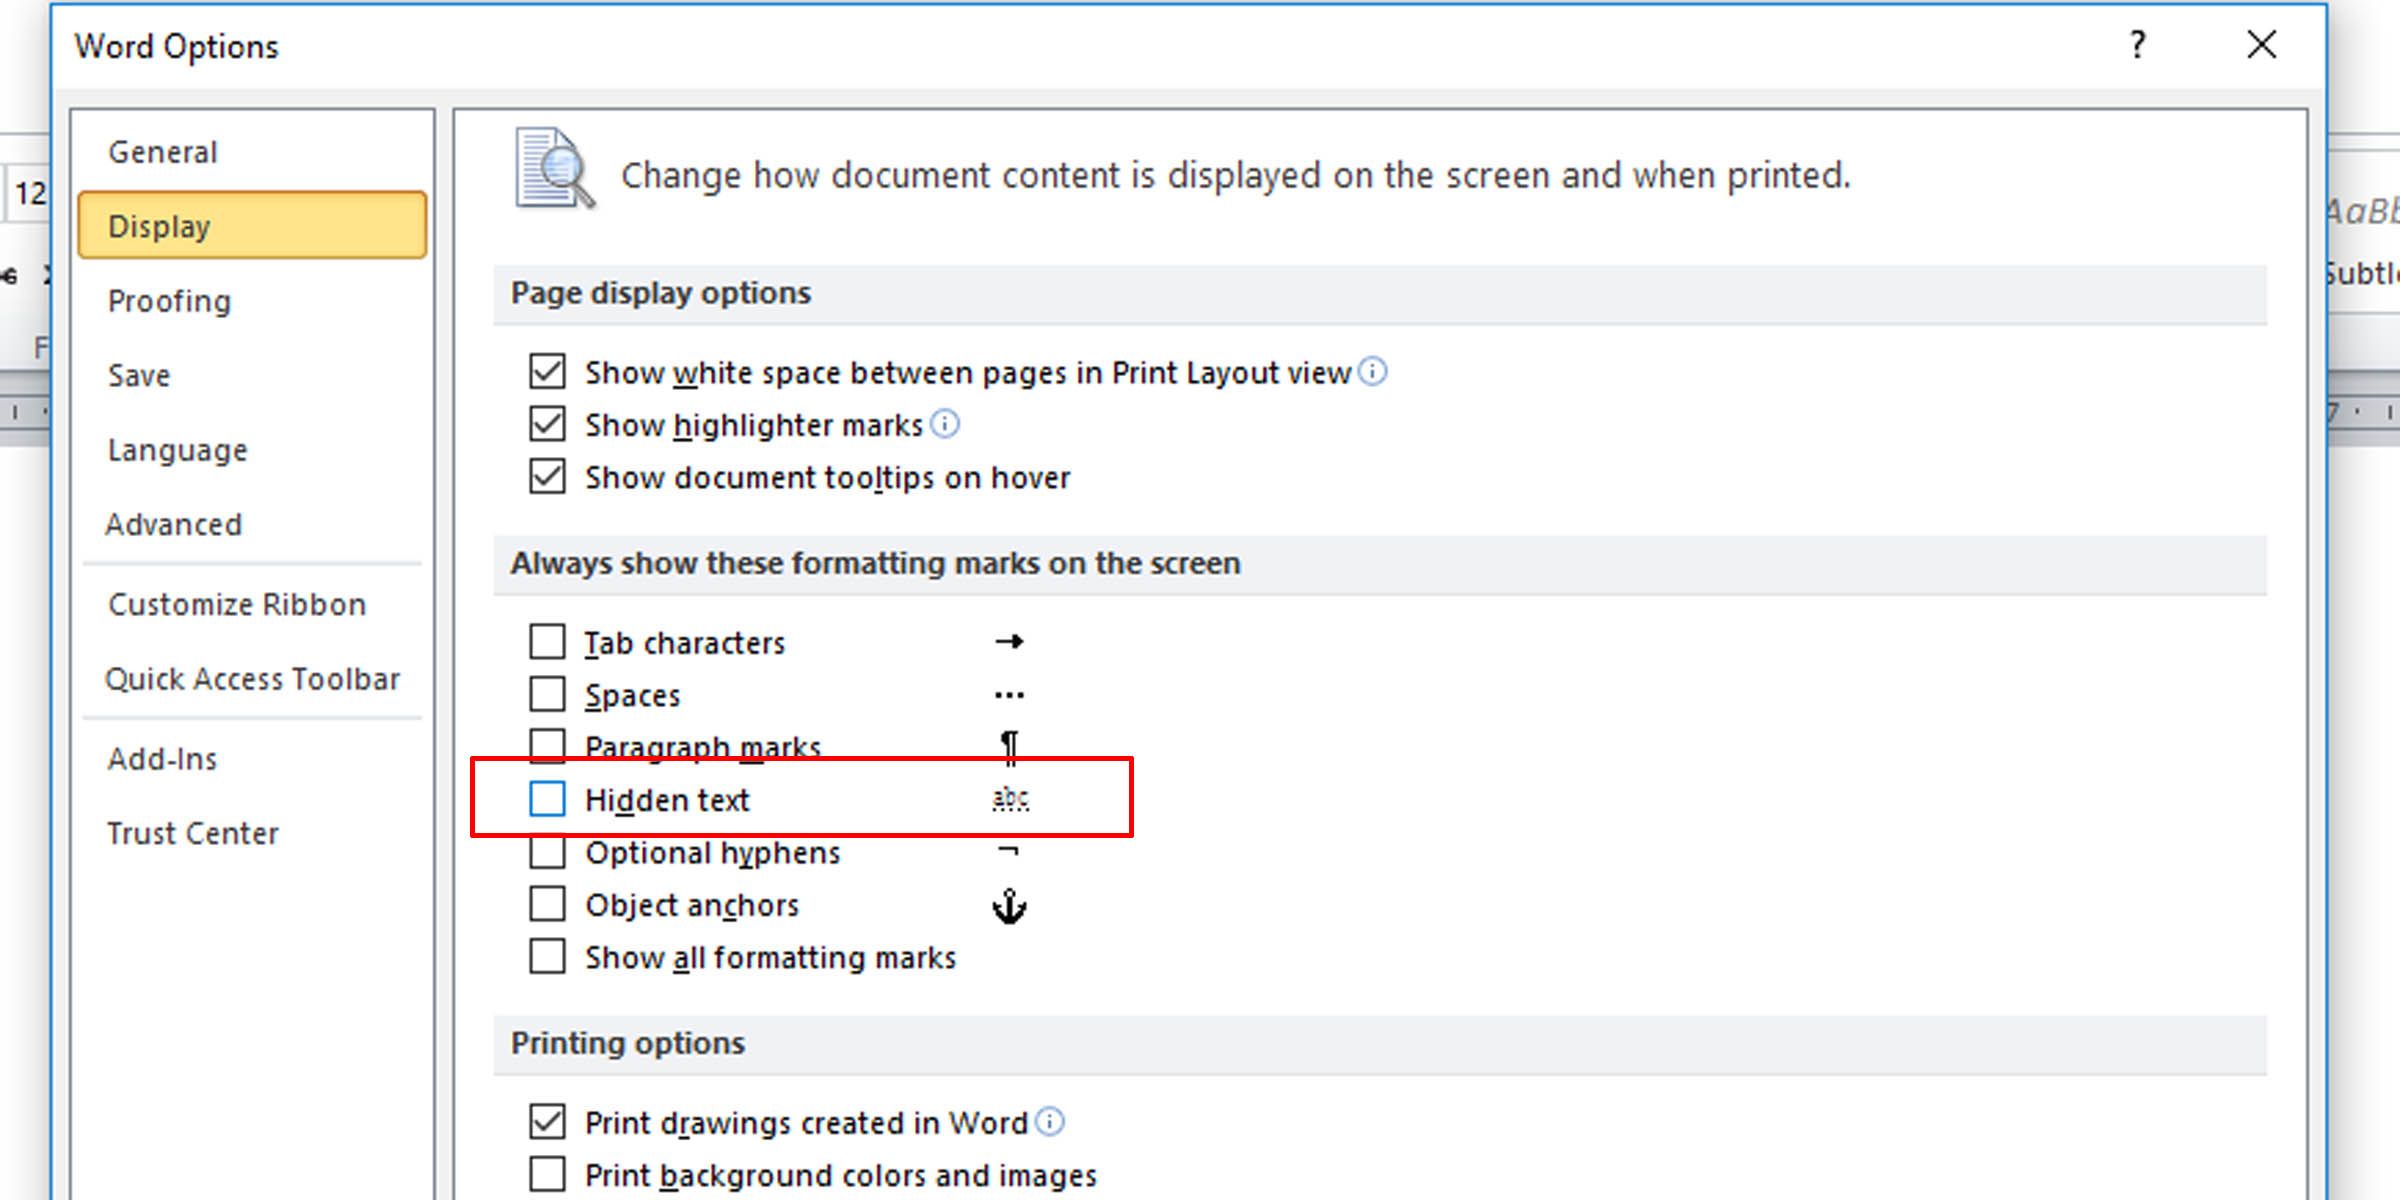
6. Check for Hidden Text
Microsoft Word affords the option of hiding text on the page. The hidden text has the same properties as formatting marks, which are characters that take up space in a document but don’t appear when printed, such as spaces, line breaks, and tab characters.
If your prints are missing part of your soft copy text, here’s how to check whether you have text hidden in the document.
- In the Word document you want to check, click on File > Options.
- Under the Display tab, make sure the Hidden text option in unchecked.
-
Print the document to see if this fixes the problem.

This informative article gives more background on non-printing or invisible characters in word processors.
7. Check Form Data Print Options
A not-so-common occurrence is table borders not showing up in final prints. This can be easily remedied.
- In the Word document, go to File > Options.
- Under the Advanced tab, scroll down to the Print section.
- Make sure that the checkbox for printing only the data from a form is unchecked.

8. Print Directly to the Printer
Some errors when printing Microsoft Word documents causes pages to have only portions of text. This might be because of a spooling issue.
- Open the Control Panel app.
- Click on the option for devices and printers.
- Right-click on your printer and select Printer properties.
- Under the Advanced tab, select Print directly to the printer.

If your computer is connected directly to a printer, you don’t need the spool print option turned on. However, turning it off may slow down your PC when printing.
9. Repair Microsoft Office Suite
If you’ve tried all these potential fixes for Microsoft Word not printing properly and the issue persists, repairing your copy of Microsoft Word might solve the problem. To detect problems and repair Word on your Windows PC, do the following:
- Click on the Start menu and type "control panel.”
- Click on the Uninstall a program option under the Program heading in Category view, or the Programs and Features option in Icon view.
- Search for your Microsoft Office suite or Word program; right-click it and select Change or Modify.
- Select the Repair option and click Continue.
This will reset the settings on the 2010, 2013, 2016, and 2019 editions of Microsoft Word.
Get Printing Again
Hopefully, one of these troubleshooting tips should serve its purpose and resolve your printing issue, and you’ll be printing error-free pages just as you see them on your computer.