The Action Center—also known as the Notification Center—is located on the far right of the Windows 10 taskbar. This feature helps you easily access your system notifications and gives you quick access to settings.
Sometimes, due to technical glitches, the Windows 10 Action Center will be grayed out and won’t open. This will hinder you from accessing the notifications and settings for various apps.
We’ll explore why the Action Center error occurs and show you how you can resolve it.
Why Is the Action Center Not Working?
The Action Center could be malfunctioning simply because it’s disabled in your system settings. In other instances, the error could occur if you’ve recently updated your Windows 10 PC.
This issue could also occur due to a bug or when the system files are corrupted or missing. If there is a problem with your system files, the Action Center can give you issues. For example, the Action Center won’t open when you select its icon on the taskbar.
In some instances, you’ll receive notifications but won’t find them when you open the Action Center. Sometimes, the Action Center will continue showing the same notifications that you’ve cleared.
Here are a few easy methods you can to help bring the Windows 10 Action Center back to life.
1. Enable the Action Center Via Settings
The quickest way to open the Action Center is by selecting its icon on the taskbar's far right. Alternatively, you can press Windows Key + A. If that doesn’t work, chances are that the Action Center is disabled. To enable it, follow these steps.
- Press Windows Key + I to open Settings, then head to Personalization > Taskbar.
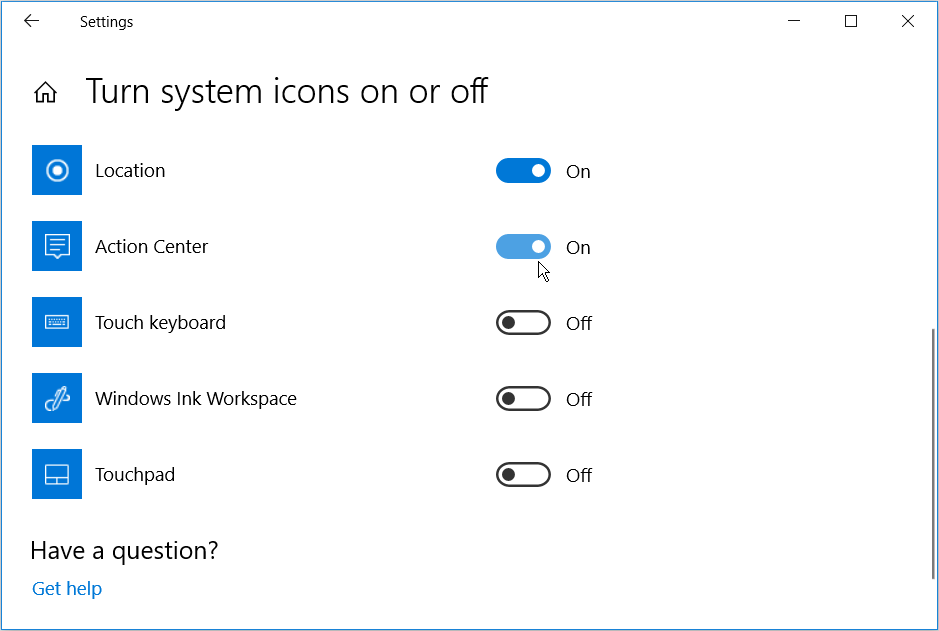
- In the Taskbar settings, scroll down and select Turn system icons on or off.
- To enable the Action Center icon in the taskbar, turn on the Action Center option.
2. Rename the UsrClass.dat System File
You can rename the UsrClass.dat file to fix this issue. When this file is corrupted, it could lead to system issues that cause several desktop items to malfunction. Renaming it will force Windows to create a new UsrClass.dat file upon reboot, which could fix the Action Center issue.
Here’s how you can rename this file.
- Press Windows Key + R to open the Run command dialog box.
- Type %localappdata%\Microsoft\Windows and press Enter.
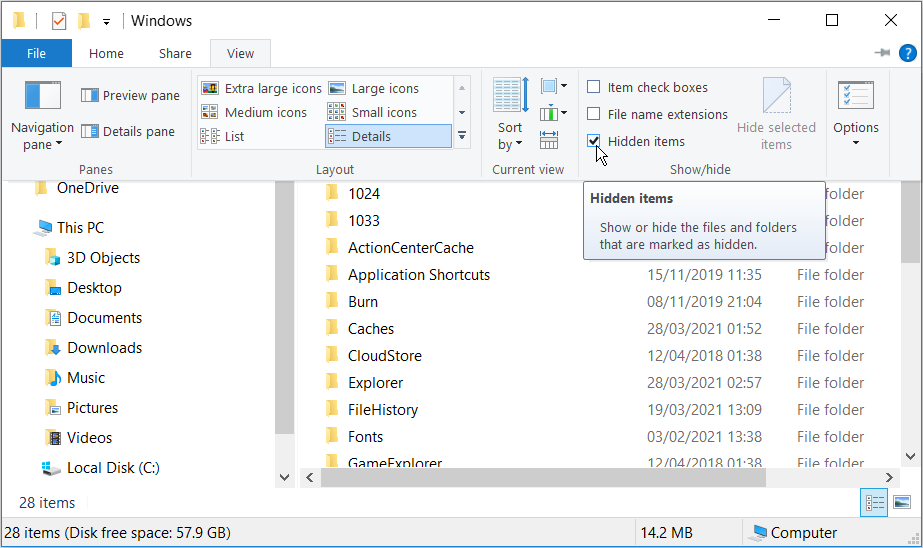
- Select the View tab in File Explorer and check the Hidden items box. This will show hidden files on your PC.
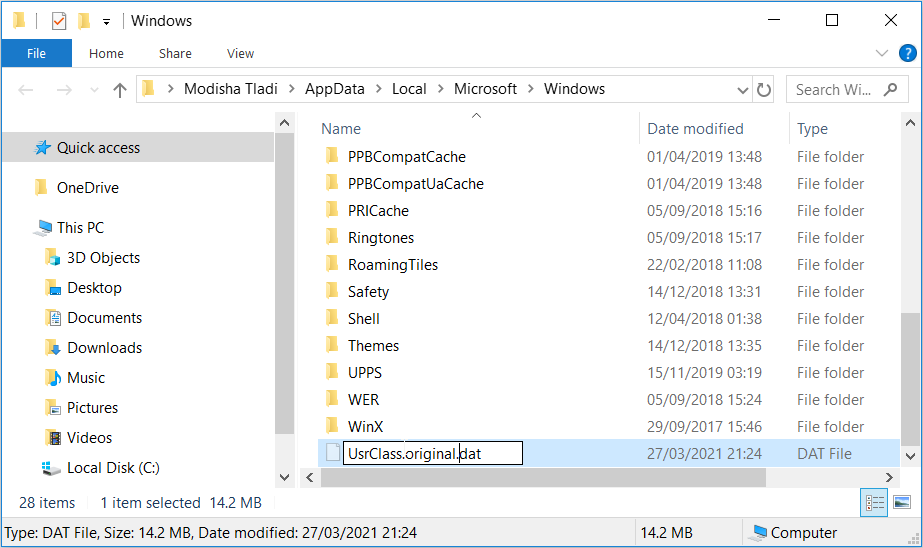
Locate the UsrClass.dat file and rename it to something like "UsrClass.original.dat." Although Windows will automatically restore this file, you shouldn’t completely delete it. In case something goes wrong, you may still need the file to restore your system settings.
When you’re done renaming the file, reboot your PC to save these changes.
3. Re-Register the Action Center by Running a PowerShell Command
When you get familiar with PowerShell commands, you can use them to solve various system issues. In this case, we’ll show you how you can use PowerShell to re-register and fix the Action Center.
- Press the Windows Key + X and select Windows PowerShell (Admin) from the options.
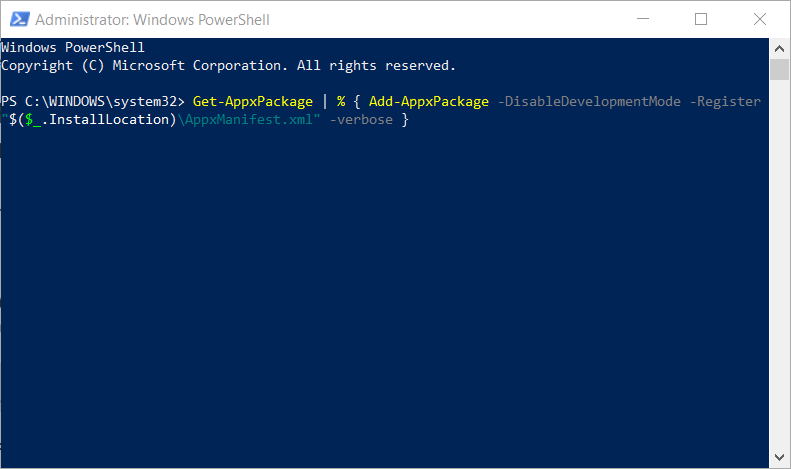
- Type the following command and press Enter.
Get-AppxPackage | % { Add-AppxPackage -DisableDevelopmentMode -Register "$($_.InstallLocation)\AppxManifest.xml" -verbose }
When you finish, restart your PC to save these changes. If PowerShell gives you trouble, there are various steps you can take to handle PowerShell errors.
4. Enable the Action Center Via the Registry Editor
To resolve this error via the Registry Editor, follow these steps.
- Press the Windows Key + R to open the Run command dialog box.
- Type Regedit and hit Enter to open the Registry Editor.
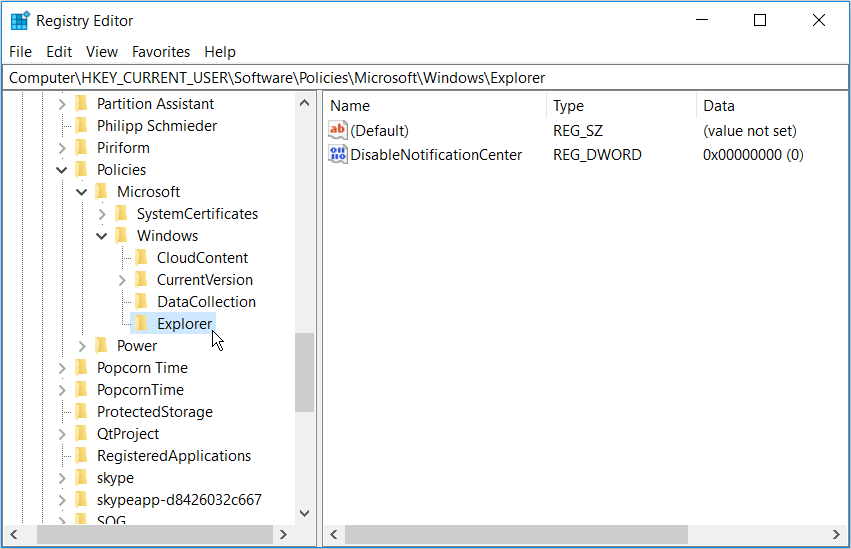
- In the Registry Editor, navigate to HKEY_CURRENT_USER > Software > Policies > Microsoft > Windows > Explorer.
If the Explorer key is absent within the Windows key, you'll have to create it. You'll also have to create relevant files within the new Explorer key. In case the Explorer key is already present, you can skip to the next step.
Otherwise, here are the steps you need to follow to create the Explorer key and its relevant files.
- Right-click the Windows key on the Registry Editor, select New > Key.
- When you’re prompted to name this new key, type Explorer and press Enter.
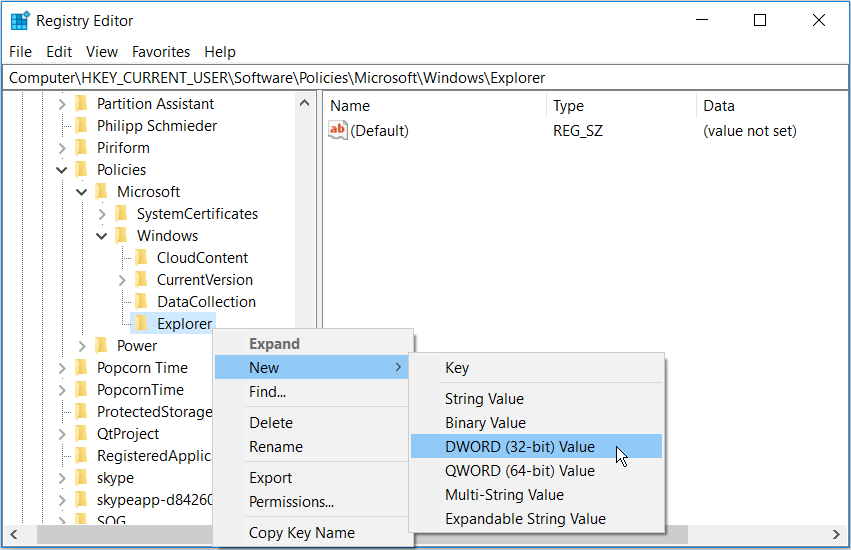
- Right-click on the new Explorer key, select New > DWORD (32-bit) Value. When prompted to name this value, type DisableNotificationCenter and press Enter.
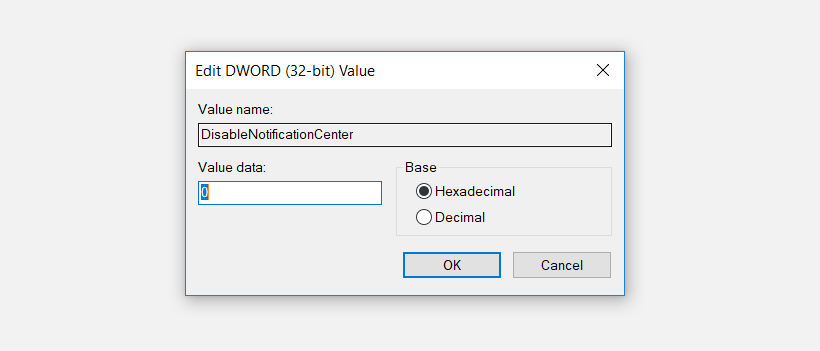
Double-click the DisableNotificationCenter file on the right-hand side pane. When a window pops up, change the Value data from one to zero to enable the Action Center. Select OK to finish.
Restart your PC to save these changes.
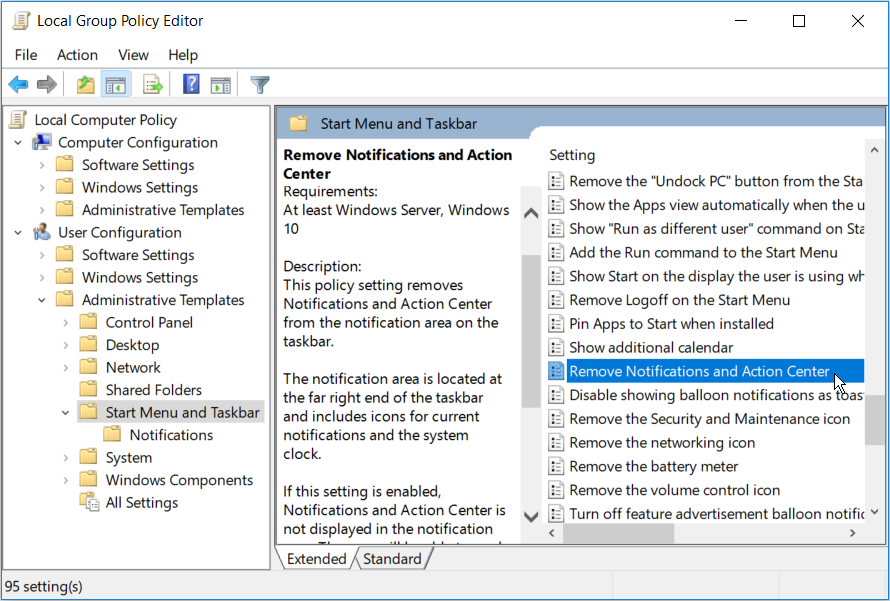
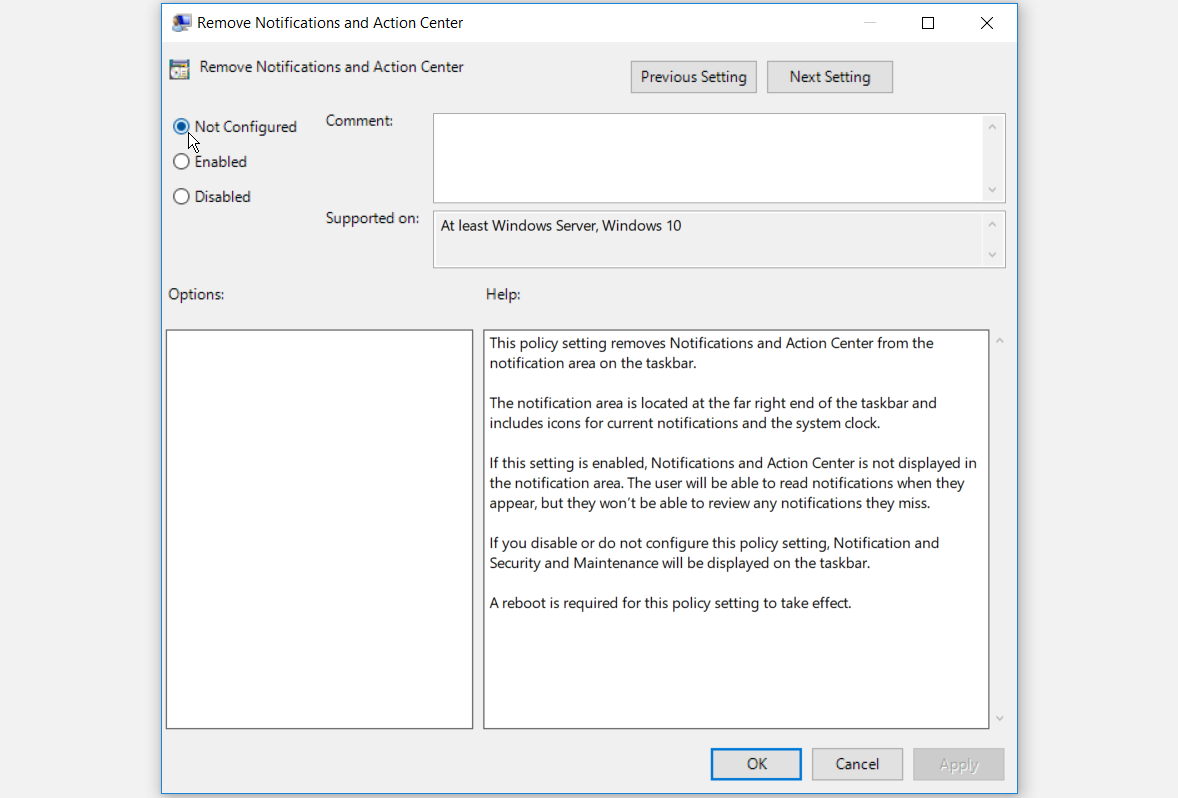
5. Enable the Action Center Via the Local Group Policy Editor
Here’s how you can enable the Action Center via the Local Group Policy Editor.
- Press the Windows Key + R, type gpedit.msc, and press Enter to open the Local Group Policy Editor.
- Navigate to User Configuration > Administrative Templates > Start Menu and Taskbar.
- Double-click the Remove Notifications and Action Center setting on the right-hand side pane.
In the window that pops up, select Not Configured or Disabled to enable the Action Center. Select Apply > OK.
Restart your PC and check if this resolves your issue.
6. Use the SFC and DISM Tools
Lastly, you can try fixing this issue by using the SFC and DISM tools. These tools are useful for fixing various system issues in Windows 10. You’ll use the Command Prompt to run both the SFC and DISM scans.
SFC scans your computer for missing or corrupt files, while DISM scans the system image used to make these corrections. In that, you run DISM first to confirm that SFC is working correctly.
- To get started, open the Command Prompt by following these steps. Press the Windows Key + R and type CMD.
- Press Ctrl + Shift + Enter to open an elevated Command Prompt.
- Type the following command and press Enter:
DISM /Online /Cleanup-Image /ScanHealth
When the scan is complete, type the following command and press Enter:
DISM /Online /Cleanup-Image /RestoreHealth
Wait for the scan to complete, and then restart your PC.
Now, open the Command Prompt as per the previous steps, then run the following command.
sfc /scannow
Wait for the scan to complete. From here, close the Command Prompt and restart your PC.
Stay Up-to-Date With System Notifications
The Action Center is quite a useful feature. However, it can break from time to time. Thankfully, the steps in this article will help you get the Action Center back up and running before long.

