Raspberry Pi OS is a Debian-derived operating system designed to help beginners and experts to get the most out of the Raspberry Pi hardware, while offering an easy-to-use desktop experience. Although you can do some basic customization before inserting your storage media into the Pi for the first time, by using the official Raspberry Pi Imager tool, you may wish that you could do more. With sdm, an SD card management tool, you can. Here's how to do it.
Why Use sdm to Create Customized Disk Images for Your Raspberry Pi?
Raspberry Pis are cheap (when you can find them) single-board computers with top-notch components and an emphasis on learning and DIY software and electronics projects. They're perfect for school computer labs and for deploying as standalone servers.
If you're deploying multiple Raspberry Pi computers in a school or other organizations, you'll find that after flashing a Raspberry Pi OS image to an SD card or SSD, you end up installing the same set of software packag over and over again. You'll set up the same services, mount the same extra drives, and add the same aliases to the .bashrc file. It can become very tedious, very quickly.
sdm is a tool which makes it easy to build consistent, ready-to-go storage media for the Raspberry Pi, containing the software you need and the configuration you choose.
How to Install and Use sdm
sdm installs on Linux via a script which you curl from its GitHub repository and pip to Bash:
curl -L https://raw.githubusercontent.com/gitbls/sdm/master/EZsdmInstaller | bash\n
You will also need a vanilla Raspberry Pi OS image to work from. Grab the most current ARM 64 Bullseye image from the official Raspberry Pi downloads directory.
Raspberry Pi disk images come compressed as XZ archives. Extract the image with:
unxz /path/to/your/image.img.xz
Now you're ready to start customizing your Raspberry Pi OS image. Unlike the official Raspberry Pi Imager tool, sdm doesn't offer a friendly GUI option, so you'll be spending a lot of time in the terminal. The first thing you want to do is make sure sdm is able to mount the ISO and start a chroot:
sudo sdm --explore your_rasperry_pi_image.img
If successful, sdm will start a chroot, and change your terminal background to gray, the terminal font color to blue, and the cursor to red. It's not very easy on the eye, but it's a reminder that you're exploring the ISO in a chroot, rather than on your host system.
Once you've had a look around, exit the chroot with:
exit
Your flotilla of Pis will need to connect to the network. This easiest way to do this is to create a new wpa_supplicant.conf file in your working directory.
nano wpa_supplicant.conf
In it, paste the following, making sure to substitute your own network and country details into the relevant fields:
        country=us
update_config=1
ctrl_interface=/var/run/wpa_supplicant
network={
    scan_ssid=1
    ssid="MyNetworkSSID"
    psk="super-secret-password"
}
Save and exit nano with Ctrl + O then Ctrl + X.
If you plan to pre-install multiple additional packages on your Raspberry Pi ISO, you may want to extend the image to give yourself more space. You can use the extend switch for this.
sudo sdm --extend --xmb 2048 2022-09-22-raspios-bullseye-arm64.img.xz
...will give you an extra 2GB to play with. You can adjust this figure to your own requirements.
Install Extra Packages on Your Raspberry Pi ISO With sdm
Having apps already installed and accessible for the end user is really the point of sdm. You can manage what apps will be pre-installed on the ISO with the customize switch, and a text file listing the apps you want to install.
nano applist
In this file, type out the names of all the apps you want to available on first boot. These can either be space separated names, or one per line. For instance:
irssi mypaint qmmp conky openvpn
If you're short of inspiration, check out our excellent curated list of great apps to install on Raspberry Pi. When you're happy, save and exit nano with Ctrl + O then Ctrl + X.
Committing Your Customization to the Raspberry Pi ISO
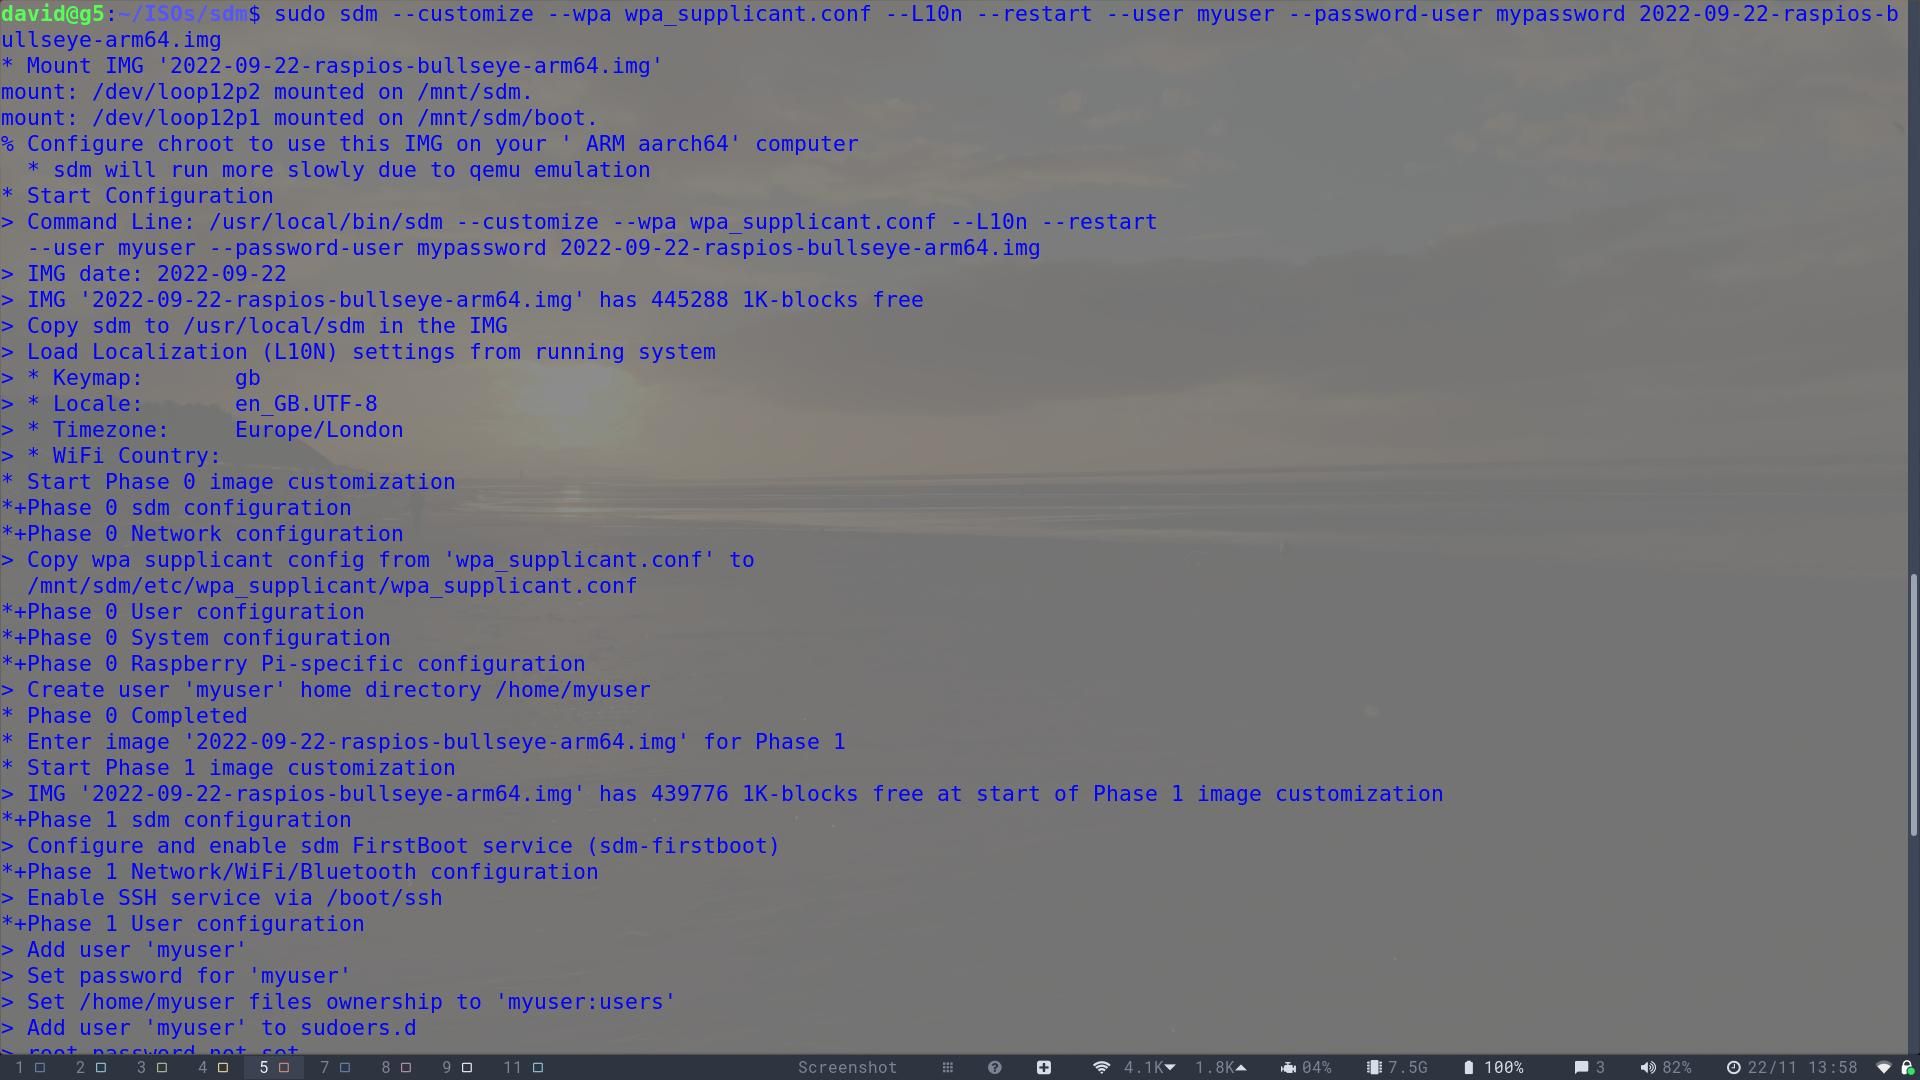
The next command will copy your keymap, locale, timezone, and Wi-Fi country settings from the system on which it's running; copy the wpa_supplicant.conf file you just configured; enable SSH on the Pi; prompt for a new password; and update and upgrade the system.
sudo sdm --customize --wpa /path/to/working/wpa_supplicant.conf --L10n --restart --user myuser --password-user mypassword your_rasperry_pi_image.img
Appending it with:
--apps applist
...will install the apps you specified in your applist file.
This process can take several minutes, but will keep you informed of progress throughout.
Before you run the command, there are additional switches you can use to configure the ISO further. Here are some of the most useful:
- password-pi password sets the password for the pi user
- password-root password sets the password for root
- autologin automatically logs in the user
- cron-d some-cron-file copies a cron file to /etc/cron.d
- hostname allows you to set a system hostname
- motd allows you to copy a specified file to /etc/motd to set a custom message
- swap n sets the system swap size
- user username creates users
Burn Your Custom Raspberry Pi ISO to SD Card or SSD
sdm uses dd to "burn" your custom Raspberry Pi ISO to your storage medium of choice. Use the burn switch to invoke it:
sudo sdm --burn /dev/sdx your_rasperry_pi_image.img
...where sdx is your SD card or SSD. If you're not sure which drive is your storage medium, run:
sudo fdisk-l
...to get a list of devices.
When the process has finished, attach the device to your Pi, and boot your custom ISO!
Creating a Customized Raspberry Pi ISO Is Easy With sdm
Now that you've created a custom Raspberry Pi OS ISO, crafted to your own specifications, installing your perfect image on multiple machines is as easy as Pi, and the possibilities are endless. If you've discovered that OS customization is fun and productive, you may want to try your hand at creating customized spins for your favorite Ubuntu distro too.


