3D characters can be used in all sorts of creative work, including photography, film, drawing, and much more.
Here, we'll go through the process of using Adobe's Mixamo software with a 3D character, applying poses and animations. We'll also cover exporting animated models so they can be used in other applications that support 3D models.
Getting Started With Mixamo
Mixamo from Adobe is a piece of software that takes human 3D models and "rigs" them. This creates the digital "skeleton" that allows them to move and perform stock animations.
These models and animations can then be exported for use across a wide range of software, including Blender and Adobe Photoshop.
The best part is, you don't need a subscription in order to use Mixamo. To access its full range of features, all you have to do is sign up for a free Adobe account.
1. Pick Your 3D Character
As we mentioned earlier, you must be logged in with an Adobe account to access Mixamo's character tools. These tools can be found on Mixamo's homepage.
There are premade characters for you to use if you don't have a custom one available. Click on the Characters tab at the top of the screen to access the selection. Once you've picked one out, check further down this article for details on how to add animation.
If you do have a custom 3D character you want to use, click the Upload Character button on the right side of the screen. The tool will accept OBJ or FBX 3D files, as well as ZIP packages. Simply drag your file into the upload window to start the process.
For the tool to work, you must be using a human-like model, standing in a standard "T" shape.
In this example, we'll be using a custom character we put together using a free 3D modeling software. If you want to give yourself more options, you can also find 3D models for animating available online.

Uploading a 3D character model to Mixamo will bring up the Auto Rigger window. You'll be prompted to rotate your character so that it faces you. To do this, use the buttons in the bottom left corner of the viewer to rotate your character.
When you've done this, click Next.
Now, you'll need to tell the tool exactly where to place points to create the "skeleton" for the model to be generated. Drag the circles to the areas of the chin, wrists, elbows, knees, and groin of your 3D character model. Click Next when content.

Mixamo will do some calculations to create the skeleton—this can take up to two minutes. Once finished, you should now see your model moving. Click Next to confirm that you are happy with the result.
If you see any odd animations or strange glitches, you may want to go back and re-adjust the position of the circles in the Auto Rigger.
2. Adding Animations and Poses to Your 3D Character
Click the Animations tab at the top of the screen to start animating your model. To view your model from all angles, click and drag around the model to move the camera, and use your mouse's scroll wheel to zoom in and out.
With your 3D character now loaded into the Mixamo tool, you can start customizing the way it moves or stands. You have the choice of applying moving animations or static poses to your model.
The left-hand window has a searchable catalog of animations and poses—Red models are female actions and Blue models are male ones. These differences can drastically alter the way a model behaves.

Use the search bar to explore your options—you'll find a variety of animations such as walking, running, dancing, using equipment, and much more.
Click on an animation to apply it to your model. Use the timeline and the Play/Pause buttons to view the animation in progress. You can also click and drag the circle playhead to rewind and fast-forward the animation.
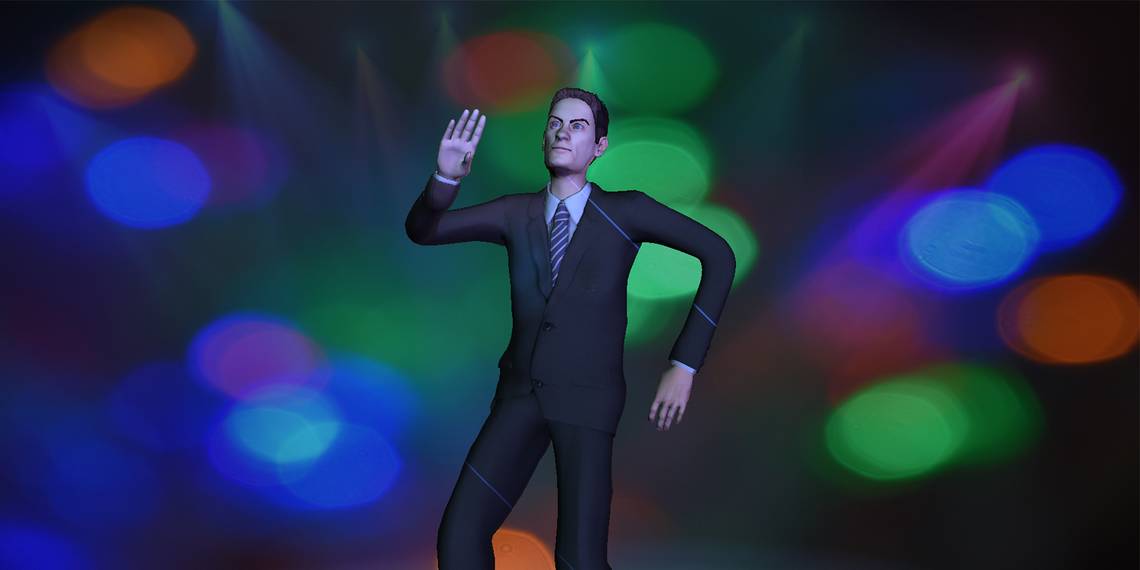
Once the animation is applied, you'll see sliders on the right-hand menu that adjust the settings of the animation. In this example, we have applied the "Macarena" animation to our custom model.

Certain animations will have their own settings—keep an eye on the sliders to see what options you have. For example, the Stance slider on the Macarena animation we've applied determines how far the businessman bends his knees while dancing.
Although you might see different settings for each animation, there will always be two options that you can adjust on any animation: Trim and Overdrive. While the Trim function allows you to cut out elements of the animation you don't want, Overdrive will adjust the animation's speed.
3. Downloading Your Animated Model
Once you're happy with the animation, it's time to take it out of Mixamo and use it in your creative projects. This can be achieved by clicking the orange Download button on the right side of the screen.

You'll be given the choice of exporting in two formats: FBX and DAE.
If you want to bring your model into more advanced 3D software, either of these should be supported. However, if you want to bring your animated model into Adobe Photoshop for graphics or artwork, the DAE format is the only one that works.
Make sure you choose how many frames per second the animation will use. You can set this from the dropdown menu.
When you're happy, click the Download button. Keep in mind that this may take some time to download if your animation is quite long. And that's it—you've applied a 3D animation to your model, and you can now use it in a wide variety of creative products!
For example, you can now take your animated model into Adobe Photoshop by importing it as a DAE file. Once in, you can apply custom backgrounds, lights, and other features to really bring your character to life. You can also produce posed stills or animations for use in your work.
Learn More About Using and Creating 3D Models
Mixamo's wide choice of stock animations and ease-of-use make it a solid first choice if you're looking to experiment with 3D models. But if you want to delve further into 3D modeling, you should think about using a more advanced 3D modeling software.