
Loops and VBA go together, and for a good reason too. When dealing with Microsoft Office objects like workbooks, worksheets, and ranges, loops can help you toggle between each of them with relative ease.
While more or less all the VBA loops work well with objects, the "for each" loop is one of the best options to work with object collections. If you are new to Excel VBA and are looking to master the for each loop, you can learn from some of these examples quickly. Here’s all you need to know about this quintessential loop.
For Each Loop’s Syntax
The for each loop syntax is quite similar to the usual for loop in Excel VBA. Here’s the syntax:
        For each variable_name in object_collection

[statement]

[statement]

[statement]

Next variable_name
The loop starts with the "for each" keyword; you can use any variable name, followed by the object collection. The object in the for each loop can be cells, ranges, sheets, and even workbooks. Such is the beauty of this loop; it gives you the flexibility to work with different Excel collections.
The loop cycles through each collection value and stores the reference in the defined variable name. After execution, VBA executes the stored statements within the loop and moves to the next object in the collection (the next keyword is helpful here). Let's understand the code structure with a basic example.
How to Use the For Each Loop in Excel VBA
Suppose you want to print a number in cells A1 to A10. The best approach is to use the for each loop with the range function and let the code do the needful. Here’s how you can do this simple task:
- Open the VBA code editor by pressing Alt + F11.
-
Insert a module by clicking the Module option within the Insert tab.
- Create a sub-routine using the sub() command in the code editor module window. Make sure you assign a meaningful name to the sub-routine. For this example, you can use the name for_each_loop.

Now that the basics are out of the way, it’s time to start writing the code. Within the sub-routine, type in the following commands:
        Dim cell as range

For each cell in Sheets("Sheet1").Range("A1:A10")

cell.value = 10

Next cell
When the code executes, the c variable will store the value of A1. Next, as it moves on to the statement within the loop, it evaluates the command and inputs a value of 10 in the defined cell, i.e., cell A1.
Finally, as it moves to the Next keyword, it moves to the next value, i.e., cell A2. The loop runs till it reaches cell A10. This is the final output:

Using the Loop With Objects: Cells, Sheets, and Workbooks
Excel has three main object types that you work with regularly. These are cells, sheets, and workbooks. Here's how you can use the loop with all three object types.
Working With Cells and Loops Together
Suppose you want to add a value and some formatting conditions to a range of cells in Sheet1. As a first step, you need to define the conditions within the loop, followed by the formatting commands.
Type in the following code within a sub-routine.
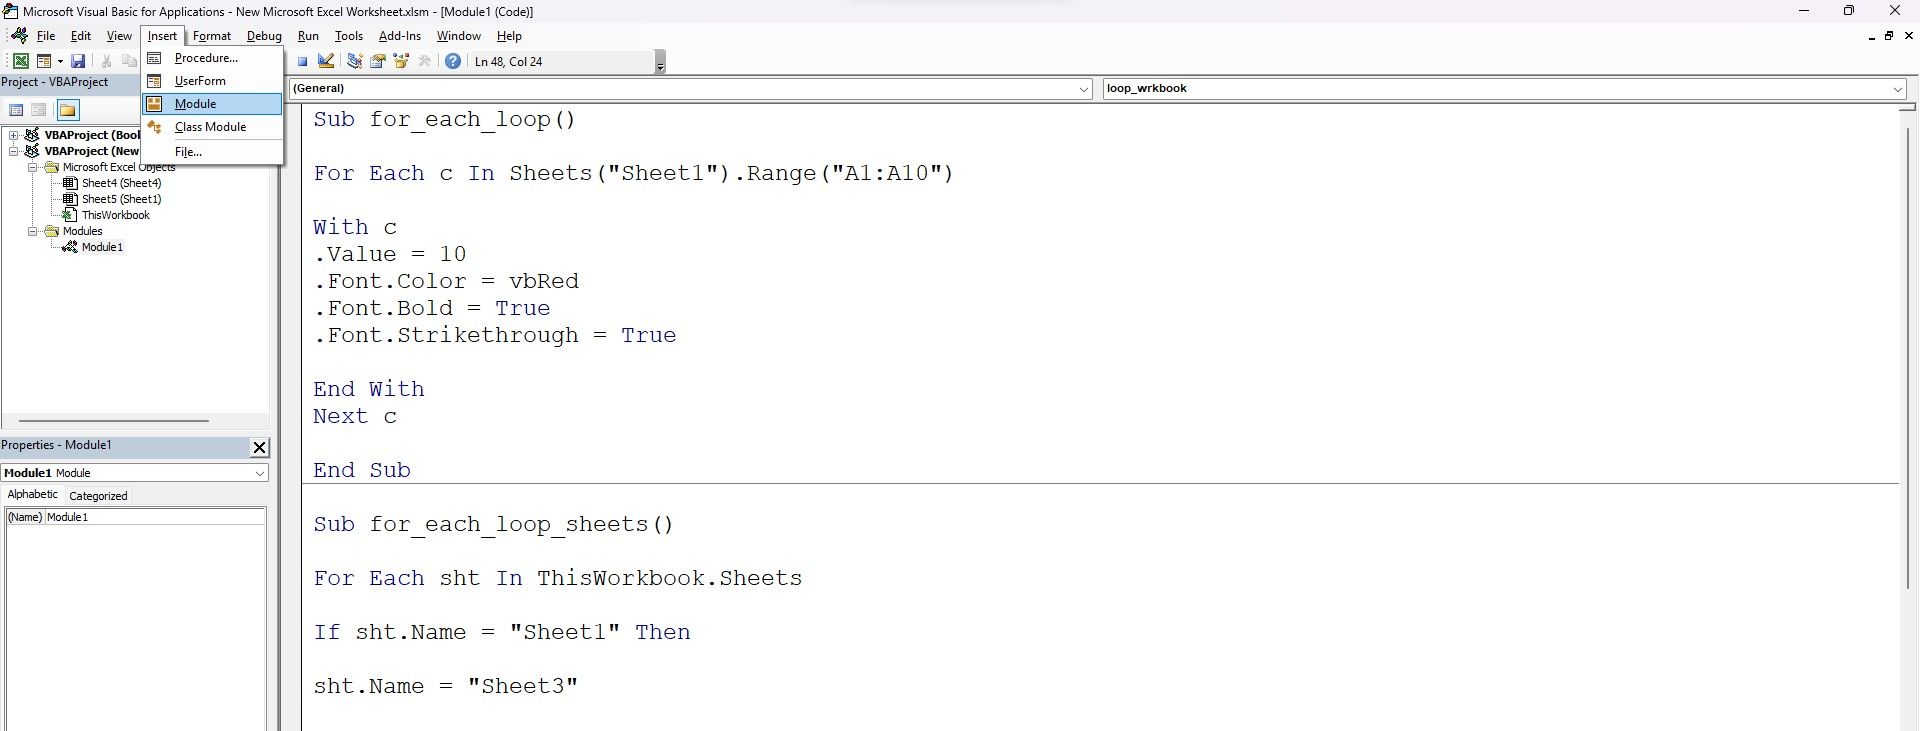
        Sub for_each_loop()


Dim c As Range


For Each c In Sheets("Sheet1").Range("A1:A10")


With c

.Value = 10

.Font.Color = vbRed

.Font.Bold = True

.Font.Strikethrough = True


End With


Next c


End Sub

The with function is useful when performing multiple functions with one specific object. Since you want to perform a series of tasks with the c variable, you can combine them all using a with..end with function.
The loop equates c's value with each cell value and inputs the value as 10. Additionally, it changes the cell's color to red, bolds the value, and strikes it through. Once it completes all the steps, it moves to the next defined value in the range.
Using the Loop to Control Sheets
Similar to the above example, you can use the for each loop to control sheets. How about changing the name of Sheet1 to Sheet3 using VBA?
You can use the following code to rename an existing worksheet in Excel using VBA:
        Sub for_each_loop_sheets()


For Each sht In ThisWorkbook.Sheets


If sht.Name = "Sheet1" Then


sht.Name = "Sheet3"


End If


Next sht


End Sub

The code loops through each sheet within the workbook and checks the name of each sheet. If it encounters the name Sheet1, it changes it to Sheet3. It progresses through the remaining sheets, if any, within the workbook. Once the code execution reaches the last sheet, it exits the loop and the sub-routine.
Amongst some other common uses, you can merge multiple worksheets using VBA and update the content in a single sheet using loops.
Toggle Through Workbooks With the Loop
Finally, you can use the for each loop to toggle through different workbooks and perform specific tasks. Let's demonstrate this function with an example.
You can use VBA commands to add three new workbooks and close all the open ones together. Here's how you can do it:
        Sub loop_wrkbook()


Dim wrkbook as workbook


Workbooks.Add

Workbooks.Add

Workbooks.Add


For Each wrkbook In Workbooks


wrkbook.Close


Next wrkbook


End Sub

The above code will close your macro workbook also; make sure you have saved your codes before running this code.
Since loops have multiple uses, you can also consolidate data from multiple workbooks into a single workbook.
Using a Nested IF Statement With the Loop
Like the above example, you can use an IF statement within the loop to check for specific conditions. Let's change the cell's background color based on the values of the cell.
There are a few random numbers in cells A1:A20. You can write a loop to cycle through each given cell in the range; if the cell's value is less than 10, the cell color should change to red. If the cell value exceeds 10, it should turn green. Use the following code for this purpose:
        Sub loop_w_if()


Dim c As Range


For Each c In Sheets("Sheet4").Range("A1:A20")


If c.Value < 10 Then

c.Interior.ColorIndex = 3


Else: c.Interior.ColorIndex = 4

End If


Next c


End Sub
This is what the output looks like:

Using Loops in Excel VBA
Excel VBA isn't restricted to just the for each loop. There are a variety of helpful loops which let you perform different functions with ease. Bid adieu to mundane, manual tasks, as VBA's loops like the for loop, do while, and do until loops step in to make your life easier.