Some features in Adobe Photoshop get all the glory. Everyone has personal favorites, like the Layer Styles feature that instantly transforms your artwork, or even the Spot Healing Brush Tool that seems like magic.
But other features, while not exactly toiling in obscurity, don’t get the attention they deserve. They might appear bland on the surface, but boast secret powers that can come to your rescue when you least expect it. Or maybe they’re just simple productivity boosters that are easy to overlook.
Here are some tools that you should get to know better.
1. Eyedropper Tool

Yes, the eyedropper is the go-to tool if you need to sample a color in your image. But it has a hidden superpower: it can also sample any color that appears outside of Photoshop, such as a color on a webpage.
This feature works best if you have a dual monitor setup, with Photoshop open on one display and the color you want to sample on the other. But it also works if you have both windows side-by-side on the same monitor.
Let’s say you want to match a color you see online. Do the following:
- In Photoshop, select the Eyedropper and hover over any part of the Photoshop Document window.
- Hold down the left mouse button. By default, Photoshop will show a sampling ring around the cursor.
- While still holding down the mouse button, drag the cursor to the other window. The sampling ring will vanish, but the cursor should still appear as an Eyedropper. If you look at the foreground color box in the Photoshop toolbox, you’ll see the colors change as you move around.
- Click on the color you want to select, and it will become the new foreground color.
If you want to take it a bit further, click on the foreground color box to open the Color Picker. Then, you can add the sampled color to your Swatches and use it whenever you’d like.
2. Ruler Tool

This modest tool has its own superpower, but one that’s not quite so hidden. In addition to letting you measure distances in the workspace, it provides a handy way to straighten crooked images.

The Ruler tool is grouped with the Eyedropper in the Photoshop toolbox. To see all the tools in the group, right-click on the Eyedropper icon or hold down the mouse button. Then you can choose the Ruler tool.
It’s helpful if the image has a linear element you can use as a guide, such as the horizon in the above photo.
Just draw a line with the Ruler tool, and click Straighten Layer in the Options bar. Photoshop will rotate the image so the line you just drew is at a zero-degree angle.
If the image is on a background layer, Photoshop will convert it to a regular layer, and you’ll have to crop the image to remove the transparent areas.

The same feature is built into Photoshop’s Crop function, and you may find it easier to use there. Just click Straighten in the Crop function’s Options bar, which will activate the Ruler when you mouse over the image.
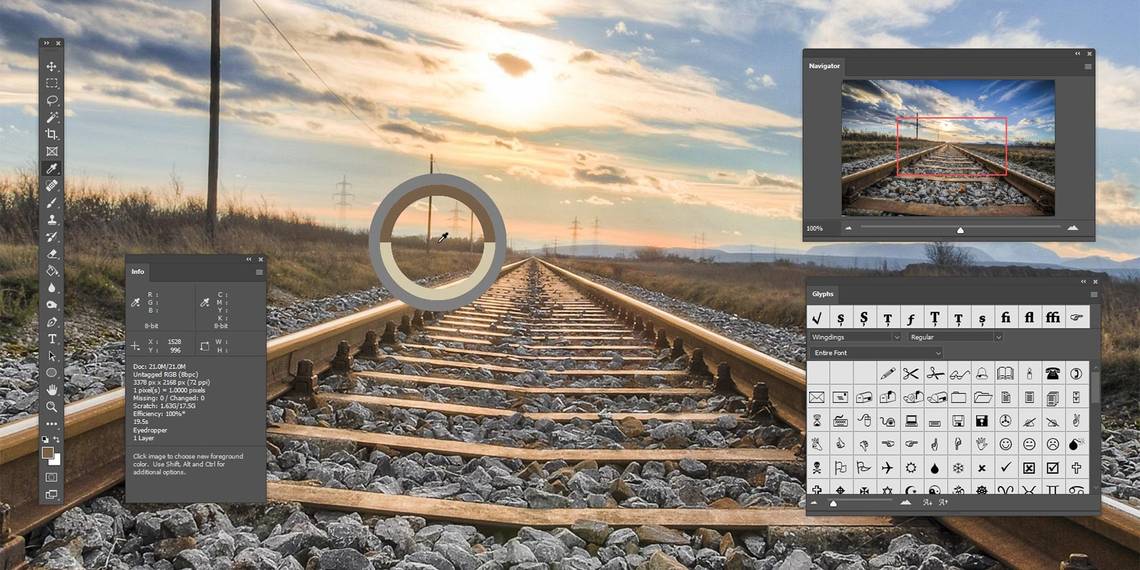
3. Info Panel

The Info Panel (Window > Info) is another feature that’s easy to overlook. It shows you the color values and X and Y coordinates as you move the pointer around the image. If you use a tool that draws a marquee, such as a Shape tool, it shows the width and height as you draw the rectangle.
In conjunction with the Color Sampler tool, the Info panel will also display the color values at specified coordinates. This tool is similar to the Eyedropper, except it shows a continuous readout from fixed points.
It can be useful for a variety of reasons. Perhaps you want to compare color values between two images, or see if a certain action has modified the color values.
As with the Ruler, the Color Sampler tool is grouped with the Eyedropper.
- Select the tool and click the spot you want to sample. A small sampler icon will appear, and the Info panel will show the RGB values at those coordinates.
- To sample other points, just keep clicking. The tool can sample up to 10 (older versions of Photoshop were limited to four).
- To move a sampler point, hover over it until the cursor turns into a pointer. Then you can drag it to another area you want to sample.
- To delete a sampler point, hover over it until the cursor turns into a pointer. Then right-click and choose Delete from the context menu. To delete all sampler points, click Clear All in the Options bar.
Want to see more information about your document? Click on the Info panel menu (the four horizontal lines) and choose Panel Options.

Here, you can set the panel to show other useful information, such as the document dimensions, color profile, current active tool, and memory usage.
4. Navigator Panel

When modifying large images, it’s often necessary to zoom in to work on small details. Then, you might find yourself zooming back out, or panning side-to-side to work on adjacent areas. You can do this with the Zoom and Hand tools, but the Navigator panel (Window > Navigator) makes it much easier.
The panel displays a preview of the image with a box indicating the current viewable area. (In "Adobe-speak," the box represents the proxy view area.) If you want to work on a different part of the image, you just drag the box.
The handy slider control at the bottom of the panel lets you quickly zoom in or out. Inside the preview, you can create a new proxy view area by Ctrl + Clicking (Windows) or Cmd + Clicking (Mac), and then dragging the mouse.
When you first open the Navigator, it may be too small, but you can easily resize it by dragging on the edges or corners.
5. Glyphs Panel

“Glyph” is the technical term for a character, symbol, or ornament in a font. Many fonts include extended character sets that don’t appear on your keyboard, forcing you to look up the key combination to insert special characters.
Some fonts also include alternate versions of certain characters or ligatures in which multiple characters are combined into a single glyph. Photoshop’s Glyphs panel (Window > Glyphs) makes it easier to insert these characters. It provides a palette of each character in the selected font.
Here’s how it works:
- Select the Type tool and choose a font.
- Click on the canvas on the area where you want to insert a special character.
- Locate the character in the Glyphs panel and double-click on it. It will appear in your artwork at the insertion point.
You can continue to double-click on characters or symbols to insert them. The most recently used glyphs appear on top.
The panel provides various options for filtering the display, which is especially useful for fonts with large character sets. For example, you can filter for punctuation, currency symbols, or math symbols. If you are viewing an OpenType font, you can filter for other features such as ligatures and stylistic alternates.
The Glyphs panel also provides its own font menu, so you can easily switch to a different font without going to the Options bar or Character panel. Controls at the bottom of the panel let you zoom in and out, and scale the display of the glyphs to make them easier to see.
Discovering Photoshop's Best Secrets
Photoshop is a complex piece of software, full of powerful capabilities alongside modest productivity aids. Even the simple step of learning common keyboard shortcuts can save you lots of time.
By all means, fire up those Layer Styles and watch in awe as Photoshop magically removes that eyesore from your nature scene. But you’ll also find many smaller features that will make your life easier as you work on your next design project.