A slicer, or slicing software, is an integral part of the 3D printing process. True to its name, it “slices” a 3D model into two-dimensional cross sections across the X-Y planes, in a manner that can be printed by conventional Cartesian printers.
There are plenty of alternatives to Cura that can convert STL files into 3D printer-friendly G-code. However, few enjoy the substantial engineering effort 3D printer manufacturer Ultimaker puts into Cura.
To drive that point home, let’s take a look at some of the best Cura plugins that radically improve your 3D printing experience.
How To Install Plugins in Cura

But first, let’s figure out how to go about installing plugins in Cura. This involves clicking on the Marketplace button at the top right-hand corner of the program window.
Thereafter, navigate to the Plugins tab and you will be presented with a laundry list of first- and third-party plugins.
1. Calibration Shapes

Calibrating your 3D printer is essential to improving quality and dimensional accuracy of your 3D prints. It’s an endeavor that must be repeated each time you change nozzles, filament type, or any other component on your 3D printer.
Wouldn’t it be nice to have the entire suite of calibration models at your disposal without having to rummage through Thingiverse? Thankfully, the Calibration Shapes plugin is just what you need.
Want to figure out the optimal printing temperature for your filament/extruder/hotend combo? The plugin offers not one but three temperature calibration models tuned for three major filament types of PLA, PETG, and ABS.
Calibration Shapes presents you with 3D models for testing 18 different 3D printing parameters ranging from retraction and bridging to dimensional accuracy and bed level calibration.
Just select the right calibration model for your tuning needs and visit the painstakingly crafted wiki to get the lowdown on how to go about the calibration process.
2. Post Processing

This is a first-party plugin created by Ultimaker itself and should be pre-installed on the latest versions of Cura. You can verify this by navigating to the Extensions menu. You should spot the Modify G-code option under Post Processing. If that isn’t the case, you can install the plugin from the Marketplace.
And you’d want to do that if you plan on using the more elaborate calibration models from the aforementioned Calibration Shapes plugin. The 3D model for a temperature or retraction tower is practically useless if your 3D printer can’t cycle through preset temperature or retraction settings while printing these models.
The Post Processing plugin allows you to instruct your 3D printer to use specific print parameters at various stages of the calibration model. That involves selecting your calibration model of choice and then selecting the Modify G-code option from the Extensions menu.

This will open a Post Processing Scripts window. Click on Add a Script button to proceed.
In the latest Cura versions, this should present you with a bevy of options ranging from being able to change the filament mid-print (for multicolored prints with a single extruder) to pausing the print at specific layer heights to introduce magnets, nuts, and for other creative engineering applications.
However, to explain how this works, we will stick to the TempFan Tower script. This is a post-processing preset tailored to be used with the Calibration Shapes plugin for finding the optimal nozzle temperature for a particular filament/hotend combination.
Refer to the model and input the starting temperature accordingly. For the ABS TempTower calibration shape, the starting value of 250°C reduces by 5°C for every subsequent stage. You can obtain the baseline post-processing script settings for each calibration model by visiting the appropriate page in the wiki.

The Change Layer value has been specified for a layer height of 0.16mm, but you can convert it to the 0.2mm layer height with basic mathematics. If you are printing at a layer height of 0.2mm, that would come out to 42 instead of the default Change Layer value of 52.
Successful application of the post-processing settings will bring up a button to modify current post-process settings near the Slice button at the lower right-hand side corner. Be sure to remove the post-processing scripts by clicking on the cross icon next to the script, or it will continue to apply to your subsequent prints.
3. TabAntiWarping

This plugin is a godsend for printing materials such as ABS, nylon, and other materials that are prone to excessive warping. This occurs when the plastic fibers shrink due to the layers getting progressively cooler as they move further away from the heated bed.
For materials such as ABS and nylon, the shrinkage is severe enough to pull the corners of the 3D printed object right off the build surface. This often causes geometrical and dimensional inaccuracies. It can even lead to failed prints when the entire model lifts off the base.
You can mitigate this problem with print adhesion improvement measures such as brims and rafts, but these tend to waste plastic and complicate post-processing by leaving marks on the print. The TabAntiWarping plugin allows you to place customizable anti-warping tabs at strategic places of the prints.

These tabs can come off relatively easily compared to brims or rafts, and leave no visible marks. You ideally want to place these tabs at the sharp corners of a model, which are most liable to curl up due to the relatively smaller area of adhesion.
The plugin even allows you to modify various parameters such as the size of the tab to scale with the adhesion augmentation required. Increasing the number of layers also improves adhesion at the cost of ease of removal. However, you can also modify the X/Y Distance parameter to strike a balance between tab support and removal difficulty.
4. Cylindric Custom Supports

A fused deposition modeling (FDM) 3D printer builds complex 3D objects by stacking two-dimensional layers of plastic upon each other. The latter is an important prerequisite because it is impossible for an FDM printer to print in thin air.
In other words, features of a 3D model that extend horizontally without anything underneath them are impossible to print without sacrificial plastic that acts as a support structure. These supports are usually auto-generated by the slicer software.
Unfortunately, slicers err on the side of caution and use a lot of supports, which not only waste plastic, but are also difficult to remove without leaving marks on your print.
Fortunately, most printers are able to bridge over small gaps, which makes it unnecessary to generate an excessive amount of support material. However, the bridging capability varies form printer to printer and primarily with the printing temperature as well as the capability of your part cooling fan.
Your slicer software has no clue about your printer’s bridging capabilities, but you can test them out with the Calibration Shapes plugin. This will make it easier to use the Cylindric Custom Supports plugin to manually place supports at strategic locations of the model to leverage the bridging capability of your printer.

If your printer can bridge one-inch gaps without compromising print quality, you can manually space custom supports by that margin using this plugin.
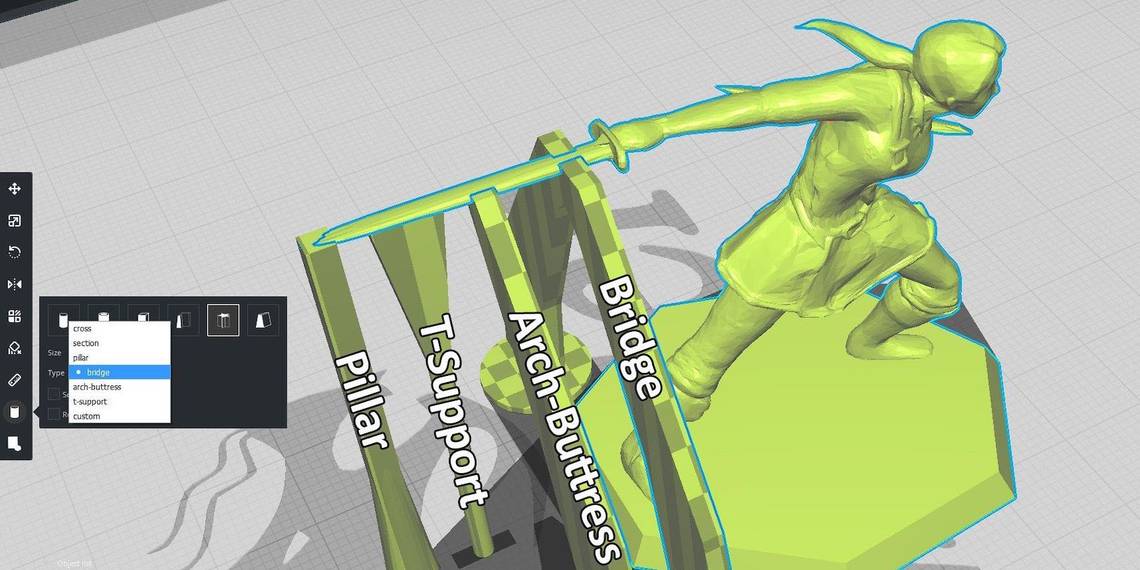
The plugin gives you a choice between custom support shapes such as a cylinder, tube, cube, and abutment, in addition to free-form and custom shapes. The three primary support parameters define the contact area (Size) with the model, size of the base (Max Size), and the angle between the top and bottom support surfaces to optimize bed adhesion and support stability.
However, the best supports are under the Freeform shapes providing options such as cross, section, pillar, bridge, arch-buttress, and T-support that allow you to bridge long gaps or avoid creating supports over the model base.
5. Settings Guide

Cura gives you the choice of several dozen slicer parameters, and every single one of those can make or break your prints. Knowing when to tweak a particular slicer setting is critical to optimizing everything ranging from the very printability of a model to its print quality and the time it takes to complete it.
Cura comes with pop-up tips for each parameter, which provide a brief description upon hovering on slicer parameters. Settings guide, however, combines the pop-up tips with the Ultimaker’s vast repository of slicer setting guides.
Instead of a short description, the plugin throws up a pop-up with a comprehensive write-up describing what the setting does, replete with detailed before/after images illustrating the change. Use this for a week and you just might become a slicer whiz.
If the massive tool-tip pop-ups prove distracting, you can disable the pop-up feature from the plugin Preferences menu. This allows you to access the same information by right-clicking on the slicer parameter instead.
Cura Is Even Better With Plugins
The open-source nature of Cura allows it to host community made plugins, in addition to a significant amount of engineering effort put in by the core development team. And these five plugins amply demonstrate the value in sticking with Cura for your 3D print slicing needs.