It takes years to master a hobby as complicated as 3D printing, but printer maintenance is a lesson beginners learn relatively quickly and painfully. Acquiring the right tools isn’t just a matter of convenience for 3D printing. Oftentimes, it will save you from the agony of losing time and money to print failures and broken parts.
At MUO, we have endured enough failed prints and broken 3D printers to curate this definitive list of 3D printing tools indispensable for home additive manufacturing enthusiasts. Read on to benefit from the fruits of our collective suffering and 3D printing mistakes.
Why Should You Invest in Tools?
A modern consumer-grade 3D printer is a delicate contraption made up of complicated motion systems liable to wear and heating elements that get hot enough to melt aluminum. Preventative maintenance not only insures against printer breakdowns, but it could also save you from a potential house fire.
The uses of the tools listed here range from helping you maintain proper bed alignment to preventing the dreaded blob of death that kills expensive hot ends.
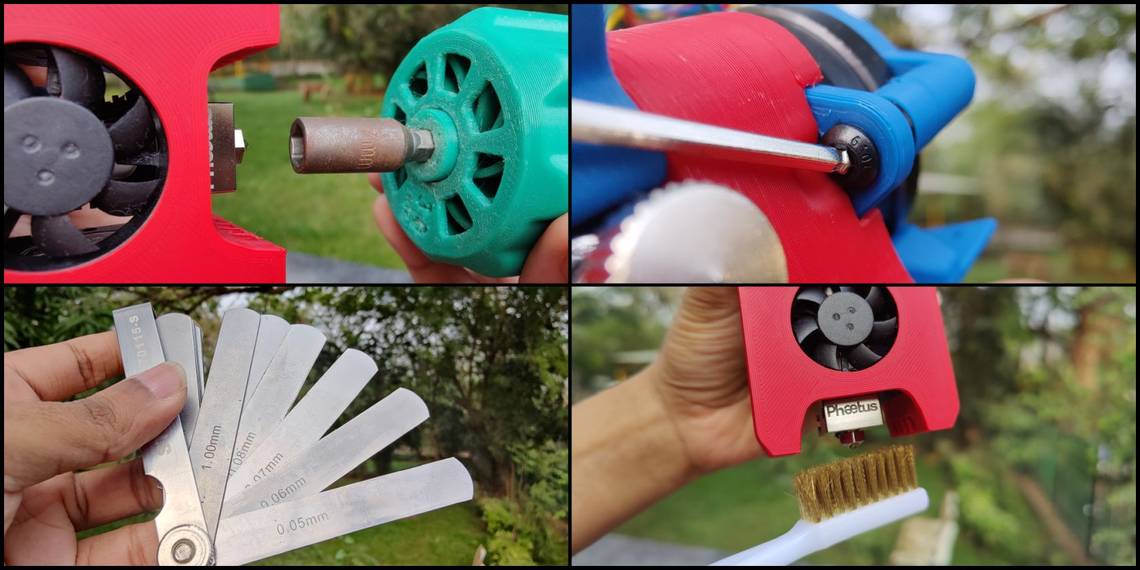
1. 3D Printed Nozzle Wrench

Since we have got your attention with the blob of death, it is the most common reason for printer breakdowns. The blob of death manifests as molten filament leaking out from the gap between the nozzle and the heat-break. This gap is a result of insufficient torque being applied to the nozzle during the hot tightening procedure.
As the name suggests, hot tightening is a scary proposition where you are expected to apply sufficient torque to a nozzle that has been heated to the highest possible temperature. Tightening the nozzle too much can easily snap it in half, so most 3D printer owners end up applying insufficient torque.
This results in molten filament oozing out the hot end and completely engulfing it in an impenetrable mess of solid plastic. Which is also known as the dreaded blob of death.
This can be prevented with a torque wrench that safely slips the moment you exceed the manufacturer recommended torque. While this is an easy fix, it can also be very expensive, so not really feasible for the average 3D printing enthusiast.
Thankfully, you can 3D print one at home, and it works just as well as the real deal for our use case. We have made dozens of nozzle changes without any issues. Just be sure to follow the print settings and material notes mentioned on the Thingiverse download page, and you should be good.
2. Hex Ball Driver Set

Common Phillips head screwdrivers are designed to cam (or slip) out to prevent overtightening of screws. Unfortunately, this feature also causes such screws to strip out with repeated use. That’s why any serious piece of machinery is outfitted with the superior hex (hexagonal) head screws.
And 3D printers are no different.
Your 3D printer will most likely include a basic set of hex head drivers, but you ideally want to upgrade to a better set with molded grips and some form of hardened tool steel. Most importantly, it pays to buy a set of hex drivers with ball-end geometry.
Hex ball drivers differ subtly from their plain vanilla counterparts by incorporating a near spherical profile at the business end. This makes it possible to turn blind screws which can’t be reached head on by the driver. Hex ball drivers can turn screws even at 30-degree offset angles.

Most 3D printer designs actually factor this angle in while designing screw locations in cramped quarters. Such fasteners can usually only be manipulated by ball drivers.
The Bondhus hex ball driver set is known for its durability and quality. If budget isn’t a constraint, Wera’s patented design is proven to reduce the chances of stripping screw heads.
3. Feeler Gauge

You can’t have a successful 3D print without a perfectly trammed (leveled) printer bed. Unfortunately, the most widespread bed tramming technique is fundamentally flawed. The process involves using a piece of copy paper to adjust nozzle height, such that it is equal across all corners of the bed.
This is achieved by bringing the nozzle down until it just about catches on a piece of paper. This is a terrible idea because paper is a relatively soft and pliable material that compresses proportionally to the applied pressure. It is nigh on impossible to set a uniformly accurate nozzle height this way, especially when even a variance of 0.05mm can negatively impact print quality.
The solution involves substituting paper with metal. A feeler gauge is the perfect tool for this job, since it’s a collection of metal strips ranging from 0.04mm to 1mm in precise 0.01mm increments.
A metal sheet is resistant to being compressed by nozzle pressure, which makes it easier to adjust the nozzle height accurately. It also allows you to jog the nozzle up by, say, 0.1mm from the bed and then use a 0.1mm metal strip to equalize nozzle height across the bed.
This way, you get a perfectly level bed without leaving an otherwise paper thick air gap during actual printing. Once you try a feeler gauge to tram your bed, you won’t ever go back to the paper method.
4. Using the Right Lubricants

Your hot-end makes tens of thousands of movements in every conceivable direction during the course of an average print. The motion system is naturally subjected to a tremendous amount of wear and vibrations over time. Proper lubrication is, therefore, essential to ensure the longevity of your 3D printer.
But which lubricant should you use?
This primarily depends on the material makeup of the sliding components. Any motion involving metal-on-metal contact is best served by petroleum-based lubricants—primarily due to their penetrative nature and oxidation (corrosion in ferrous parts) resistance offered. Using any other type of lubricant poses a significant risk of oxidation.
That means that a brass lead screw nut riding on a steel lead screw is best lubricated with lithium grease. However, some lead screw assemblies use a POM (polyoxymethylene) plastic nut instead. Petroleum greases tend to destroy plastic and rubber parts over time. In that case, your lubricant choice is limited to non-petroleum derived options such as silicone greases and PTFE powder/grease blends.

However, the chemical composition of a lubricant isn’t the only deciding factor. The speed at which a part moves also dictates the lubricant viscosity. A lead screw driving the printer’s Z-axis only moves a couple of millimeters every hour. Lubing it with thin oils will cause most of the lubricant to drain away under gravity.
Slow-moving parts need thicker lubricants, whereas fast-moving parts such as roller and linear bearings used in the printer’s motion system benefit from the thinner variety.
The viscosity of a lubricant is specified by the NLGI consistency number, which typically ranges between grade 0 and grade 3 (in ascending order of viscosity) for 3D printer applications. You essentially want a grease that strikes a balance between ease of movement and lube adhesion.
Lower-grade greases are best used to lubricate fast-moving components, whereas the ones with higher NLGI grade numbers are suitable for slower components.
5. Brass Nozzle Cleaning Brush

This might seem obvious, but a dirty nozzle has a domino effect on multiple factors ranging from print reliability to bed tramming accuracy. Molten plastic tends to accumulate on the nozzle and is eventually burnt to a crisp, only to attract another layer of fresh plastic.
Covering the heater block with a silicone sock helps alleviate the problem, but the nozzle is still free to accumulate carbonized plastic. Cleaning the nozzle regularly with a brush is the only viable and practical option.
However, not any odd brush will do. Plastic can only be cleaned off a hot nozzle, so that rules out brushes with polymer bristles. Steel bristles can survive a hot nozzle, but will scratch away at the softer brass material. Your safest bet, therefore, is to use a brush equipped with brass bristles instead.

But be sure to keep the conductive bristles away from the heater and thermistor cartridges attached to the heater block. Stray bristles can cause these components to short, which may result in damage to the printer mainboard.
Printer Maintenance is Easy With the Right Tools
As a beginner, it might be tempting to save a few bucks on cheap tools and skimp on maintenance, but 3D printing is too complex on its own to complicate it further with a careless attitude.
We hope these hard-won lessons from our experience maintaining and running 3D printers will save you the time, effort, and expense of dealing with avoidable breakdowns and ensuing heartburn.