Before we start, let me make something clear: performing maintenance on your computer is vital. It'll prolong the life of your hardware and save you hours of frustration.
In Windows 10, Microsoft has provided a tool that does much of the hard work for you. It's called Automatic Maintenance. However, it's not without its flaws. You might want to take maintenance into your own hands instead.
Unfortunately, unlike previous iterations of the operating system, there is no easy way to turn off the feature.
Or is there? In this article, I'll show you how to disable Automatic Maintenance and introduce you to some ways to manage the processes yourself.
What Is Automatic Maintenance?
Microsoft is a bit vague when describing exactly what the Automatic Maintenance does. On the company's website, it says the following:
"Maintenance includes keeping Windows and applications up-to-date, checking security, and running scans for malware."
It's important to distinguish Automatic Maintenance from other maintenance tools found within the operating system. They include a host of mini-tools within the Control Panel (Control Panel > Administrative Tools), as well as other tools that are bundled into the Security and Maintenance app (Control Panel > Security and Maintenance).
How to Configure Automatic Maintenance
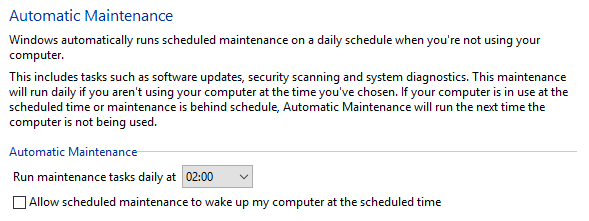
To configure the Automatic Maintenance settings, head to Control Panel > Security and Maintenance > Maintenance > Automatic Maintenance > Change maintenance settings.
On the following screen, you can choose the time you want Automatic Maintenance to run at each day, as well as choosing whether to allow Windows to wake your computer up to perform the tasks.
That's it. There are no further options, and as mentioned, no way to turn off the Automatic Maintenance feature.
The Problems With Automatic Maintenance
Maintenance is important, but Automatic Maintenance is not necessarily the best tool for the job. It's due to the way it works.
Once you've scheduled a time for your maintenance, your PC will try to begin the task for up to one hour. The maintenance will only start if you're not using your machine. If the maintenance is not successfully started during the hour, Windows will defer the task to a later date.
But what exactly is a later date? Well, according to Microsoft, Automatic Maintenance will restart the task during the next "idle" period.
So, let's paint a picture. Your maintenance is scheduled for 2 am each day, but your computer is switched off at that time. At the start of the day, you fire up your machine and start working. Because the PC is in use, maintenance won't start.
But what happens at lunch time? As you head off to the cafeteria for a snack, your machine becomes idle. The Automatic Maintenance will fire up. Your CPU usage will rocket, components will heat up and -- unless you own a top-end PC -- Windows will become more sluggish.
When you return to your desk for the afternoon, the maintenance will suspend itself. But your computer needs time to settle down -- a lot of tasks have just been unexpectedly interrupted at the same time. It's like when you try to do too many things at once immediately after startup.
In the worst case, your computer could even crash, potentially resulting in a lot of lost work.
The solution is to prevent Automatic Maintenance from running in the first place. You need to turn it off.
How to Turn Off Automatic Maintenance
Disabling Automatic Maintenance requires you to edit the Windows registry. As you probably know, making errors when editing the registry can have grave consequences for your system. In the worst case, you might not be able to boot your machine at all.
Before proceeding, make a complete backup of all your valuable data. Ideally, you should also create a system restore point.
To begin the process, open the registry. The easiest way is to open the search bar, type regedit, and hit Enter.
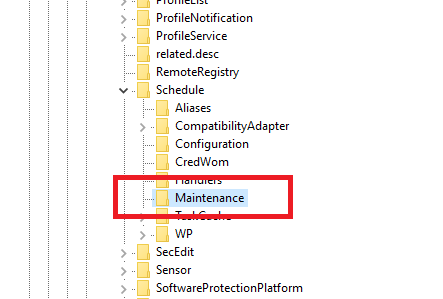
In the left-hand panel of the registry, navigate to HKEY_LOCAL_MACHINE > SOFTWARE > Microsoft > Windows NT > CurrentVersion > Schedule > Maintenance.
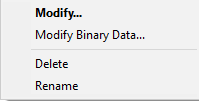
Now focus on the right-hand panel and locate an entry called MaintenanceDisabled. Right-click on the entry and choose Modify.
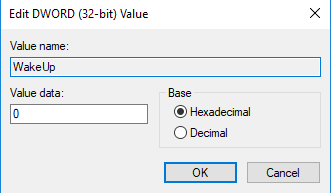
A new window will appear. You need to change the Value data field to 1. Click OK when you've made the changes, and restart your machine to ensure the changes take effect.
If MaintenanceDisabled Doesn't Exist
If you can't see MaintenanceDisabled, don't worry. Making your own registry entry is easy.
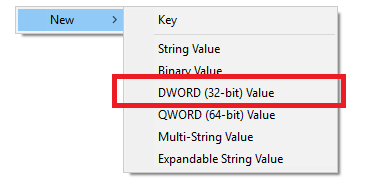
Right-click anywhere in the right-hand panel and select New from the context menu. On the next menu, click DWORD (32-bit) Value.
Call your new entry MaintenanceDisabled, then right-click on it and choose Modify. As per the instructions above, you need to make sure the Value data field is set to 1.
How to Turn Automatic Maintenance Back On
The changes you just made to the registry entry are easily reversible.
If you change your mind and decide you'd like to re-enable Automatic Maintenance, reopen the registry editor, head back to HKEY_LOCAL_MACHINE > SOFTWARE > Microsoft > Windows NT > CurrentVersion > Schedule > Maintenance, and set the DWORD value back to 0 (zero).
How to Maintain Your System Manually
If you choose to disable Automatic Maintenance, you will have to manually perform maintenance tasks on your operating system. Thankfully, many of the tasks performed by Automatic Maintenance are also available as standalone tools.
Defragmentation
Windows has included a defrag tool for almost as long as it's existed.
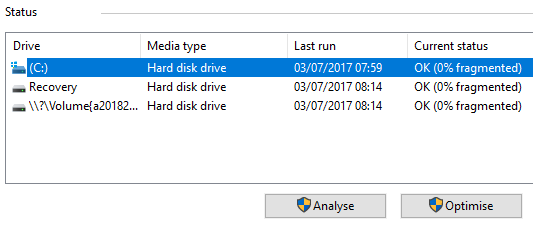
Head to Control Panel > Administrative Tools > Defragment and Optimize Drives, and highlight the drive you want to defrag. Click Optimize to start the process. It could take a long time, depending on the amount of data on your hard drive.
Malware Scans
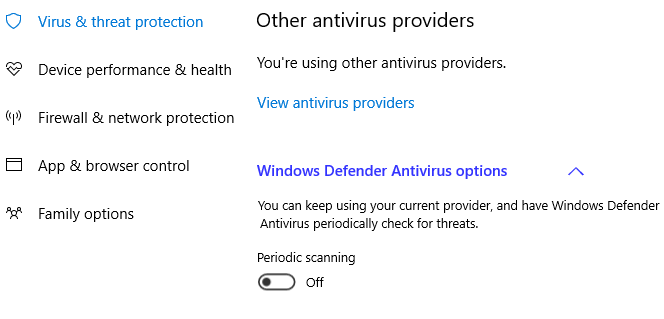
You can run a Windows Defender scan at any time. In the Windows 10 Creators Update, the tool is easier to use than ever. It now forms part of the new Windows Defender Security Center App.
To get started, locate the app in your Start Menu, open it, and click Virus and threat protection from the menu on the left. Expand the Windows Defender Antivirus Options and flick the toggle next to Periodic scanning.
Windows Updates
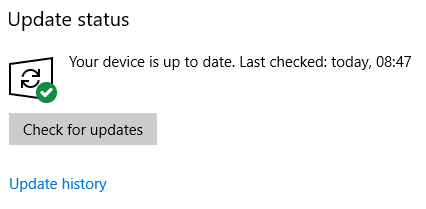
To manually check all the most recent Windows updates are installed, navigate to Start > Settings > Update and security > Windows Update > Check for updates.
You can continue working while Windows Update downloads and installs upgrades in the background, though you will probably need to restart your machine to complete the update process.
Best Third-Party Tools for System Maintenance
Remember, you can always supplement the native Windows tools with third-party apps. We covered some of the best free tools in a previous article:
Check out that article to learn more about the tools and how they can enhance your operating system.
Do You Use Windows Automatic Maintenance?
I've shown you how to disable Automatic Maintenance and offered some ways you can stay on top of system maintenance if you want to do it manually.
Do you use Automatic Maintenance or take responsibility for your own upkeep? Have you ever experienced any of the problems with Automatic Maintenance that I described?
As always, you can leave all your stories in the comments section below. And remember to share the article with your friends on social media.
Image Credit: Art_Photo via Shutterstock.com


