We love the RetroPie project here at MakeUseOf, and with the launch of the Raspberry Pi 2, it's even more powerful than ever – able to emulate up to Playstation 1 and N64 games with ease.
For an authentic gaming experience, you'll want some real buttons and an arcade cabinet. Most RetroPie cabinet builds either use a tiny screen for an all-in-one mini cabinet, or hook straight up to the TV. What I'd like is something with full size buttons, and a big screen – but without having to buy a dedicated monitor for something that might only get occasional use.
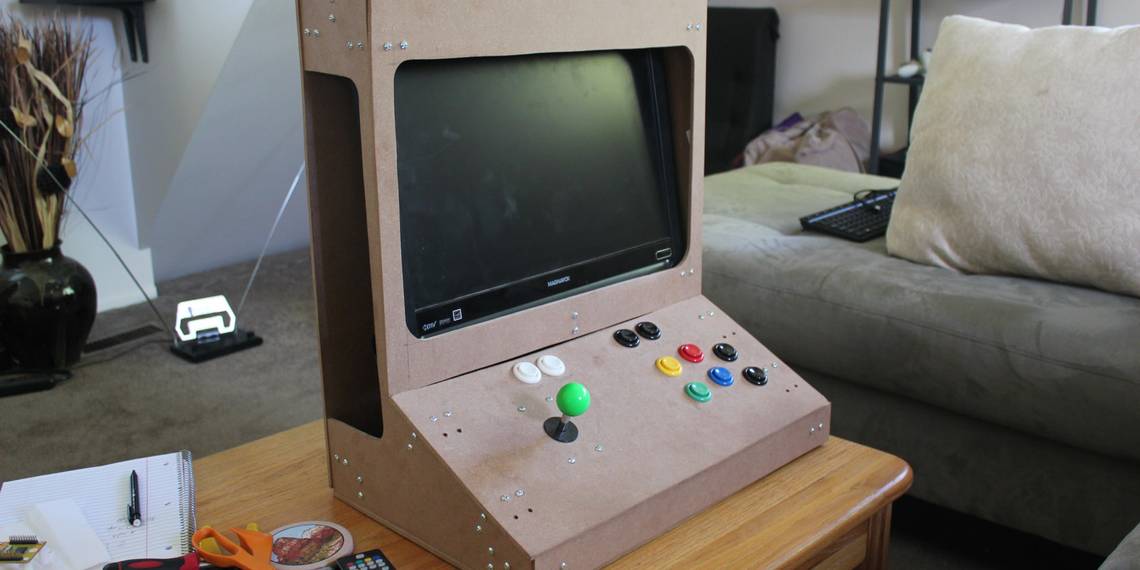
So for today's project, we've built a desktop sized RetroPie cabinet with a removal screen - just slot in your monitor for parties and play sessions, and remove it again when you're done. It's a great compromise between authentic style and practicality.
Step 0: You Will Need

Materials
- 1 x Raspberry Pi 2
- 1 x 16GB Class 10 Micro SD Card
- 1 x HDMI Cable
- 1 x 5V 2A Power supply
- 1 x TV/Monitor
- 2 x sheets of MDF board 2'x4' ¼"
- ~20 x 90 deg brackets
- ~100 x Machine Screws and Washers
- Small Hinge (optional)
- 1 x Sanwa Arcade Joystick
- 10 x Arcade Buttons
- 1 x IPAC 2 USB Interface PCB Kit
- ~50 x Quick Connects
Tools
- Jigsaw (or table saw)
- Drill
- Wrench
- USB Keyboard
The total build cost is about $150-$200, but you can of course repurpose your Pi for other projects.
Step 1: Plan Out the Enclosure

You can use these plans, or create your own, but this enclosure has excellent ergonomics and just enough space to easily slide the screen in and out. You'll likely have to adjust the overall size to fit the screen you will be using. I fit all of the pieces for the enclosure for the console on two 2'x4', ¼" thick pieces of MDF board with a bit to spare. 1/4" MDF is ideal for this application because it's thick and sturdy enough to support your hands during gaming, but light enough to still be transportable. Once planned, I measured and sketched the cuts onto the MDF.
Step 2: Cut the Enclosure

For the cutting, I again used a Jigsaw so that this project can be done only with simple hand tools. It won't make the straightest cuts, so use a circular or band-saw if you have one, but it will definitely work. Once the pieces were cut, I marked them (front, top, back, bottom, sides) and then sketched where the brackets went. Once the bracket locations were planned, you'll need to drill holes for the screws. Using the machine screws, attach the brackets with the screw head on the outside (for aesthetics) and the nuts on the inside. Machine screws are perfect for the project because we are using thinner sheets of MDF (or wood) and they will make it so it can be disassembled easily in the future. I attached all the brackets to the two side pieces and then measured the holes for all of the attaching pieces which was much easier with the brackets already in place.
Step 3: Cut Button Holes

Next is cutting the holes for the buttons and joystick. The easiest way to do this is using spade bits to make the large diameter holes. The Joystick requires a 3/4" hole to be inserted through and then 4 screws to to attach it. Take ball top off and insert the stick from the back, screw the ball back on, and attach the joystick to the panel using the machine screws. The buttons require a 1-1/8" holes. Remove the micro-switch from the back of the buttons, then remove the plastic bushing and insert the button from the top and screw back on the bushing. Now all buttons and joysticks should be secure onto your board.
Step 4: Assemble the Enclosure and Controls

For the assembly, I found it easiest to attach all pieces, except the one with controls, to one of the side panels and then then close it by adding the second side panel last. This will ensure you have as much room as possible to work with your screwdriver and ratchet to tighten the screws. I also added an access hatch to the rear of the enclosure to make getting into the box in the future easier. Building the entire enclosure, but leave the top panel with the controls off to make the wiring easier.
Step 5: Wire the Controls

This step can vary in difficulty depending on how many players you are making your console for and how many buttons you're using. You can also minimize cost by simply buying ribbon cable and soldering the wires from the buttons/joystick to the GPIO pins on the RPi. However this increases the complexity of set up and the time required, so we bought the IPAC2 USB interface kit. You can get away with as little as 6 buttons, but we recommend using at least 10 for the more complex emulators. The IPAC2 USB Interface kit I linked to in the materials is highly recommended for a few reasons. Once you assemble the buttons with the included wiring to the IPAC2, it's simple to connect/disconnect your controller from your RPi through a single USB connection. The IPAC2 also provides protection from frying your RPi should something short out or go wrong in your controller.
Daisy chain the ground wire and connect all positive leads to the normally open (NO) terminal on the buttons. Once you have wired your joysticks and buttons to the PCB, secure the PCB to the enclosure. I used the included mounting brackets and bolted it straight to the bottom of the enclosure. Make sure the USB cable from the IPAC2 to the RPi is accessible and has a clear path.
Step 6: Download and Configure RetroPie
The RetroPie images are specific to the model of RPi, so download the corresponding image for your model here. The RetroPie image includes the front end and all the emulators you should need for running your games, but not the ROMs. The video on the left outlines the procedure for OSX; Windows users should check out our previous article on how to write images onto your MicroSD card.
Insert the MicroSD with the RetroPie Image into your RPi. Plug in a USB Keyboard for the initial setup. Boot up the RPi and it should boot into Emulation Station. Configure your controller when prompted, note that this will not affect the arcade controls configuration and is only for navigating the menus.
Next is setting up the controller to work within games. This is the hardest part of the setup, since each button needs to be mapped to control the software. I was unable to use the auto setup program due to the program not recognizing my USB controller. I had to edit the setup script using the following terminal command
sudo nano /home/pi/opt/retropie/configs/all/retroarch.cfg
You'll need the keyboard for this and will use the command line outside of Emulation Station. You only have to do this once however and it should work for all emulators. If you're having trouble with this step, here is the best resource for getting whatever controller you've built to work; we've also written our own tips for configuring controllers before.
Step 7: Load ROMs onto your RPi

There are many places to obtain ROMs, but remember that you should only download copies of ROMs that you have physical copies of the game for. Connect your RPi to your router through an Ethernet cable (or wireless USB dongle). Use Cyberduck to remote SSH into your RPi and load ROMs from a Mac (or WinSCP to do it from a PC). Load all the ROMs you have or have space for. ROMs will be placed into the corresponding emulator folder.
ROMs go into the /RetroPie/roms/SYSTEMNAME Folder where SYSTEMNAME corresponds to the system that the ROMs are for. Additional information can be found here.
Step 8: Enjoy!

Now you should be all set up, with the RPi, controls, and software! Plug your RPi into your screen, controller, and power supply if you haven't already. Hopefully everything is running smoothly and you're gaming away! You shouldn't have to deal with any more command line prompts and should be controlling everything through Emulation Station, picking emulators and then running different ROMs. This thing is a blast and a great addition to any game collection. Thanks to the removable monitor, when I'm done playing for a while, I can slide the monitor out the side, hook it back up to a computer and have dual screens again.
For that authentic arcade feel, we painted the cabinet black. If you're feeling particularly artistic, you might even try depicting some space invaders on the sides, or your favorite retro characters.
Your RetroPie arcade will be a hit at your next party! Let us know if you have any questions in the comments, and definitely show us what you came up with.