Need to record your Linux desktop? Perhaps you want to demonstrate some software or give a Linux newbie some visual steps to improve familiarity.
Whatever the reason, you'll get the best results from a screen recording tool.
Here are seven ways to record your Linux desktop, including apps to record your Raspberry Pi screen, too.
What You Should Look for in a Screen Recorder
Before proceeding, let's look at the typical functions of a desktop screen recorder.
For example, it should be able to capture either the entire desktop, or a single app window. Additionally, you can expect to be able to set the recording to a particular resolution and video file type.
Do you need to appear in the video? If so, some screen recorder tools offer the ability to detect video from your computer's webcam, along with mic audio.
Other features can also be found, such as a zoom/follow mouse tool. In short, Linux screen recorders come with various features on offer, making it tricky to find the one you need. But we can help with that.
1. Kazam: Best Screen Recorder for Raspberry Pi
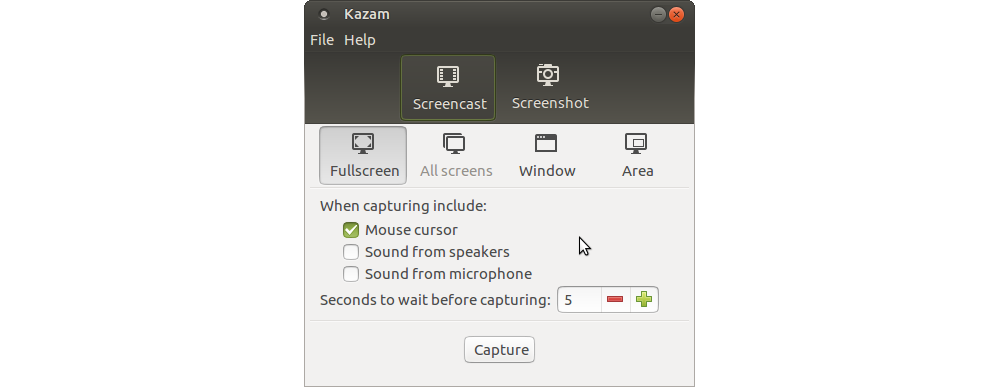
Available from the Ubuntu repository, with support for ARM and PowerPC devices as well as 32-bit and 64-bit, Kazam is an efficient desktop video capture tool. Capable of recording full screen, all desktop screens, a single window, and areas of the desktop, Kazam can also capture audio from the speakers and your mic.
Install via your software manager, or:
sudo apt install kazam
Once you've recorded your desktop activity, you can stop via the system tray. You'll be prompted to Save for later or edit with your usual video editing software.
With the ability to select audio devices, video formats and even take screenshots, Kazam is a great Linux screen recorder for beginners.
2. Simple Screen Recorder
It may call itself "simple", but this app has more features than some of the others listed here. Further, Simple Screen Recorder also works with Raspberry Pi.
To install Simple Screen Recorder on Ubuntu-like systems use:
sudo apt install simplescreenrecorder
This will also work on the Raspberry Pi, as demonstrated here:
(Instructions for installing to other distros can be found on the developer's website.)
Upon launching, you'll be presented with a single screen with plenty of options. These include the expected full screen recording, recording a selection, following the cursor, and the option to record GL for video game captures.
To save time, you can also create profiles suited to different screen capture tasks. Audio can also be recorded, and video type changed via the subsequent screens found via the Continue button. Once you're ready, hit Start Recording---by default, the resulting video will be saved in your Home directory.
Simple Screen Recorder is certainly not simple, but it is straightforward and offers some useful features.
3. ScreenStudio
Unlike the other screen capture tools in this list, ScreenStudio is a Java-based application, enabling you to record your desktop, include footage from your webcam, and even stream to Twitch, YouTube, and Facebook.
Getting started with this is easy. You'll need to download directly from the link above, and then ensure that you have ffmpeg, PulseAudio and Java installed on your computer before running. You can then use the Sources menu to setup your desktop and webcam as a source, add audio if necessary, select your Output format and tap Ctrl + R to begin and stop recording.
ScreenStudio is lightweight and flexible, although it misses some of the more common desktop capture features.
4. RecordMyDesktop
The original screen capture tool for Linux, RecordMyDesktop will record desktops on virtually any system, including the Raspberry Pi. While you can use the basic version via the command line, installed using:
sudo apt install recordmydesktop
You can also use the tool with a choice of two GUI frontends, gtk-recordmydesktop and qt-recordmydesktop.
Once installed, this simple tool---which offers some additional options in the Advanced menu, and the ability to select entire windows or just sections---is ready to record. Just remember to give it time to encode your video after capture. Videos will be output to your Home directory.
5. Record Any Desktop With VLC
Most Linux distros, even Raspberry Pi OS, come with VLC preinstalled. Where it isn't already available, it can be installed with ease. A truly versatile media player, VLC can also record your computer's desktop.
Record your Linux desktop with VLC:
- Click Media > Open Capture Device
- In the Capture Device tab, select Desktop as the Capture Mode
- Under Options, set the Desired frame rate for the capture (25f/s by default)
- Click Play to confirm
- Back in the main VPC interface click Record to begin, and Stop to finish
The completed screen recording can be found in the default VLC save location, usually the Videos directory.
6. asciinema
If you're planning to record the Linux terminal, the tools elsewhere in this list are overkill. You need asciinema, a utility to record a terminal session and upload it to the web for easy sharing.
To install asciinema on Ubuntu use:
        sudo apt-add-repository ppa:zanchey/asciinema

sudo apt update

sudo apt install asciinema
Once installed, simply type
asciinema rec
and the tool will begin recording the terminal session.
To stop, enter exit or hit Ctrl+D. The URL of the shared asciinema file will be displayed, ready for you to share.
7. Screen Recording With OBS Studio
Finally, if you're planning to record game streams, there is no better option than OBS. On Ubuntu (and other snap-supporting distros) you can install OBS with
sudo snap install obs-studio
Alternatively, you can install using the PPA repository:
        sudo add-apt-repository ppa:obsproject/obs-studio

sudo apt update

sudo apt install obs-studio
Using OBS Studio is potentially the most difficult option for this, as it is scaled towards game streaming. As such, you might prefer other tools on this list. The premise is simple, however. You set up a recording in OBS Studio, selecting your desktop display as the source using the Display Capture source.
Check our guide to screen recording with OBS Studio for full steps.
OBS Studio is multiplatform, and it can also run on the Raspberry Pi. You'll need to build from source for this to work. Unless you want to specifically record and stream games, you might opt for a simpler solution.
Screen Recorders for Every Linux OS, Even Raspberry Pi!
We've given you a look at seven Linux desktop recorders for capturing activity in apps and games on your computer. They're suitable for all Linux distros, and most will run on the Raspberry Pi 4 and other Pi devices.
A completed screen recording can be uploaded raw to YouTube or shared elsewhere. Alternatively, edit the video into a more interesting presentation.


